Cyclades P M Ipdu
FCC Warning Statement Canadian DOC Notice
Cyclades PM Ipdu
Power On
Table of Contents
Configuration
Appendices
Vi Cyclades PM Ipdu Installer/Administrator/User Guide
List of Figures
Viii Cyclades PM Ipdu Installer/Administrator/User Guide
List of Tables
Cyclades PM Ipdu Installer/Administrator/User Guide
Alarms and monitoring
Features and Benefits
Sequential power up
Creation of user accounts
Hardware Configuration Options
Standalone configuration
Support for daisy chaining
Standalone Configuration
Daisy chained configuration
User
Integrated configuration
PM Ipdu #2 PM Ipdu #3 PM Ipdu #4
An integrated environment offers the following advantages
To connect a Cyclades PM Ipdu to an Avocent DSR switch
Accessing the System Console
Direct console access
Console access through a management device
Cyclades PM8 Ipdu
Component Overview
Cyclades PM10 Ipdu
Cyclades PM8i Ipdu
Cyclades PM10i-L30A Ipdu
Cyclades PM10i Ipdu
Cyclades PM10i-32A Ipdu
Cyclades PM20 Ipdu
Cyclades PM10i-32Au Ipdu
Cyclades PM20i Ipdu
Cyclades PM20i-32Au Ipdu
Cyclades PM20i-32A Ipdu
Cyclades PM Ipdu Installer/Administrator/User Guide
Supplied with the PM Ipdu
Getting Started
Connector on
Modular input power cables for the PM Ipdu
PM8i-10A Ipdu and PM10i-10A Ipdu power cables
Rack Mounting the Cyclades PM Ipdu
PM10i-15A Ipdu power cables
PM10i-16A Ipdu and PM 20i-16A Ipdu power cables
PM10i-20A Ipdu and PM 20i-20A Ipdu power cables
Rack Mounting a Cyclades PM10 IPDU, PM10l Ipdu and PM8iIPDU
Installation environment
Locate the appropriate sets of holes on the PM Ipdu
To mount the Cyclades PM8i IPDU, PM10 Ipdu or PM10i Ipdu
To daisy chain a PM Ipdu
Daisy Chaining PM IPDUs
Plugging Devices Into PM Ipdu Outlets
Powering Up the PM Ipdu
Making a Direct Connection for Console Access
To power up the PM Ipdu
Connecting a Local Work Station to the Cyclades PM Ipdu
To access the console
To log into the PM Ipdu through the console in port
Default Configuration Parameters
Configuration
To assign outlets to users with the assign command
Initial Configuration Using the Command Prompt
To change the default password
To create users with the adduser command
To save the configuration with the save command
Resetting the Admin Password
To reset the admin password using the loopback connector
Upgrading the Cyclades PM Ipdu Firmware
To upgrade PM Ipdu firmware
To use HyperTerminal in Windows
Pmupgrade
To use Minicom in Linux
Sending Firmware using HyperTerminal
Sending Firmware using Minicom
Cyclades PM Ipdu Installer/Administrator/User Guide
Number of PM Ipdu outlets
Daisy chained PM IPDUs in the login prompt
PM Ipdu User Interface
Number of PM IPDUs
Logging in to the PM Ipdu
Commands
Examples
Adduser
Syntax
Arguments
To read the threshold, enter the following
Alarm
Assign
To set the threshold, enter the following
Current
Buzzer
To turn buzzer notification on or off, enter the following
Pm current
To reset maximum current drawn, enter the following
Pmcurrent reset
Currentprotection
Example
Currseg
To view the current load of segment A, enter the following
To view the current load of segment B, enter the following
Cycle
To cycle one outlet, enter the following
None
Dbsync
Deluser
To cycle multiple outlets, enter the following
Pmdisplay 2
Display
To delete the user rog, enter the following
Pmdeluser rog
To view the display status, enter the following
Factorydefaults
Exit command exits the session
Exit
Pmsyslog help
To reset the factory defaults, enter the following
Pmfactorydefaults
Help
Pmhelp
Humidity
Hwocp
Pmhumidity reset
Pm humidity
Pmid 1 R&D
Pmhwocp 1 reset
To set the ID of PM Ipdu 1 R&D, enter the following
Pmhwocp
Pmid
Interval
To display the ID of PM Ipdu 2, enter the following
To display the interval of outlet 1, enter the following
Pminterval 2,4-6
List
Pmlist
To name outlet 4 as nowhere, enter the following
Lock
Name
To lock outlets 1, 2, and 6, enter the following
Pmoff
Off
To turn all outlets off, enter the following
Pmoff all
To turn on outlets 1, 3, 4, and 5, type
Passwd
Pmon 1
Pmpasswd alpha
Reboot
Pmpasswd
Pmreboot
Arguments Examples
Restore
Pmrestore
Save
To display the status of outlet 1, enter the following
To save the configuration to flash, enter the following
Status command displays the status of selected outlets
Status
Pmsyslog
Syslog
To display the status of all outlets, enter the following
Pmstatus all
Pmsyslog on
Temperature
Pm temperature
Pmtemperature reset
Pmunassign 2,4 diderot
Unassign
Unlock
To unlock outlets 2, 3, 4, and 8, enter the following
Upgrade
Ver
To upgrade 1, type
Pmver
Voltage
To view the current username, enter the following
Whoami
Pmwhoami
Cyclades PM Ipdu Installer/Administrator/User Guide
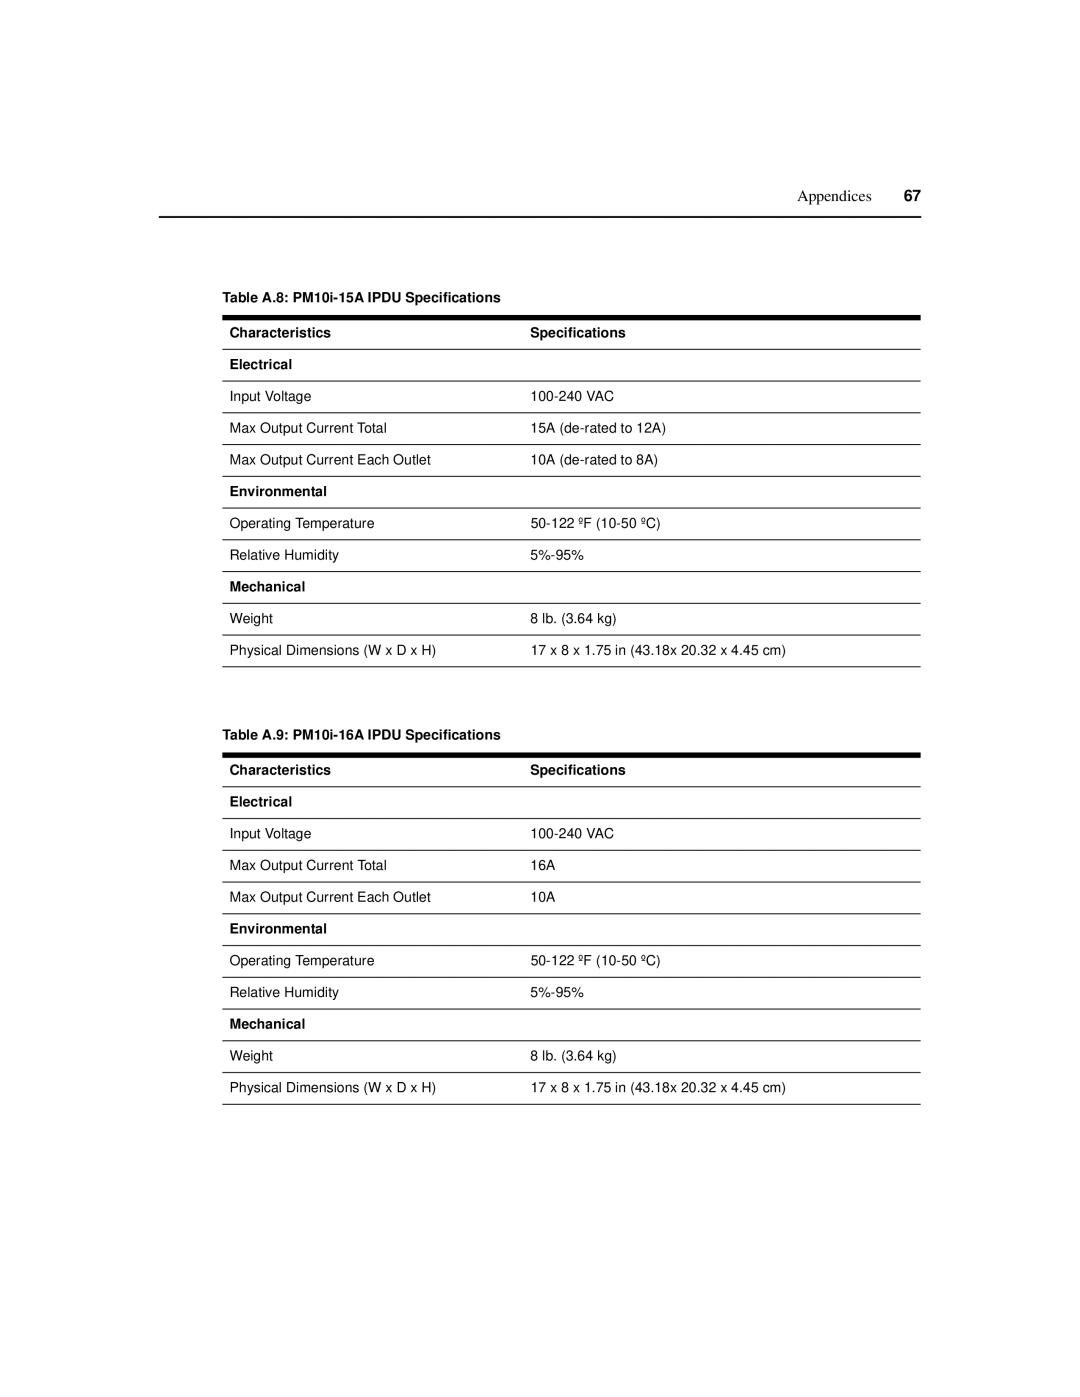
Appendix a Specifications
Cyclades PM Ipdu Installer/Administrator/User Guide
Appendices
Cyclades PM Ipdu Installer/Administrator/User Guide
Appendices
Table A.11 PM10i-32A Ipdu and PM10i-32Au Ipdu Specifications
Table A.13 PM20-20A Ipdu and PM20-L20A Ipdu Specifications
Cyclades PM Ipdu Installer/Administrator/User Guide
Appendices
Interface Pinouts
Safety Instructions
Appendix B Safety Instructions
Sicherheitsanweisungen
Istruzioni di Sicurezza
Instruções de Segurança
Instrucciones de seguridad
Instructions de sécurités
PM Ipdu Units with One Circuit Breaker
Appendix C Circuit Breakers
PM8i Ipdu and PM10i Ipdu
PM10i-32A Ipdu and PM10i-32Au Ipdu
PM10i-L30A Ipdu
PM20i-L30A Ipdu
PM20-L30A Ipdu
PM20i-32A Ipdu and PM20i-32Au Ipdu
Circuit Breaker Trip Time
Cyclades PM Ipdu Installer/Administrator/User Guide
Index
Cyclades PM Installer/Administrator/User Guide
Index
Cyclades PM Installer/Administrator/User Guide
Page
590-667-501A

