Dell 1815dn
Page
Safety Warning
Precautions
Toxic material
Electric Shock and Fire Safety Precautions
Assembly / Disassembly Precautions
Handling Precautions
Disregarding this warning may cause bodily injury
Be careful with the high temperature part
When you move the printer
Ensure the printer is installed safely
Super Capacitor or Lithium Battery Precautions
ESD Precautions
Tool for Troubleshooting
SPL
Acronyms and Abbreviations
Sample Pattern for the Test
1 A4 ISO 19752 Standard Pattern
This test page is reproduced at 70% of the normal A4 size
Product Overview
Product Specifications
Remarks
Product General Specifications
Sdram
Copy
Items Dell Laser MFP 1815dn Remarks
Telephone
ITU-T G3
Face Down 150Sheets/20lb Face Up 1Sheet
Whql MFP
CPU Part
System Configurations
Modem Part
FAX Section
Modem SFX336 specification
SSD Clkp Clkn Dibp Dibn LSD
Signal Transition of DAA Solution
Ring Sensitivity
Line Interface Part
OPE Pannel Section
Scan Part
Printer Section
Items Specification Remark
PLL Main / Hpvc
RTC Core Voltage
System Outline
Copier Section
Telephone Section
Hvps High Voltage Power Supply
15%
Output Voltage Fluctuation Method PWM Control
Line Regulation under
AVG TBD Wh
Smps Switching Mode Power Supply
Remark
+5V
Fuser AC Power Control
Transfer Ass’y
Toner Cartridge
LSU Laser Scanner Unit
Fixing Part Fuser
Duty Cycle
Feeding Part
General Precautions on Disassembly
Releasing Plastic Latches
Whenever servicing the machine, you must perform as follows
Open the Cover
Front Cover
Take out the Cassette
If necessary, remove the Toner Cartridge
Open the MP Tray Assy
MP Tray Assy
Take out the Duplex Unit
Rear Cover
Face Up Cover
Fuser Assy
Bracket
Jam Holder
Side Cover Left, Right
Dimm Cover
Pull up the Scanner Assy, as shown below
Scanner Assy
Lift the ADF Assy upward to remove it
Remove the four screws securing the Scan Upper
Remove the CCD Cable, as shown below
Pull up the CCD Shaft and take out the Ccdm
Remove the CCD Holder
Remove the Open Cover, as shown below
ADF Assy
ADF Motor Assy
OPE Unit
Remove the Keys from the OPE Cover
Remove the Contact Rubber from the OPE Cover
Shield Controller Assy
Film Cable
Drive Assy
Duplex Drive Assy
Shield Smps Assy
Connection PCB
Connectors are located, as shown below
Fuser Drive Assy
16 Fan
Pick Up Roller Assy
Pull the Feed Roller from the Bushing
Duplex Guide Housing With Feed Roller
Hvps Housing
Cover Mid Front
Middle Cover Assy
MPF Housing
Feed Roller Parts
Pull up the Feed Idle Shaft and the Bushs with Spring
Release the E-Ring securing the Feed2 Gear and remove it
Pull up the Feed1 Roller from the Bushing, as shown below
Remove the Clutch Unit, as shown below
Exit Roller
Pick Up Gear Assy & Solenoids
Terminal PBA
26 LSU
Transfer Roller Parts
Paper path
Alignment and Adjustments
Clearing Paper Jams
If the document is jammed in the paper feed area
Clearing Document Jams
If the document is jammed in the paper exit area
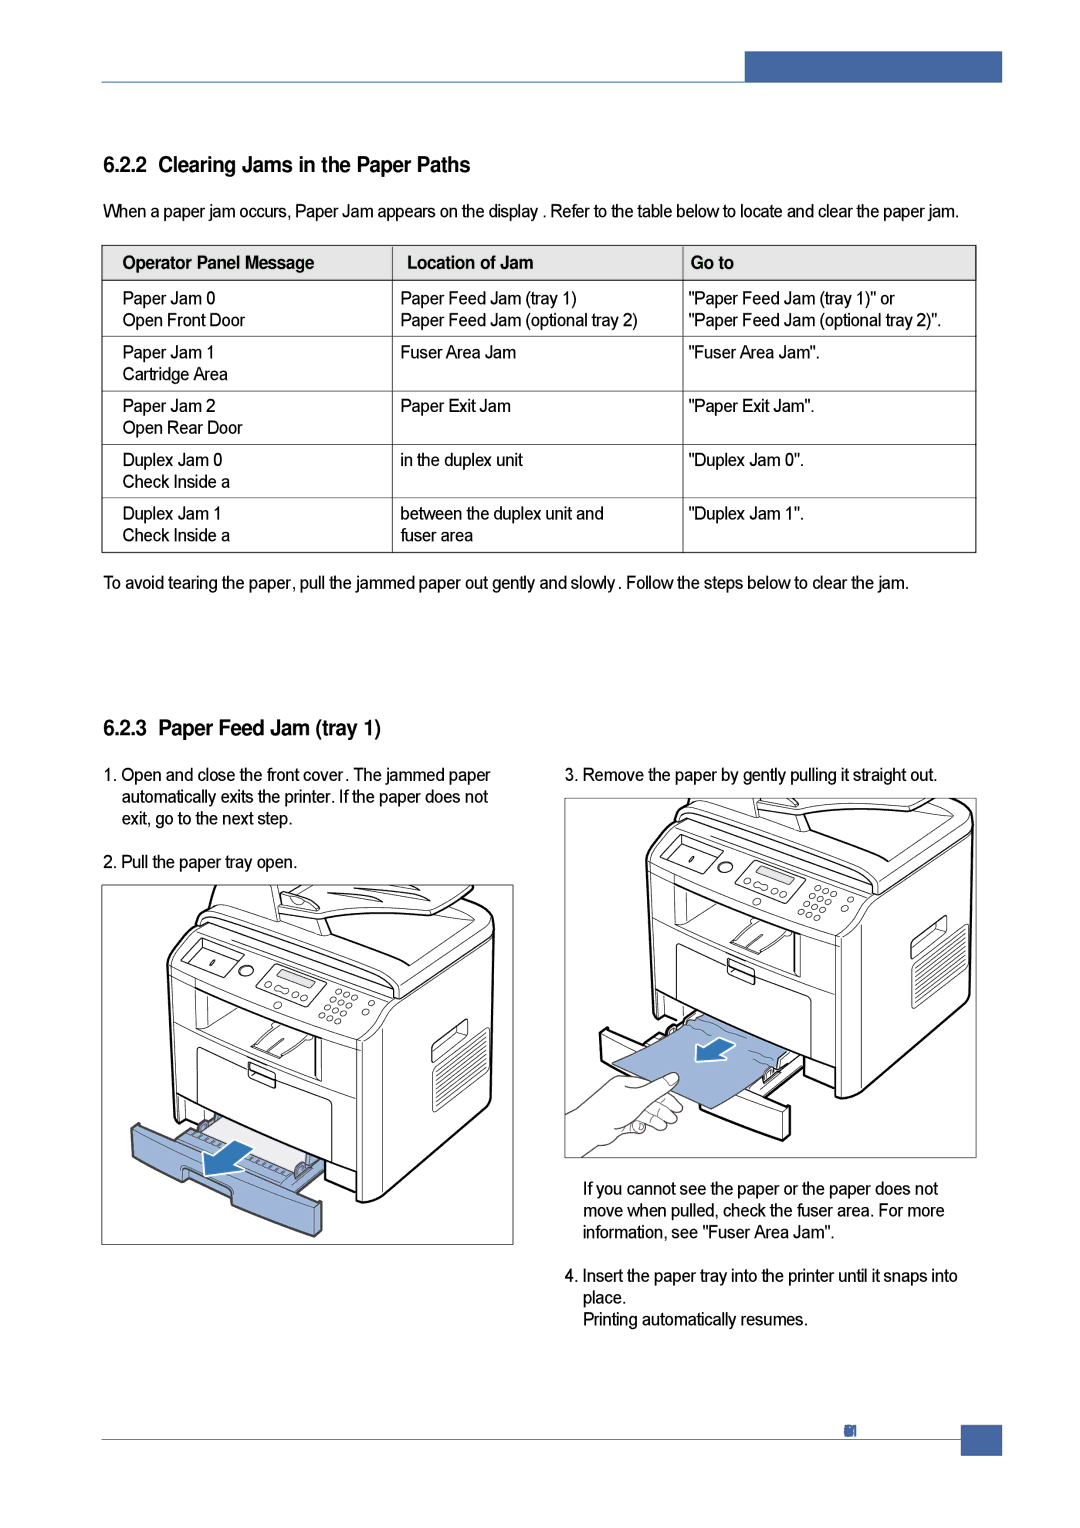
Clearing Jams in the Paper Paths
Paper Feed Jam tray
Operator Panel Message Location of Jam Go to
Paper Feed Jam optional tray
Bypass tray Jam
Pull the tray 1 half Pull the paper straight up and out
Paper Exit Jam
Fuser Area Jam
Alignment & Adjustments
Push the duplex unit to the printer
Duplex Jam
Duplex Jam
User ModeDell Laser MFP1815dn
Paper Setting Copy Setup Fax Setup
To enter the Tech mode
Tech Mode
How to Enter Tech Mode
Setting-up System in Tech Mode
Method
Data Setup
Remote FAX
Do not turn off the power while upgrading process
Local Machine
Fprt rom file
Machine Test
Select the Adjust Shading at
Protocol List
Report
To enter the Engine Test mode
Engine Test Mode
To enter the Engine Test Mode
Diagnostic
Laser Motor OnOff
Detail DescriptionEngine Test Mode
Identify Sale Date
Component Replacement Cycle
Consumables and Replacement Parts
Heat Roller
Abnormal Image Printing and Defective Roller
Display Meaning Suggested solutions
Error Messages
Toner Empty
2 JAM
Paper Feeding Problems
Check and Cause Solution
Wrong Print Position
4 JAM
3 JAM
Paper rolled in the fuser
Multi-Feeding
Defective ADF
Paper rolled in the OPC
Description
Printing Problems malfunction
Display
Defective LCD Operation
Motor breaks away from its place due to gear melting away
Not functioning of the fuser gear due to melting away
Paper Empty
Paper Empty without indication
Check the insertion of the Door S/W Connect
No Beep on when the Door is open
Error lamp is on even when the print Door is closed
Door Open
Defective Motor operation
No Power
Replace LSU
Vertical Line Getting Curved
Printing Quality Problems
Vertical Black Line and Band
Vertical White Line
Black/White Spot
Horizontal Black Band
Dark Image or a Black
Light Image
Background
Uneven Density
Ghost
Hvps board Life of developer is expired
Above directions
Stains on the front
Blank Page Print out
Stains on back
Fax & Phone Problems
No Dial Tone
Defective MF Dial
Defective FAX Forward
Defective FAX FORWARD/RECEIVE
Another machine receiving a FAX additionally Sent to
Defective FAX Receive
Dial Telephone line
FAX at another fax machine
To the FAX Mode
Defective Automatic Receiving
Description The automatic receiving function is not working
Copy Problems
White Copy
Black Copy
Defective Image Quality
Abnormal noise
Scanning Problems
Defective PC Scan
Defective Image Quality of PC Scan
Open the Front Cover
Toner Cartridge Service
Precautions on Safe-keeping of Toner Cartridge
Service for the Life of Toner Cartridge
Signs and Measures at Poor toner cartridge
Recycled product
Fault Signs Cause & Check
White Black spot
Never use usual alcohol
Fault Signs Cause & Check Solution Ghost & Image
General Problems
Network Problems Troubleshooting
Windows Problems
Macintosh Problems
SyncThru Installation Problems
Page8-5
Page8-2
Page8-3
Page8-4
Main
Exploded
Views
Cover Assy
Middle Cover Assy
Front Cover Assy
Rear Cover Assy
Frame Assembly
Fuser Drive Assy
Assy
Main Drive
MP Assy
ADF Assy
Cover Platen Assy
OPE Unit
Scanner Assy
Cassette Assy
Fuser Assy
UnitOptional
Duplex
Parts ListModel Dell 1815dn
Rear Cover Assy
Fuser Drive Assy
MP Assy
Cover Platen
Scanner Assy
Fuser Assy
BELT-TIMMING
Block Diagram
Connection Diagram
Dell 1815dn recommended spare part list
Modems, Accessories