W . d e l l . c o m s u p p o r t . d e l l . c o m
Installation and Troubleshooting Guide
Abbreviations and Acronyms
Contents
Troubleshooting the Video Subsystem
Safety First-For You and Your System
Troubleshooting a Serial I/O Device
Troubleshooting System Cooling Problems
Installing System Components
Dell Enterprise Training and Certification
Memory Module Installation Guidelines
Integrated Network Adapter Connector 115
Returning Items for Warranty Repair or Credit
105
106
Contents
Introduction
Introduction
Other Documents You May Need
Obtaining Technical Assistance
Indicators, Messages, and Codes
Indicators, Messages, and Codes
Front-Panel Indicators and Features
Hard-drive 2 status indicator
Front-Panel Features Hard-drive 0 status indicator
Front-Panel Indicator Codes LED Indicator Description
Back-Panel Indicators and Features
Blue/amber status indicator Indicators, Messages, and Codes
Back-Panel Features Serial connector
Page
System Messages
Back-Panel LED Codes LED Indicator LED States Description
System
System Messages Causes Corrective Actions
Troubleshooting Your System
Figure A-2 for jumper location
Guide
See Getting Help
Your System. If the problem persists, see
Check the Integrated Devices
Integrated Drive Controller is enabled
Faulty hard drive Replace the hard drive. See
Server Module Beep Codes Cause Corrective Action
System Beep Codes
Server Module Beep Codes Cause Corrective Action
Server Module Beep Codes Cause Corrective Action
Alert Messages
Diagnostics Messages
Troubleshooting Errors and Conflicts
Finding Software Solutions
Finding Software Solutions
Before You Begin
IRQ Assignment Defaults IRQ Line
Input Errors
Application Conflicts
IRQ Assignment Conflicts
IRQ11
Finding Software Solutions
Using Server Administrator Diagnostics
Running the System Diagnostics
System Diagnostics Features
Running the System Diagnostics
Running the System Diagnostics
When to Use the System Diagnostics
Using the Custom Test Options
System Diagnostics Testing Options
Selecting Devices for Testing
Selecting Diagnostics Options
Viewing Information and Results
Safety First-For You and Your System
Troubleshooting Your System
Checking Basic Power Problems
External Connections
Checking the Equipment
Troubleshooting the Video Subsystem
Troubleshooting the Mouse
Troubleshooting the Keyboard
Troubleshooting a Serial I/O Device
Troubleshooting Basic I/O Functions
Troubleshooting a USB Device
Troubleshooting a Network Adapter
Inside the System
Responding to a Systems Management Software Alert Message
Removing and Replacing the Bezel
Opening the System
Installing and Removing the Bezel Release latch
Closing the System
Troubleshooting a Damaged System
Troubleshooting a Wet System
Troubleshooting the System Battery
Troubleshooting a Fan
Troubleshooting the Power Supply
Troubleshooting System Cooling Problems
Troubleshooting Hard Drives
Troubleshooting Expansion Cards
Troubleshooting System Memory
Troubleshooting the Processor
Troubleshooting the System Board
Troubleshooting Your System
System Board Components
Installing System Components
Installing System Components
Cooling Shroud
Drac connector System battery
Removing the Cooling Shroud
Processor and heat sink
Installing the Cooling Shroud
System Battery
Replacing the System Battery
Cooling shroud Release latch
Replacing the Battery Release tab Battery socket
Fan Assembly
Removing the Fan Assembly
Installing the Fan Assembly
Power Distribution Board
Removing the Power Distribution Board
Installing the Power Distribution Board
Removing the Power Supply
Power Supply
Connector
Installing the Power Supply
P1 connector P2 connector Power supply Captive screw
Expansion Cards
Installing an Expansion Card
Expansion card
PCI slot
Installing and Removing a Remote Access Controller
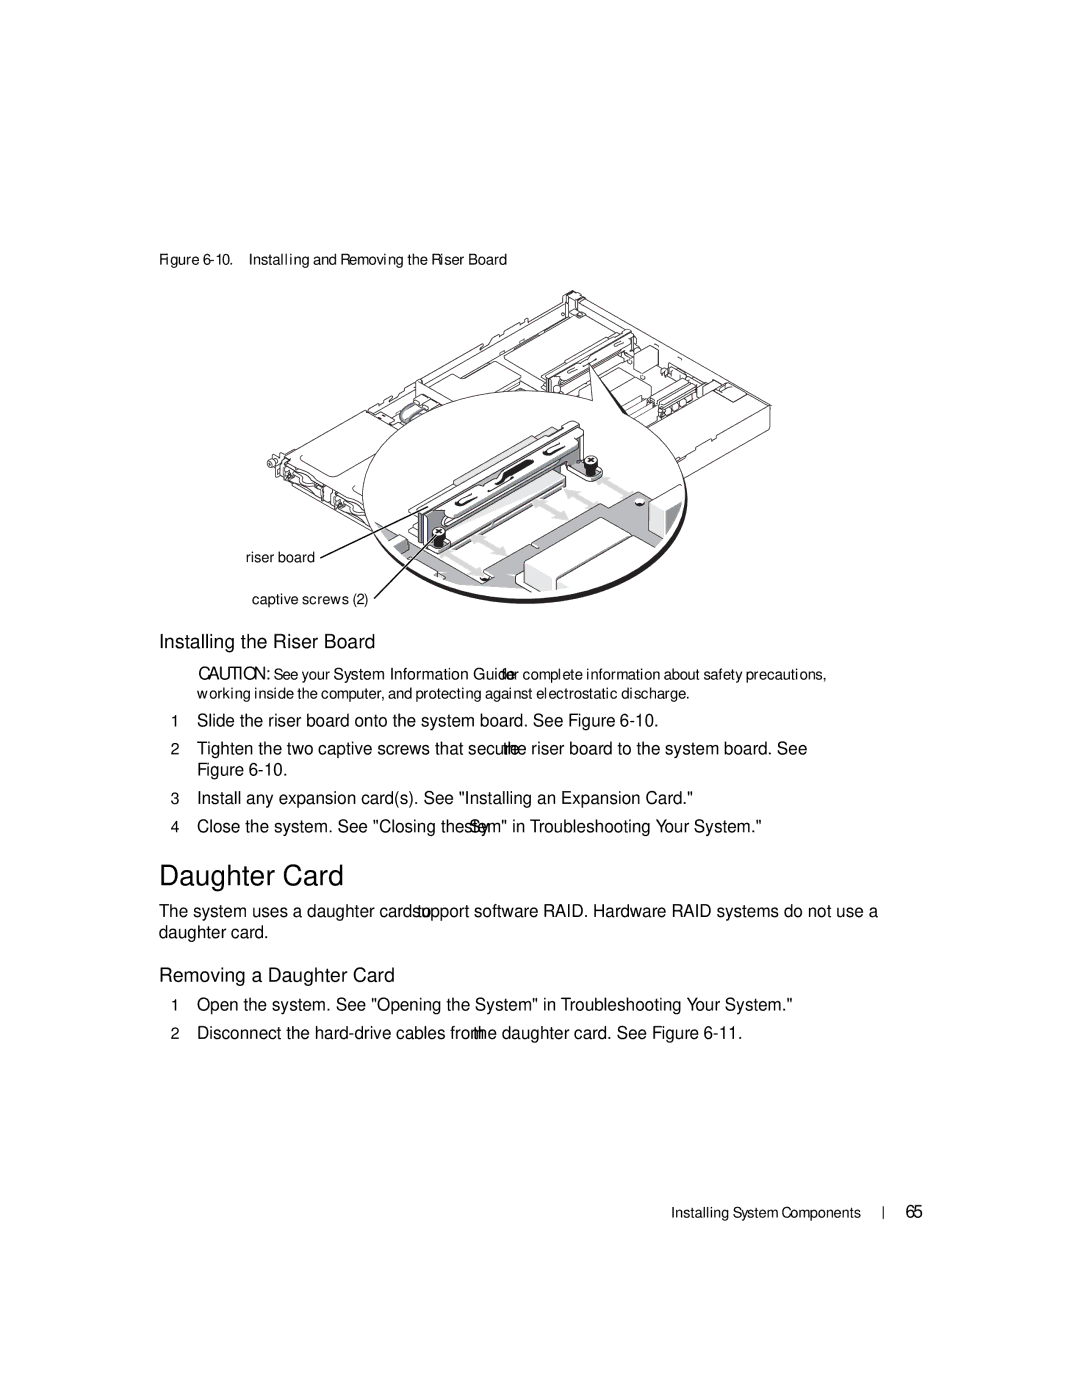
Removing the Riser Board
Riser Board
Removing an Expansion Card
Removing a Daughter Card
Installing the Riser Board
Daughter Card
Daughter card connector LED cable Hard-drive cables
Installing a Daughter Card
Sample Memory Module Configurations Total
Memory Module Installation Guidelines
System Memory
Memory
Installing Memory Modules
Removing Memory Modules
Control Panel
Removing the Control Panel
Socket Alignment key
Installing System Components
13. Control Panel Removal
Installing the Control Panel
Processor
Sata Cable Kits
Removing the Sata Cable Kits
Replacing the Processor
Installing System Components
Securing clips Heat sink Heat-sink posts Processor
14. Installing and Removing the Securing Clip Latch
Socket-release lever Pin-1 corner of socket ZIF socket
15. Installing and Removing the Processor in the Socket
System Board
Removing the System Board Assembly
Installing System Components
16. Removing the System Board and System Board Tray
Installing the System Board Assembly
Installing System Components
Installing System Components
Configuring the Boot Drive
Installing Drives
Installing Drives
Removing a Hard Drive
Removing the Hard-Drive Carrier Release lever
Installing a Hard Drive
Hardware RAID Internal Drives
Connecting Hard Drives for RAID
Software RAID
Getting Help
Online Services
Technical Assistance
Getting Help
Automated Order-Status Service
AutoTech Service
Technical Support Service
Contacting Dell
Before You Call
Toll-free
11 4515
0820 240 530
300-65-55-33
0660
02 481 92
51 481
0800 90
604 633
866 440
02 2186 27
818
980-9-15-3978
3287
7023
01-899-753-0777
09 253 313
0825 823
0825 387
0825 004
04 99 75 40
08844140083
080044149518
2108129800
2108129812
0870 908
1850 543
01 204
0870 906
81-44-520-1435
81-44-556-4162
Toll-free0120-198-433
81-44-556-3894
Or 512
512
3420808075
Toll-free 0800
020 674 45
001-800-882-1519
020 674 47
020 674 42
23162298
671
001-800-507-0962
0800-50-669
011 709
Toll-free 800 6011
011 706
902 100
08 587 70
08 590 05
20 140 14
0844 811
01344 860
01344 373
8001-3605
Toll-free 1-877-Dellnet
Getting Help
Jumpers, Switches, and Connectors
Jumpers, Switches, and Connectors
Jumpers-A General Explanation
Jumpers
Passwd
System Board Jumpers
Table A-2. System Board Connectors
System Board Connectors
Connector Description
CN3 Fan
Table A-2. System Board Connectors Description
Riser Board Connectors
Disabling a Forgotten Password
Jumpers, Switches, and Connectors
Connectors
Connectors
Table B-1. I/O Connector Icons Icon Connector
Connectors
Serial Connector Autoconfiguration
Serial Connector
PS/2-Compatible Keyboard and Mouse Connectors
Video Connector
Integrated Network Adapter Connector
USB Connector
Network Cable Requirements
Abbreviations and Acronyms 117
Abbreviations and Acronyms
118 Abbreviations and Acronyms
LVD
Abbreviations and Acronyms 119
NIS ROM
120 Abbreviations and Acronyms
Index 121
Index
122 Index
See diagnostics
Index 123
124 Index
Installing and Removing the Bezel
Network Adapter Indicators Front-Panel USB Connector
Installing and Removing the Riser Board
Installing and Removing the Securing Clip
Figure A-1
Table B-1
Table B-2 Serial Connector Pin Assignments 112 Table B-3