User’s Guide
Safety indications
Screen shots of the configuration menu
General information indications
Select Brightness from the Image menu
Contents
Problem Solving
Memory Function
Network Menu
Image Menu
Maintenance
Monitoring and Controls
Network Functions
Installation and Connections
Optional Accessories and Consumables
Supported Certificates Specifications
Appendix
Appearance Glossary General Notes
Introduction
Projector Features
Ease of Use when Installed on a Ceiling Mount
Easy maintenance
Centered lens
Operating temperature of 32-122F 0-50C
Reliability You can Depend on
Dual lamps to reduce risk of shutdown
Precise color adjustments
Meets a Wide Range of Needs
Project two images simultaneously Split Screen
Clearly reproduce medical images
Enhanced Security Functions
Easy to Handle
Monitoring and Control Functions
Taking Full Advantage of a Network Connection
Project using Connect to a Network Projector
Part Names and Functions
Front/Top
Rear
Four points
Name
Lamp cover
Interface
Name Function
Control panel
Control Panel p.18
Power inlet
PowerLite Pro Z8450WUNL Z8455WUNL only
Name Function BNC input port
Cable holder
Control Panel
Remote Control
ID switch
Split button
Auto button
Aspect button
Indicators
Remote control
Unpacking the projector
Search button
Installing the batteries
Remove the battery cover
Replace the battery cover
Insert the batteries in the correct direction
Operating range of remote control
Horizontal operating range
Vertical operating range
Useful Functions
Using the Remote Control
Changing the Projected Image
Switch to the Target Image using the Remote Control
PowerLite Pro Z8350WNL/Z8450WUNL/Z8455WUNL
PowerLite Pro Z8150NL/Z8250NL/Z8255NL
Changing the Aspect Ratio of the Projected Image
Changing the Aspect Mode PowerLite Pro Z8450WUNL/Z8455WUNL
Aspect Input Signal
Projecting images from a computer
1280X800 1920X1200 1610 Full Zoom Native
Changing the Aspect Mode PowerLite Pro Z8350WNL
1280X800 1280X1024 1610 Normal 169 169 Up Down
Projecting images from video equipment
1280X800 1280X1024 1610 Full Zoom Native
Projecting images from the HDMI1/2 input port
1280X800 1280X1024 1610 Normal 169 169 Up
1024X768 1280X800 1280X1024 1610
Selecting the Projection Quality Selecting Color Mode
Projecting Two Images Simultaneously Split Screen
Input Sources for Split Screen Projection
Left Right Screen Comp
Vide Video
Operating Procedures
Press the Menu button on the remote control or the control
Projecting on a split screen
Panel
Switching the left and right screens
Select Execute and press the Enter button
Equal
Restrictions during Split Screen Projection
Ending the split screen
Operating restrictions
Restrictions relating to images
Functions for Enhancing Projection
Hiding the Image Temporarily Shutter
Freezing the Image Freeze
Pointer Function Pointer
Display the Pointer
Enlarging Part of the Image E-Zoom
Move the Pointer icon
Start E-Zoom
Move the to the area of the image that you want to enlarge
Enlarge
After setting Users Logo Protect to Off. s p.45
Saving a Users Logo
Select the zoom factor from the zoom setting screen
When Select this image? is displayed, select Yes
Managing Users Password Protect
Type of Password Protect
Setting Password Protect
Security Functions
Entering the Password
Turn on Power On Protect
Set the Password
Turn on Users Logo Protect
Restricting Button Operation
Control Panel Lock
During projection, press the Menu button and select
Lens Operation Lock
Remote control button lock
Select On
Installing the wire lock
Theft-Deterrent Lock
Available Settings
Memory Function
Saving/Loading/Erasing the Memory
Saving to memory
Loading a saved memory
Erasing a saved memory
Renaming a saved memory
Press Finish to complete renaming
Configuration Menu
Using the Configuration Menu
Exit
Configuration Menu
Top Menu Sub Menu Items/Values
Settings Menu s p.65 Geometric Correction Keystone, Quick
Resolution, Memory
Mode, Sleep Mode
Timer, Shutter Button
Wired LAN Menu
Network Menu
Basic Menu s p.73 Projector Name
Projector Keyword On, Off
Priority Gateway Wired, Wireless
Crestron RoomView On, Off Bonjour Epson Message Broadcasting
Image Menu
Reset
Sub Menu Function Abs. Color Temp
Advanced
Auto Iris
Signal Menu
RGB Signal Component Video Signal g
Sub Menu Function Auto Setup
Resolution
Trackingg
Super-resolution
Video Signal
Sub Menu Function Frame Interpolation
Noise Reduction
Settings Menu
Sub Menu Function Power Consumption
Remote Receiver
Test Pattern
Memory
Color Mode or Aspect
Extended Menu
Standby Mode
Sub Menu Function Operation
Air Filter Notice
Time/Schedule Settings
Sub Menu Function Multi-Projection
Language
You can set the Language for message displays
Network Menu
Network Menu
Soft Keyboard Operations
Web Remote Password
Basic Menu
Sub Menu Function Projector Name
Projector Keyword
Wireless LAN Menu
Search Access Point
Sub Menu Function
Channel
Ssid Display
Search Access Point screen
Starts detecting access points again
Indicates an already set access point
Indicates the access points where security is enabled
When Quick is selected
When Advanced is selected
Sub Menu Function Security
When WPA/WPA2-PSK is selected
Sub Menu Function Passphrase
When WPA/WPA2-EAP is selected
PEAP/EAP-Fast
Sub Menu Function EAP Method
User name
Sub Menu Function Password
Client Certificate Issued to /Issued by /Validity period
CA certificate Issued to /Issued by /Validity period
Setting Radius Server
Wired LAN Menu
If this is set to On you cannot set any static IP addresses
Administrator Settings Menu
Sub Menu Function AMX Device Discovery
Crestron RoomView
Bonjour
Epson Message
Setting a Notification
Mail Notification menu
Address 2/Email Address
Event
Manage Certificates menu
Network Menu
Snmp menu
Address
However, the following IP addresses cannot be used
Community Name
Reset Menu
Sub Menu Function Reset network settings
To reset all of the network settings, select Yes
To their default values, and the certificates are deleted
Info Menu Display Only
Sub Menu Function Status
Serial Number
Displays the projectors serial number
Event ID
Reset Menu
Reset Memory Resets items for Memory in the Settings menu
Network menus, Lamp Hours , and Language
Troubleshooting
Using the Help
Press the Help button
Select a menu item
Confirm the selection
Problem Solving
Reading the Indicators
Indicator is lit or flashing red
Status Cause Remedy or Status Internal Error
Filter Airflow Error Check the following two points
Auto Iris Error
Cinema filter error Shutter Error Power Err. Ballast
Status Cause Remedy or Status
N Indicator is flashing or lit
High Temp Warning
Replace Lamp
Images
On, on the configuration menus Extended menu. s p.67
100
Points
When the Indicators Provide No Help
Problems relating to images
101
Problems when projection starts
Other problems
102
Interpreting Event IDs
Problems relating to images
103
Turn the power on for the source
Are the image signals being output to the projector?
LCD monitor or accessory monitor. s p.152
104
Is the Resolution set to Manual?
Only when projecting on a split screen
105
Tracking, Sync. p.62
Configuration menu
Signal, Video Signal p.62
106
Is the computer set for dual display?
Problems when projection starts
107
Image Menu Contrast p.60
Multi-Projection p.67
Setting to Off. s Settings Menu Control Panel Lock p.65
108
Is Control Panel Lock set to Full Lock?
Other problems
Remote Control Type p.67
109
Receiver p.65
Check Remedy Is Standby Mode set to Communication On?
110
BNC input port? Monitor Are you projecting a split screen?
Be displayed on an external monitor. s p.35
111
Network Menu Mail Notification Menu p.84
Cause Remedy
Menu Wireless LAN Menu p.74, Wired LAN Menu p.81
Interpreting Event IDs
112
Event ID Cause Remedy
113
Where to Get Help
Purchase Supplies and Accessories
Internet Support Speak to a Support Representative
114
Maintenance
115
Cleaning
Cleaning the Projectors Surface
Cleaning the Lens
Cleaning the Air Filter
Remove the air filter cover
Remove the air filter
117
Remove any dust remaining on the air filter by using a
Vacuum cleaner from on front side
118
Press until it clicks into place
Lamp replacement period
How to replace the lamp
Replacing Consumables
Replacing the Lamps
120
Lamp
Resetting the Lamp Hours
Install the new lamp
Reinstall the lamp cover
121
Air filter replacement period
How to replace the air filter
Replacing the Air Filter
122
Remove the air filter Install the new air filter
123
Replace the air filter cover
When Transporting
Moving Nearby
Preparing packaging
124
Monitoring and Controls
125
EasyMP Monitor
126
Changing Settings Using a Web Browser Web Control
Displaying Web Remote
Displaying Web Control
127
Displaying Lens Control
128
Web Remote screen appears
Setting Certificates
129
Lens Control screen appears
Secure Http Notes
130
Sub Menu Items/Values CA certificate
Web Server
Using the Mail Notification Function to Report Problems
Reading Problem Mail Notification Function
Message Cause Problems/Warnings
131
Management Using Snmp
132
ESC/VP21 Commands
Command List
Serial Connection
Communications Protocol
Command
134
Non-compatible commands
About PJLink
135
About Crestron RoomView
Operating a Projector from a Computer Window
Displaying the operation window
136
Using the operation window
137
138
Using the tools window
139
140
About Message Broadcasting
141
Network Functions
142
Projecting with Connect to a Network Projector
143
Connection Setup Method
144
Making a connection using the push button method
From Wireless LAN select To Setup Wizard
145
Select Push Button Method
Making a connection using the PIN Code Method
It returns to the Wireless LAN menu screen
Select Setup complete Yes
146
147
Select PIN Code Method
148
Installation and Connections
149
Installation Methods
150
151
Connecting to Equipment
Connecting to a Computer
Computer port Connecting cable Projector port
152
Changing the video output from a laptop computer
153
Example of changing the output Windows computers
Connecting to Video Equipment
Port on the video equipment Connecting cable Projector port
154
Connection 1 Component outputs
155
156
Adjusting the Projected Image
Displaying a Test Pattern
157
Reset
158
Press the Esc button to end the test pattern
Rgbcmy s p.169
Adjusting the Position of the Projected Image Lens Shift
159
Focusing the Image
Zooming the Image
160
Adjusting the Tilt of the Projected Image
Correcting Distortion in the Projected Image
161
Quick Corner
162
Select Quick Corner, and then press the Enter button
163
Keystone
164
165
Arc Correction
166
Select Arc Correction and press the Enter button
167
168
Adjusting the Image Quality
Hue, Saturation, and Brightness Adjustment
Gamma Adjustment
Select and adjust the correction value
Adjust while viewing the image
Adjust using the gamma adjustment graph
170
Frame Interpolation PowerLite Pro Z8450WUNL/Z8455WUNL only
Super-resolution
Noise Reduction
171
Mosquito NR
172
Settings for Multiple Projectors
Projector ID/Remote Control ID
Preparation Flow
Requirements
Setting the projector ID
Checking the Projector ID
174
Setting the remote control ID
175
Adjusting the Position of the Projected Image
Point Correction
176
177
Checking the Color Mode
Using the Edge Blending Function
Press the h button to correct the distortion
178
179
Turn on Edge Blending
Displays the guide
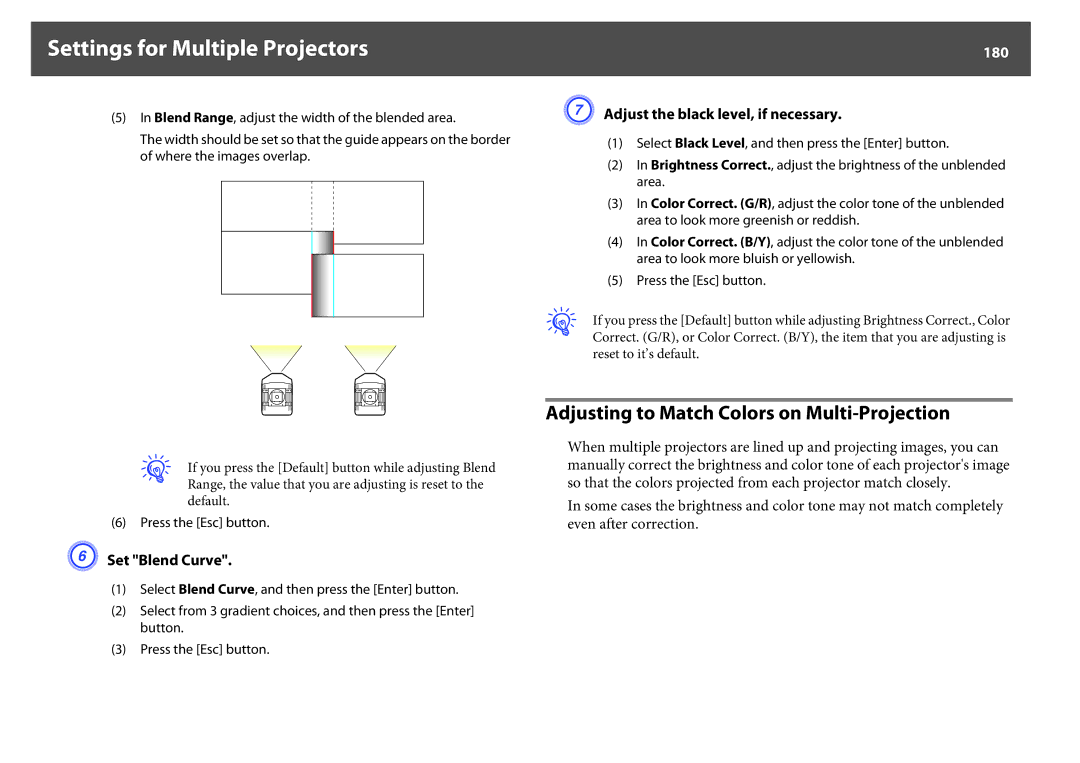
Set a side for edge blending
Adjusting to Match Colors on Multi-Projection
Adjust the black level, if necessary
180
Set Blend Curve
Displays the Image Partly Enlarged Scale
181
Select Scale, and then select On
182
Select Scale Mode, and then select the scale
Set Image Display Range
Full Display
Setting Schedule
Setting Methods
Select the Setup Complete menu, and then select Yes
183
Clock / Schedule Setting screen
Clock
Schedule
Daylight Saving Time screen
Connecting to External Equipment
Connecting a LAN Cable
Connecting to an External Monitor
185
Installing Optional and Supplied Accessories
Removing and Attaching the Projector Lens Unit
Removing
186
Attaching
Remove the front cover
187
188
Install the cover along the guide Tighten the screw
Replace the front cover
189
Replace the interface cover
Installing the Wireless LAN Unit V12H418P12
Reading the wireless LAN indicators
Remove the interface cover Install the Wireless LAN unit
190
Attaching and Removing the Interface Cover
191
Flashing Lit Off
While pulling up the interface cover open switch, pull
Install the cover along the guide
192
Interface cover straight out
Removing the Feet
193
Remove the feet Attach the supplied foot covers
Appendix
194
Optional Accessories and Consumables
Optional Accessories
Consumables
195
PowerLite Pro Z8150NL/Z8250NL/Z8255NL 43 image
PowerLite Pro Z8350WNL 1610 image
Screen Size and Projection Distance
196
PowerLite Pro Z8450WUNL/Z8455WUNL 1610 image
197
Computer signals analog RGB
Supported Monitor Displays
Supported Monitor Displays
Component Video
Input signals from HDMI1/2 input port
199
Supported Certificates
Client Certificate PEAP-TLS/EAP-TLS
Server Certificate PEAP/PEAP-TLS/EAP-TLS/EAP-Fast
Web Server Certificate Secure Http
Specifications
Projector General Specifications
201
202
203
204
Appearance
205
Glossary
206
207
208
Tracking
Trap IP Address
Progressive
Recycling Important Safety Instructions
General Notes
About Notations
209
210
211
212
FCC Compliance Statement
Restriction of Use
For United States Users
213
Wireless Telegraphy Act Regulations
Software Copyright
For Canadian Users
214
215
GNU General Public License
216
217
218
219
END of Terms and Conditions
220
Glibc-2.8 SDL-1.2.13 SDL-Image
221
222
223
224
225
226
227
228
BSD License Berkeley Software Distribution License
Busybox-1.13.4
229
Libjpeg
Libjpeg-6b
230
231
Libpng
Libpng-1.2.7 Libpng-1.2.44
232
233
Zlib
234
Zlib-1.1.4 Zlib-1.2.3
MDNSResponder
MDNSResponder-107.6 only mDNSResponderPosix is used
235
236
237
238
Newlib
239
240
241
242
USA
243
244
245
Purpose
246
247
248
249
250
251
WPA Supplicant
WPA Supplicant-1.13.4
252
For MPEG-4 ASP For MPEG-4 AVC For WMV/WMA Microsoft
For VC-1
Trademarks
Copyright Notice
253
Copyright Attribution
254