Manuals
/
EverFocus
/
Photography
/
Security Camera
EverFocus
EPHD04+
user manual
Click Network and Internet Connection
Models:
EPHD04+
1
31
146
146
Download
146 pages
23.44 Kb
28
29
30
31
32
33
34
35
Page 31
Image 31
EPHD04+ HDcctv DVR
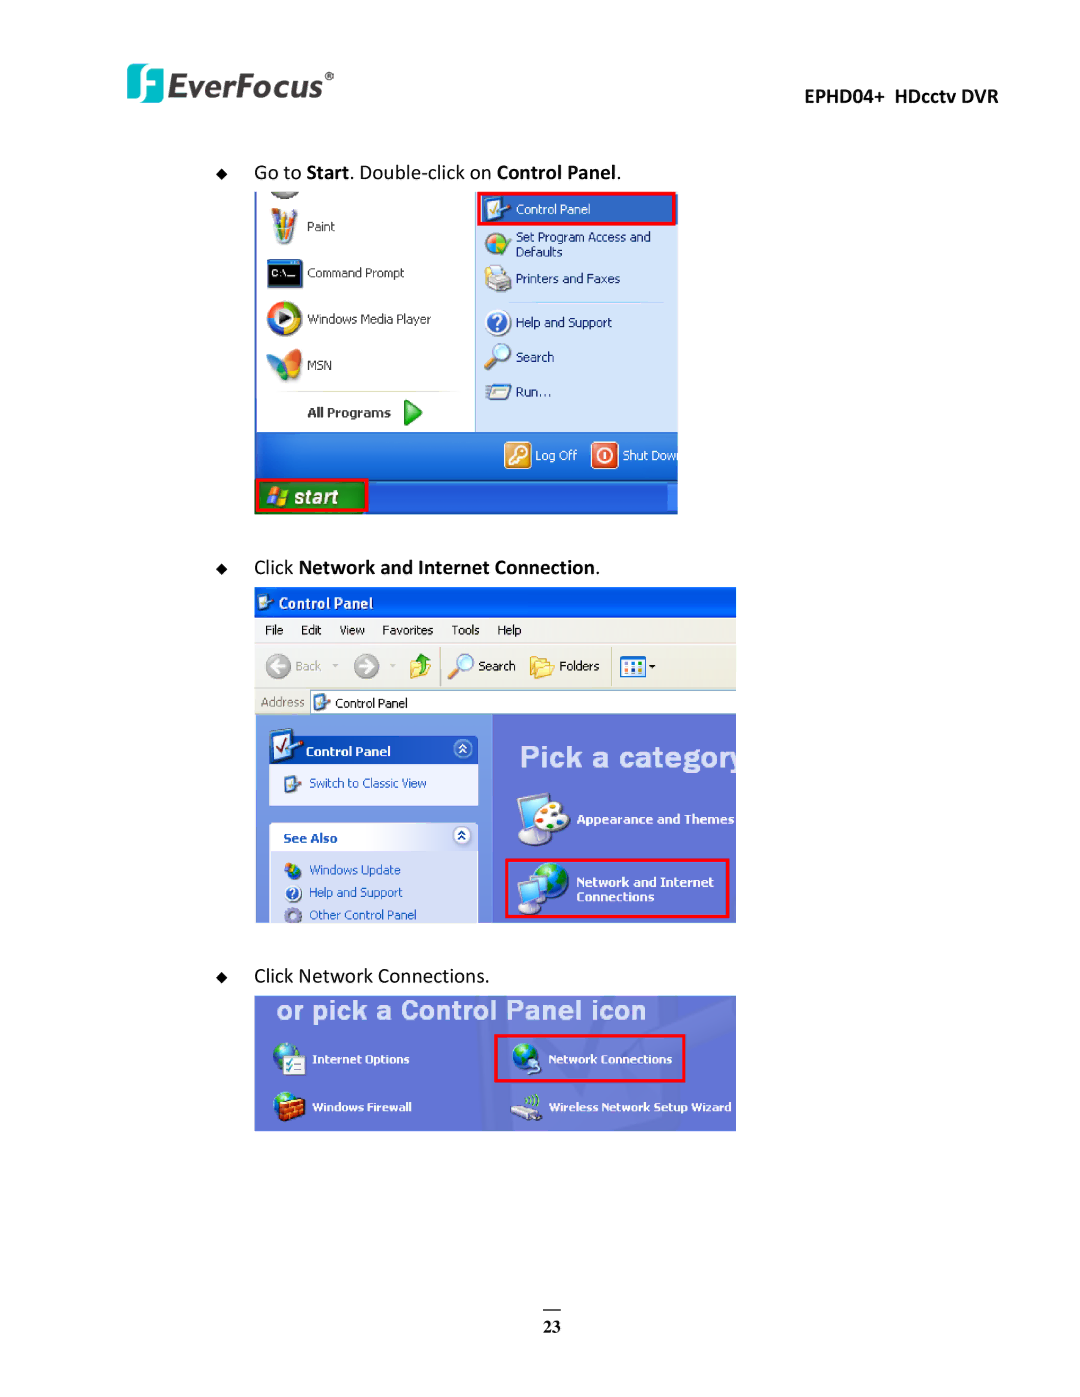
Go to
Start
.
Double-click
on
Control Panel
.
Click
Network and Internet Connection
.
Click Network Connections.
23
Page 30
Page 32
Page 31
Image 31
Page 30
Page 32
Contents
EPHD04+ HDcctv DVR
Release Date November
EPHD04H+ HDcctv DVR
Retain Instructions
Read Instructions
Heed Warnings
Attachments
Cleaning
Power Cord Protection
Follow Instructions
Weee
Table of Contents
Playback
Configuration
Remote Access to the DVR 111
EPHD04+ HDcctv DVR
Introduction
Packing List
Features
Press the button to
Front Panel
Use the Jog inner wheel to
IR Receiver Receiver for IR Remote Control
Use the Shuttle outer wheel to Jog / Shuttle
Wheel
Rear Panel
Optional Devices
Coaxial Cable Preparation
Installation
Coaxial Cable Requirement
Hard Disk Installation
EPHD04+ HDcctv DVR
EPHD04+ HDcctv DVR
Basic Connection
Using the EHA-FTX/FRX HDcctv to Optical Fiber Converter
Using the EHA-RPT Repeater / EHA-SRX Converter
Cable Length Extension
Monitor Connection
Alarm Input Contacts
Alarm I/O
Alarm Output Contacts
4 RS-485 Port
Turning On / Off the Power
Accessing the DVR
EPHD04+ HDcctv DVR
Router or LAN Connection
Connecting the DVR to the Network
To manually assign an address
EPHD04+ HDcctv DVR Connection Procedure
To set the DVR for Internet Connection through router
Direct High-Speed Connection
One-to-One Connection
Click Network and Internet Connection
Page
OSD Root Menu
How to Select a Channel /Enable Audio
Mouse and Front Panel Button Operation
USB Mouse Operation
Space
Field Input Options
Caps
Front Panel Buttons Operation
How to Select a Channel / Enable Audio
Front Panel Review
Field Input Options
Password
Login
General Operation
Camera Selection
Audio Selection
Using the front panel buttons
Monitor
OSD Root Menu
Layout
Channel
Logout
Direction buttons
PTZ
EPHD04+ HDcctv DVR
Express Control of PTZ
Display
Channel Switching
Zoom
Monitor Switching
EPHD04+ HDcctv DVR
Archiving the Recordings or Log Data to the USB or DVD
Logout
Temporarily Logout
Quick Playback
Playback
Playback Bar
Name Description
By Front Panel Press the Search button
Searching the Recordings for Playing Back
Time Search
Event Search
Smart Search
EPHD04+ HDcctv DVR
Snapshot Search
Previous Play Close Next
Configuration
EPHD04+ HDcctv DVR List of Configuration Options
Express
EPHD04+ HDcctv DVR Record With Select a record method
Basic Setting
Camera Settings
EPHD04+ HDcctv DVR
Motion
To Edit the Motion Grids
EPHD04+ HDcctv DVR
Video Loss
EPHD04+ HDcctv DVR
Record
Record Settings
Built-in Calculator
Play
Alarm
Alarm & Event
EPHD04+ HDcctv DVR
Fan Failure
Event
HD Temperature
HD Failure
HD Full
HD Off
Power Loss
Network Loss
Express Setup
Schedule Setting
Holidays
Schedule
To Set Schedule using Mouse
Schedule Setting using the front panel buttons
EPHD04+ HDcctv DVR
EPHD04+ HDcctv DVR
EPHD04+ HDcctv DVR Editing Timezone
Alarm Action
Alarm Action Setting from front panel
Page
EPHD04+ HDcctv DVR
1 LAN
Network Settings
EPHD04+ HDcctv DVR
EPHD04+ HDcctv DVR
EPHD04+ HDcctv DVR
Ddns
EverFocus Ddns
EPHD04+ HDcctv DVR Setup Steps
Alarm Server
Remote / Mobile
Network Testing
Disk
Disk
Lock/Format
RAID
Local Drive Configuration
EPHD04+ HDcctv DVR
Monitor OSD
Display Setting
Main M/T SEQ
Call M/T SEQ
Date / Time
System Setting
Daylight Saving Time
Functions
User
3.1 Add
RS-232 The RS-232 port of the DVR is currently reserved
4 I/O Control
EPHD04+ HDcctv DVR RS-485
Misc
【Configurations】
【Firmware】
Quick Archive to the DVR
Quick Archive
Quick Archive to the Remote Computer or DVR
【Network】
Information
System
【System】
EPHD04+ HDcctv DVR 【Status】
10.2 Log
Internet connection
Remote Access to the DVR
Accessing the DVR on the Network
Local connection
Installing ActiveX Controls
Browser Security Setting
113
Now you will be able to see the remote live
Enabling ActiveX Controls
Prompt
Enable
117
Remote Live View
Menu Bar
Remote Playback
System
Specifications
Network
I cannot connect to the recorder via the internet
Troubleshooting
The DVR will not go into record mode
The DVR displays nothing on the main monitor
Introduction to TCP / IP
Appendix a Network Overview
Subnet Masks
Virtual Ports
Gateway Address
Pre-Installation
127
Typical Linksys Port Forwarding
Appendix B Linksys & D-Link Port Forwarding
129
Typical D-Link Port Forwarding
Http
Virtual Server Select Enabled or Disabled
Transparent Mode
Appendix C Timing of Alarm Modes
Timeout + Transparent Mode
Permanent Mode
EPHD04+ HDcctv DVR Timeout Mode
Timeout+Transparent Mode Retrigger of Alarms
EPHD04+ HDcctv DVR Timeout Mode Retrigger of Alarms
Case Record Mode Normal + Event
Appendix D Express Setup Recording Value Selection Rules
136
Appendix E IR Remote Control
EverFocus Electronics Corp
Top
Page
Image
Contents