URL http//dvdcam pc.support,hitachi.ca
LilhrJ.,IIII1
Dvdcam PC Software Support Center
Precautions
Identifications of caution marks
@tj o3
RiSK of Electric Shock Jl
Connected
Important Safety Instructions
Handle the liquid crystal display LCD with care
Liquid crystal display LCD and viewfinder
Hold the DVD video camera/recorder correctly
Do not subject the DVD video camera/recorder to impact
At worst the DVD video camera/recorder could malflmction
Do not point directly at the sun
ACCESS/PC indicator or
Battery provided has not been charged at time of purchase
Be careful of moisture condensation
Vapor Air Warmed
Recorded contents cannot be compensated for
Suggestions and Restrictions
Read This First
About This Manual
@Displays in this manual
@, and marks beside headings
Introduction
OYou can immediately play back desired recorded scenes p
OUse Disc Navigation to create your original movie p
Recorded scenes t
OCreate original DVDs on PC p
Collect scenes of your child, for example, on play
Contents
Advanced Techniques
Setting Up Camera Functions
Disc Navigation
Connecting To PC
Subsidiary Information
Checking Provided Accessories
Avis input/output cable
Names of Parts
11 12
Light receiving sensor for DZ-GX20A only
Infrared receiver p
Battery Eject button p
Record button REC p Lock switch p
Power switch p Hand strap p Disc insertion block p
I5 16 17 18 19 21 22 Viewfinder p
Speaker p Reset button p
2728 29 30 31 32 Quick Menu button p
Focus button p
Menu button p , 66
Hitachi
Power cable AC adapter/charger DC power cord
Ll or Ll only din fbr DVD Disc
Photo
@ Put in a card
Page
Discs and Cards
Available Discs
Information on DVD-R Disc
OFinalizing DVD-R disc
Examples of Discs That Cannot be Used on this DVD Video
CAMERA/RECORDER
OUsing discs
Disc Cleaning
Handling Discs
OStoring discs
OCommon cautions for disc and card
Available Cards
OHandling card
Storage Capacity Disc Card
Recordable
Time of Movie Video
Recordable Stills Photos on Disc
Recordable Stills Photos on Card
For DZ-GX20A
Norm
ECO
× 480 pixels
DZ-MV78OA
Holding DVD Video CAMERA/RECORDER
Setting Up the DVD Video Camera/Recorder
Adjust Length Hand strap
Attaching Shoulder Strap
Attaching Lens CAP
Inserting Battery Into Remote Control
Removing Battery from Remote Control
OUsing Remote Control
VCR
ORange where the LCD monitor can be moved
Viewing Image on LCD Monitor Screen
With the screen down as much as 900, and can
Tile lens
Closing LCD Monitor
Viewing Subject Through Viewfinder
Setting Date and Time
Use tile I1/I,I,!/II
Date Set
4Press the hntton
Changing Display Format of Date and Time
Setting Up the Battery
Charging Battery
Battery charged status
Attaching Battery to DVD Video CAMERA/RECORDER
Removing Battery
While holding down
With DZ-BP148 provided with DZ-GX20A/DZ-BP14SW optional
Battery Remaining Level Indicator
Efficient USE of Battery
Battery life
Power save and discharge of battery
Using DVD Video CAMERA/RECORDER with AC ADAPTER/CHARGER
Turning DVD Video Camera/Recorder On and Off
Set to D
Set to
To record still on DVD RAM disc
Inserting and Removing
Inserting Disc
Tens
Identifying recording sides of disc
OWhen using brand-new DVD-R disc
When fiormatting is Complete, DVD R disc
Camera/recorder
Once fiormatted a DVD R
Remove tile disc
Removing Disc
Gently open tile cover Fiflly tmtil it stops
Close tbe cover Card insertion block
Inserting and Removing Card
Block Inserting Card Terminal Inward Card with its Until
Recording Indicator
Once witl start
Pressing it once
Again will
Page
Recording Stills
Idisc Access
On-Screen Information
Information Display During Recording
See the next page fbr details
No display EIS OFF EIS on
OSwitching the information display mode
Still recording quality when using card
External Input and playback
Message will appeai
ODisplay when recording an image of yourself
Zooming
Recording wide area wide-angle Ged Image teIephoto
Ring
Macro Recording
Camera/recorder
Playing Back
Playing Back
Search Playback of Movie
Frame ADVANCE/FRAME BACK/SLOW Playback of Movie
When using disc
When using card
Skip Playback of Movie
Playing Back Stills
Jumping to Specified
Point GO to
OSpecifying the point to view
Press the Menu button during playback
On-Screen Information Display
Switching the information display mode
When using disc
How to interpret the menu screen
Checking Flow of Quick Menu
OOperating Menu
ORecord Functions Setup
Flow of Quick Menu When Recording Movie
ODate Setup
Record Functions Setup
Initial Setup
Flow of Quick Menu When Recording Photo Disc
@Date Setup @Initial Setup
Flow of Quick Menu When Recording Photo Card
Date Setup
102
Olnitial Setup
LOl
Flow of Quick Menu with DVD-RAM Disc
OScene
ODisc Others
Llo
OOthers
Flow of Quick Menu with DVD-R Disc
ODisc
Focusing range
Manually Focusing Subject
Focusing During Recording
Objectsarefar andthat
1Press the Exposure button during Recording
Adjusting Brightness of Image to be recorded Exposure
Compensating for Backlight
Using External Microphone
Built-in Video Flash for DZ-GX20A only
Optional Video Flash for DZ- GX20A or DZ-MV780A only
Connecting to a TV
Viewing on TV Screen
Viewing on TV Screen
Perform playback, recording or editing
Playback on DVD Recorder/Player
Playing Back DVD-RAM Disc
Playing Back DVD-R Disc
Insert tile disc into the DVD player and play it back
Recording Dubbing Images
Recording Dubbing Images from Other Video Device
Page
Switch tile input Referring to Input Source on
Recording Dubbing Images from Other Video Cameras
Tlle AV/S input/output Cable provided to
Picture will appear on the LCD screen or
1Press the Disc Navigation button
Recording Dubbing Images on Other Video Devices
Cable provided to connect
White Be
Menu screen for setting
Checking Flow of Normal Menu
Record Functions Setup
Beep Power save 9 p Recording LED 9 p
Language selection I7 Demo mode I7 Reset I7
OFIow
Setting Up Camera Functions
Options will appear on the right of Program AE
N-lenu screen will disappear
Selected AE mode-- o ORAtl
Recording Dark Subjects Using LCD Monitor Light
Adjusting Color White Balance
OSetting white balance manually
PointtheDVD
Using the Electronic Image Stabilizer EIS
Recording Subject Using Large Magnification Digital Zoom
OChecking EIS On or Off
Reducing Wind Noise During Recording MIC.FILTER
Setting Up Record Functions
Switching Movie Quality Video Mode
Setting to Wide TV Screen Mode 169 Mode
I/11 button Press the Menu button To end the setting
Page
Device Input Source
Switching Quality of Still Image Quality
Receiving Image from Another
Switching External Input Recording Method Photo Input
101 E As with ordinary cairleras Press the Photo button
SELF-TIMER
Self-timer recording
Choose On or Off, and press the I/11 button
Setting ON-SCREEN Display Output on or OFF OSD Output
Press tile Menu button to end the setting
Setting Brightness of Viewfinder EVF Brightness
LCD/EVF Setup
Setting Brightness of LCD Screen LCD Brightness
Setting Color Density Color Level
Always Displaying Image in VlEWFINDER
100
Initial Settings
Switching Operating Sound on or OFF Beep
Select Franais, Then press the I/ll hntton
Turning Record LED on or OFF Record LED
Changing Display Language Language
Resetting Menu Settings to Defaults Reset
102
Menu p to choose
YES, and then press the I/ button
Using Disc Navigation
103
104
Icons to be displayed oil thumbnail
Fade in p
Skip
OWhen Playback Ends
105
Playing Back from Disc Navigation Screen
OPlaying back photos
106
Selecting Multiple Scenes
Selecting Consecutive Scenes
Together
Functions Available with Disc Navigation
RAM
OWhen using DVD-RAM disc
OWhen using DVD-R Disc
Understanding Flow of Disc Navigation Menu
Iskip 115
OWhen Using card
109
Scene
Deleting Scenes Edit Delete
OEditing using submenu
Lt,ER-3URNE RAM
Dividing Movies Edit Divide
Divide Scene
Arranging Order of Scenes Edit Move
113
Combining Multiple Scenes Edit Combine
Fade Set screen
114
Directing Scenes Effectively Effect Fade
Releasing Skip
115
Playing Back by Skipping Scenes Effect Skip
116
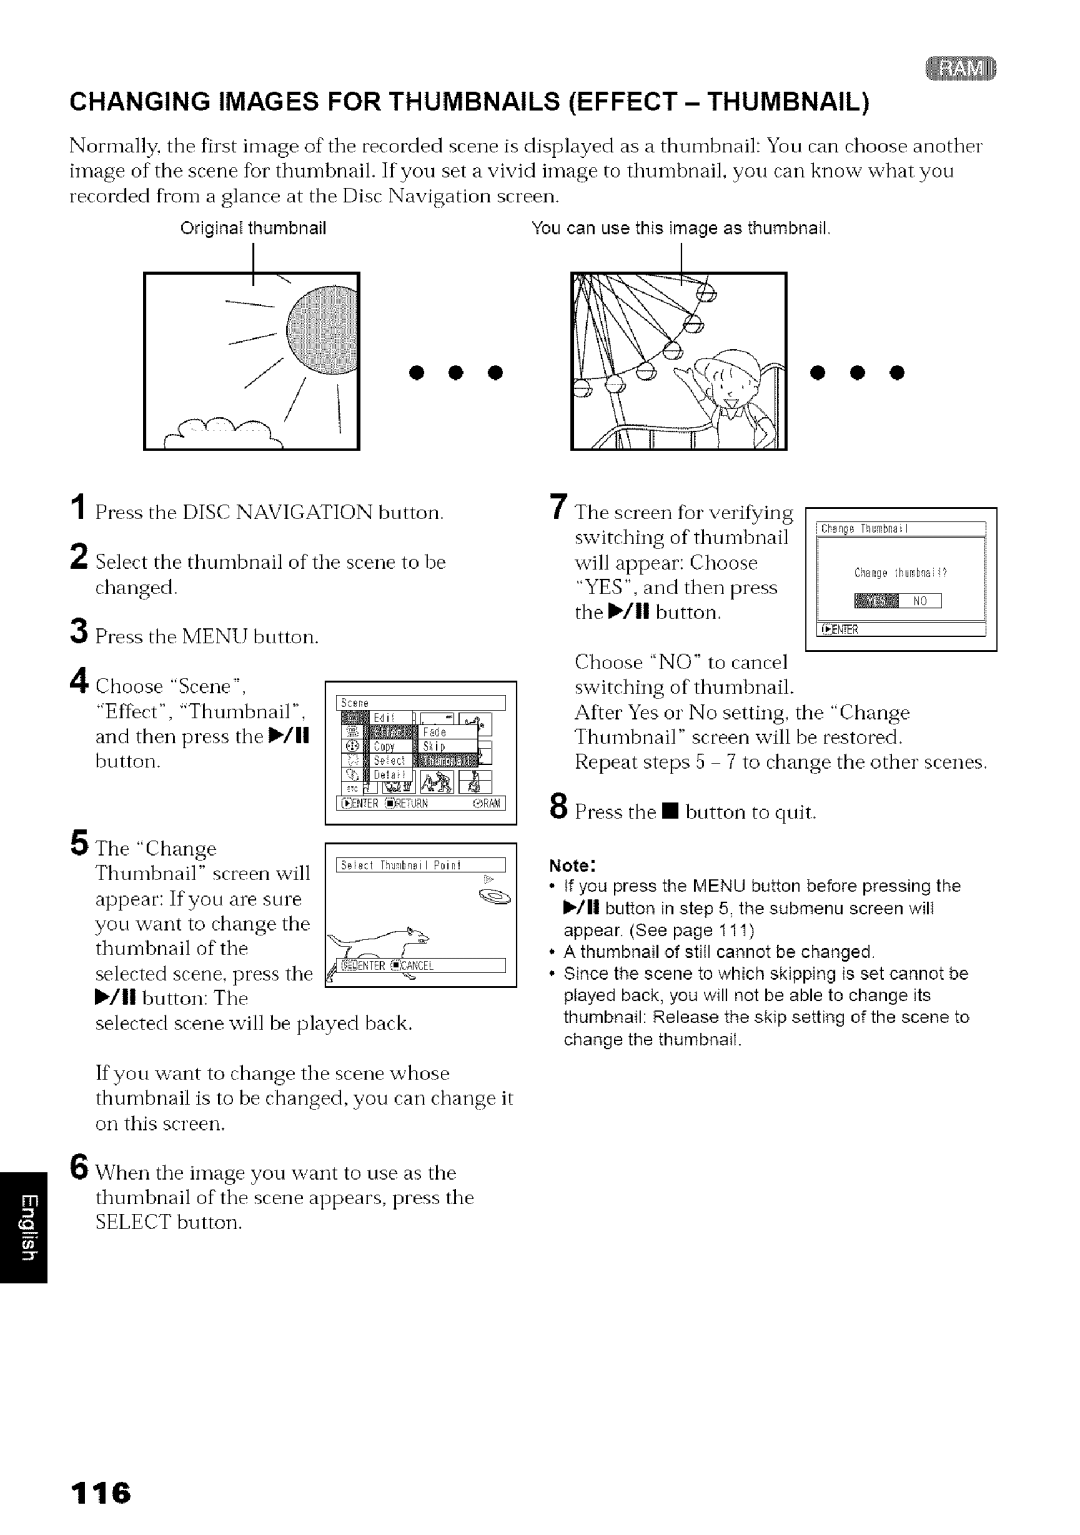
Changing Images for Thumbnails Effect Thumbnail
Select the thumbnail of the scene to he
Changed
Screen %1verif¢ing
Press the I*/IIhutton Choose no to cancel Copy
Copying Stills on DVD-RAM Disc to Card Copy
118
Locking Scenes on Card Lock
OTo unlock the scene
Scene nrenu
ODeselecting selected scenes
Selecting Scenes Using Menu Screen Select
119
Tile recording mode, recording date/time
Displaying Information Using Menu Screen Detail
120
What is PROGRAM?
Switching to Thumbnail Display of Specific Date Switch
121
Use Operating Menu
122
Playing Back Program
Changing Title of Program Title
Use IN/I1/qll/1 Title input bar
Characters available for entering title
123
Screen %1verifying
After entering the title Choose Enter
What is Play LIST?
Play List
124
Creating NEW Play List Create
Switching to Display of Each Play List Switch
125
126
Adding Scenes to Play List Editing Play List
To choose Edit Oil tile
Menu Screen Then Press
Adding Scenes Using Submenu for Editing Editing Play List
127
Deleting Scenes from Play List Editing Play List
6Choose Add, Then press the / button
Deleting Scenes Using Submenu for Editing Editing Play List
128
Then press the I1/ button
To select all scenes, simply press the Menu button
Press tile I/ button Choose no to cancel
Arranging Order of Scenes Move
129
10Press the button to quit
130
Changing Title of Play List Title
Deleting Play List Delete
Whose Title has been Changed will appean
Go To
TOP END
131
Then press tile I/ hutton
Disc or Card Management
Initializing Disc or Card Format DISC. Format Card
Before You Begin
132
Setting, the Disc Navigation screen will be restored
Protecting Disc from Writing Protect Disc
Verifying Remaining Free Space on Disc or Card Capacity
133
134
Finalizing DVD-R Disc Finalize Disc
135
Disc will be finalized
Choose YES, and then
Others
Displaying Movies or Stills Independently Category
Playing Back Scenes Repeatedly Repeat Play
136
137
Slide Show Continuous Playback of Stills
Following are Available When Connecting to PC
138
139
Languages compatible with each software program
Contents on Provided CD-ROM
Following procedures
141
DVDfu nSTU DIO
UDF driver DVD-RAM driver
Installing Software
Installer Screen
142
Displaying
Installing Software
143
Screen for installing DVDfhnSTUDIO Will appear Click Next
Click Install Installation will start
144
CIick
145
Click
If yon do not wish to change the folder nan-le
Click Next
146
147
148
DVDI\mSTI Jdio
Will start. Wben writing is complete, a DVD
Approx Minutes
149
Uninstalling Software
Recorder by Connecting It to PC
For Mac
Introduction to Video Editing Software
150
Introduction to Optional Accessories
Camera Accessories
Power Supply
151
Removing and Replacing FROM/IN Round DVD Holder
Removing Disc from Its Package
152
Cleaning
Cleaning LCD screen and camera lens
Removing Disc from Cartridge
ERemoving disc from caddy case
Changing Setting of Demonstration
154
Terminology
155
MultiMediaCard
This sensor is used to adjust the white balance
156
Thumbnail
157
Suspending PC
No DVD Video Camera/Recorder Operation Check the Following
158
159
Trouble Messages
160
161
Cannot
Card Almost Full
YES
Copy Protected Disc Access Disc Almost Full
II0
163
END of Disc
164
No Disc
Unformat Disc
165
Use AC adapter/ charger Turn off powen
166
Troubleshooting
Battery weakens fast
168
169
During Playback
170
When the DVD video camera/recorder is connected to PC
111
172
173
Disc cannot be removed Cover will not open
System Reset
List of setting items
Major Specifications
175
Dimensions W × H × D
Recording format DVD-RAM disc
DZ-MV78OA/DZ-MV730A
Jpeg
177
To Order in the Canada
To Order in the United States
178
By Phone
Index
179
180
181
License Agreement
Article 2 Copyrights
Article 4 Quality Assurance
182
Date of Purchase Dealer Name Dealer Address City State Zip
Conditions Hitachi Limited Warranty
Days Labor Carry-in Year Parts Except Battery
Hitachi
HITACH,COMtTV
RrG
HITACH! Warranty Policy
IVlR6RTANThis Iieu
Hitachi Hitachi
Hitachi Register Your Product on Line AT WWW Hitachi .CA