HP Photosmart 3100 All-in-One series
User Guide
Safety information
Contents
Use the fax features
HP All-in-One overview
HP All-in-One at a glance
HP Photosmart 3100 All-in-One series parts
Label Description
Paper-width guide for the main tray
Lid
HP Photosmart 3100 All-in-One series control panel features
Control panel overview
Label Name and Description
Color graphics display icons
Color graphics display sleep mode
Menu overview
Photo Menu
Icon Purpose
Proof Sheet Menu
Copy Menu
Scan To menu
Setup Menu
Fax Menu
Select Function Menu
Help Menu
Text and symbols
Enter text using the visual keyboard
Enter text using the keypad on the control panel
To enter text using the visual keyboard
To enter text using the keypad on the control panel
To add a space
To enter a space, pause, or symbol
Use the HP Image Zone software
To open the HP Image Zone software on a Windows computer
To open the HP Image Zone software on a Mac
Overview
Setup Guide
Find more information
Sources of information
User Guide
HP Image Zone Help
To access the HP Image Zone Help on a Windows computer
Use the onscreen Help
Use the Help on a Windows computer
Contents
Index
Search
Display area
Use the Help on a Mac
Help toolbar
To access the HP Image Zone Help on a Mac
Navigation panes
Back Help Center Search area
Finish setting up your HP All-in
One
Set your preferences
Set your language and country/region
Adjust the volume
Set the date and time
To set the date and time from the control panel
Connect using a USB cable
Connection information
Supported connection types
Connect using Bluetooth
To check the USB port speed on your computer Windows XP
To check the USB port speed on your computer Mac OS
To change the rear port speed to Full Speed HP All-in-One
To install and print using the Microsoft stack Windows
To install and print using the Widcomm stack Windows
Windows users
To install and print using Bluetooth Mac
Use printer sharing Windows
Click View devices in range
Mac users
Fax setup
To enable printer sharing
From the Services tab, click Printer Sharing
Use printer sharing Mac
Set up the HP All-in-One for faxing
Countries/regions with a parallel-type phone system
Choose the right fax setup for your home or office
Select your fax setup case
Other equipment/ services sharing your fax line
Recommended fax setup for parallel-type phone systems
Recommended fax setup for serial-type phone systems
Service
Modem, and voice mail
Case a Separate fax line no voice calls received
Back view of the HP All-in-One
To set up your HP All-in-One with a separate fax line
Case B Set up your HP All-in-One with DSL
To set up your HP All-in-One with DSL
Case D Fax with a distinctive ring service on the same line
To set up your HP All-in-One with a distinctive ring service
Case E Shared voice/fax line
To set up your HP All-in-One with a shared voice/fax line
Case F Shared voice/fax line with voice mail
To set up your HP All-in-One with voice mail
To set up your HP All-in-One with a computer modem
Case H Shared voice/fax line with computer modem
Example of a parallel splitter
Back view of the HP All-in-One
Case I Shared voice/fax line with answering machine
Finish setup
Example of a parallel splitter
Finish setup
Example of a parallel splitter
Back view of the HP All-in-One
Change settings on the HP All-in-One to receive faxes
Set the answer mode
Change the answer ring pattern distinctive ringing
Test your fax setup
To change the answer ring pattern from the control panel
Set the number of rings before answering
To test your fax setup from the control panel
Set the fax header
Set up speed dialing
Create individual speed dial entries
Create group speed dials
Finish setup
Load originals and load paper
Load originals
Load an original
To load an original on the glass
Choose papers for printing and copying
Load an oversized original
To remove the lid
Recommended papers for printing and copying
Papers to avoid
HP does not recommend printing to the following papers
HP does not recommend copying to the following papers
To select input trays without adjusting any other settings
Select an input tray
Load paper
Press Start Color or Start Black
Load full-size paper
To load full-size paper
Load 10 x 15 cm 4 x 6 inch photo paper
To load 10 x 15 cm 4 x 6 inch photo paper in the photo tray
Load postcards, Hagaki cards, or HP Panorama photo paper
Load envelopes
To load envelopes
Load other types of paper
HP Premium Inkjet Transparency Film
HP Iron-On Transfers
Avoid paper jams
HP Matte Greeting Cards, HP Photo Greeting Cards, or
HP Textured Greeting Cards
HP Inkjet Labels
Use the photo and video features
Insert a memory card
Connect a digital camera
To insert a memory card
Connect a storage device
View photos and videos using the HP All-in-One
View photos and videos
View photos using your computer
Cancel
Select photos and videos
Select individual photos and videos
Select all photos and videos
Select a range of photos and videos
To select all photos and videos
To select a range of photos and videos
Select a single video frame
Deselect photos and videos
To select a single video frame
Edit photos
Print photos and videos from the control panel
Use the Easy Print Wizard
Print selected photos and videos
Print a cropped photo
To use the Easy Print Wizard
Print photos using a proof sheet
To print a cropped photo
Print a proof sheet
All Last Custom Range
Complete the proof sheet
Set photo print options
Save photos to your computer
Scan a proof sheet
Share photos with friends and relatives
Photos and videos
Use the copy features
Change the copy settings
Make a copy
Number of copies Copy Preview
To save the current settings as defaults for future jobs
Preview your copy job
Reduce/Enlarge Paper Size Paper Type Crop Tray Select
Make a borderless copy of a photo
To preview your copy from the control panel
Press Start Black or Start Color
Crop an original
Stop copying
To crop an image from the control panel
Print from your computer
Print from a software application
To print from a software application Windows
Change the print settings
To change the print settings for all future jobs
To change the print settings for the current job
Windows users
To change all other print settings
Stop a print job
Mac users
To stop a print job from the HP All-in-One
To stop a print job from the computer Mac users
Use the scan features
Scan an image
Scan an original to a computer
Share a scanned image with friends and relatives
Print a scanned image
Edit a scanned image
Edit a scanned photo or graphic
Edit a scanned document
Scan
Use the fax features
Send a fax
Send a basic fax
Press Start Black
Send a fax manually from a phone
If you have another page to fax a. Press 1 to select Yes
If you do not have another page to fax
To send a fax manually from a phone
Send a fax using monitor dialing
If you have another page to fax
To send a fax using monitor dialing from the control panel
Receive a fax
Set up backup fax reception
Receive a fax manually
To set backup fax reception from the control panel
Reprint received faxes from memory
Print fax error reports
Receive faxes successfully. This is the default setting
Print reports
Print fax confirmation reports
To cancel a number you are dialing
Stop faxing
To stop faxing from the control panel
Ink cartridges Symbol HP reorder number
Order supplies
Order accessories
Accessory and HP model number
Order other supplies
Description
Clean the HP All-in-One
Clean the glass
Clean the lid backing
Maintain your HP All-in-One
Clean the exterior
Check the estimated ink levels
To check the ink levels from the Setup menu
Print a self-test report
Work with ink cartridges
Replace the ink cartridges
To replace the ink cartridges
Pull the ink cartridge toward you out of its slot
Align the printer
To align the printer from the control panel
Clean the print head
Clean the ink cartridge contacts
To clean the print head from the control panel
To clean the ink cartridge contacts
Self-maintenance sounds
Troubleshooting information
Additional troubleshooting topics in this User Guide
Other sources of information
Setup troubleshooting
Hardware setup troubleshooting
View the Readme file
My HP All-in-One does not turn on
User Guide 111
Color graphics display shows the wrong language
HP All-in-One does not print
Software installation troubleshooting
Fax Setup Wizard Windows or Fax Setup Utility Mac runs
To start the installation from a Windows computer
To start the installation from a Mac
Minimum system checks screen appears Windows
Received a message that an unknown error has occurred
Red X appears on the USB connect prompt
To start the Fax Setup Wizard Windows
To start the Fax Setup Utility Mac
Uninstall and reinstall the software
Registration screen does not appear Windows
To uninstall from a Windows computer, method
Fax setup troubleshooting
Select Reinstall
To uninstall from a Mac computer
Double-click the Applications HP All-in-One Software folder
Solution
Fax test failed
Fax Hardware Test failed
Fax Connected to Active Telephone Wall Jack test failed
Phone Cord Connected to Correct Port on Fax test failed
Using Correct Type of Phone Cord with Fax test failed
Dial Tone Detection test failed
Fax Line Condition test failed
Color graphics display always shows Phone Off Hook
User Guide 125
HP All-in-One is having problems sending a manual fax
HP All-in-One cannot receive faxes, but can send faxes
128
HP All-in-One cannot send faxes, but can receive faxes
Fax tones are recorded on my answering machine
Operational troubleshooting
To extend your phone cord
Paper troubleshooting
Paper has jammed the optional two-sided printing accessory
Paper has jammed the HP All-in-One
Device update
Ink cartridge troubleshooting
Device update Windows
Zone Help
Device update Mac
To use device update
134
HP warranty and support
Warranty
Warranty upgrades
Warranty information
HP product Duration of limited warranty
Access your serial number and service ID
Before you call HP customer support
Call in North America during warranty
Call elsewhere in the world
Get support and other information from the Internet
Support
HP Quick Exchange Service Japan
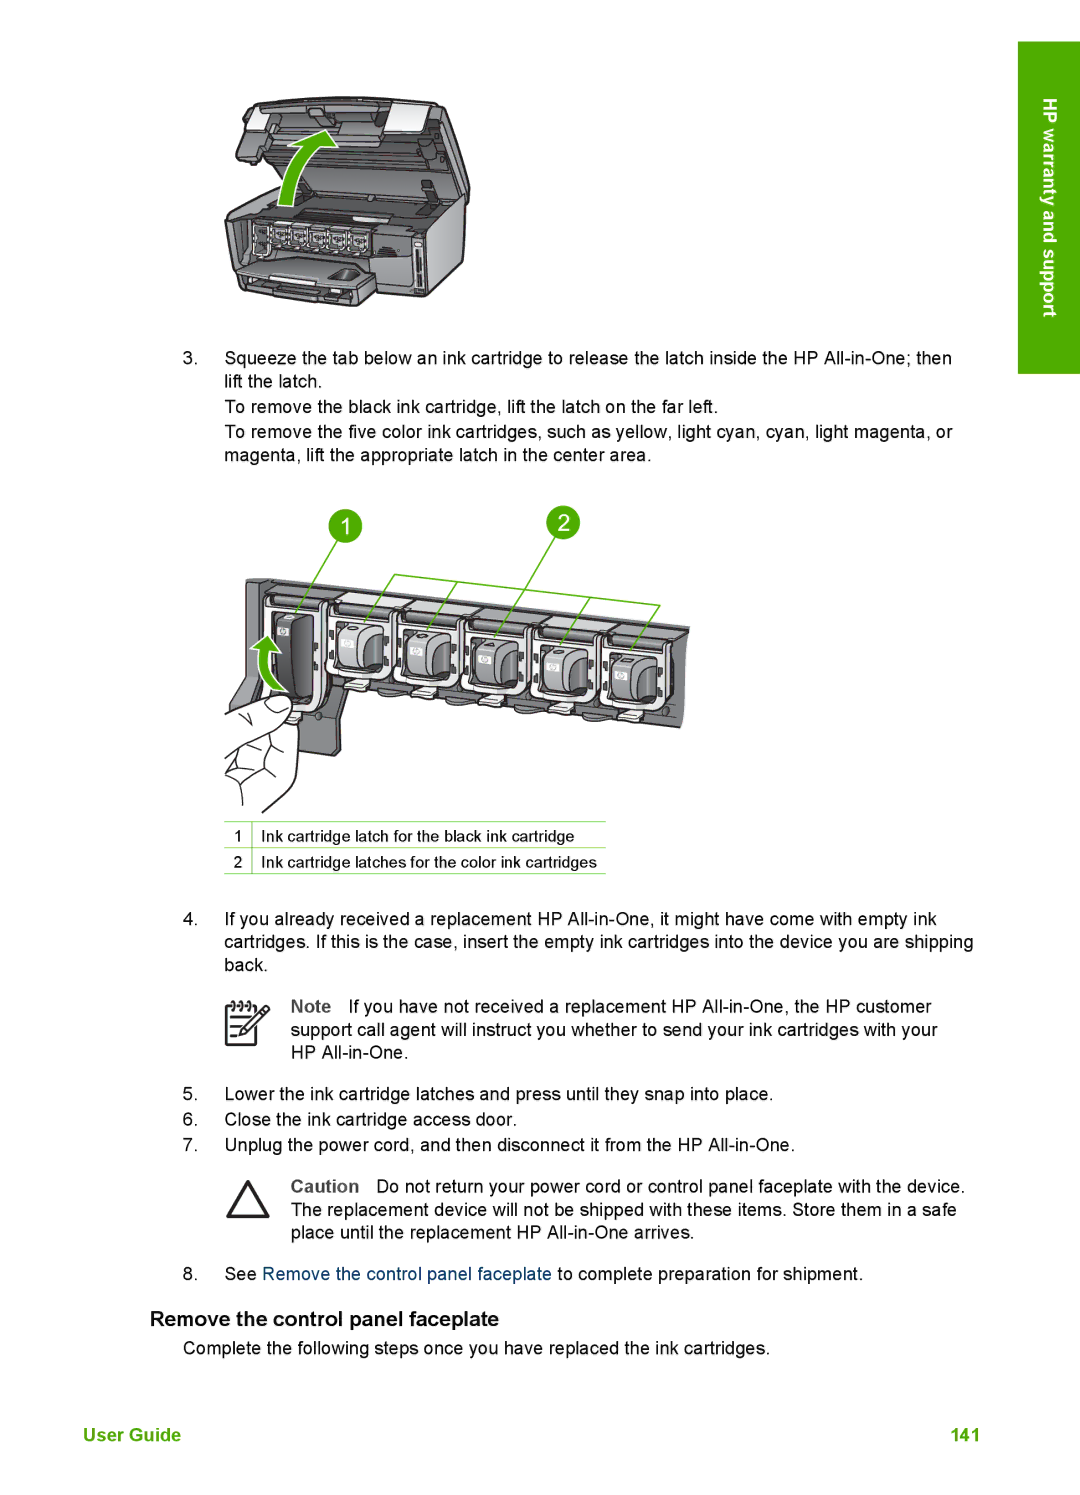
Prepare your HP All-in-One for shipment
Replace the ink cartridges in your HP All-in-One
Remove the control panel faceplate
142
Pack your HP All-in-One
144
Paper specifications
Technical information
System requirements
Paper-tray capacities
Type Size Weight
Paper sizes
Print specifications
Print margin specifications
Copy specifications
Fax specifications
Memory card specifications
Scan specifications
Physical specifications
Power specifications
Environmental specifications
Additional specifications
Material safety data sheets
Paper use
Plastics
Recycling program
Regulatory notices
Regulatory model identification number
FCC statement
VCCI-2
Declaration of conformity European Economic Area
Geräuschemission
156
Symbols/Numerics
Index
FCC
User Guide 159
Weee
User Guide 161
162
Q5831-90157