PROCEDURE 5 | UPHOLSTERY/POSITIONING STRAP |
|
|
U P H O L S T E R Y
P O S I T I O N I N G
S T R A P
This Procedure Includes the Following:
Replacing Seat Positioning Strap - Captains Van
Seats
Replacing Back Upholstery
WARNING
After ANY adjustments, repair or service and BE- FORE use, make sure that all attaching hardware
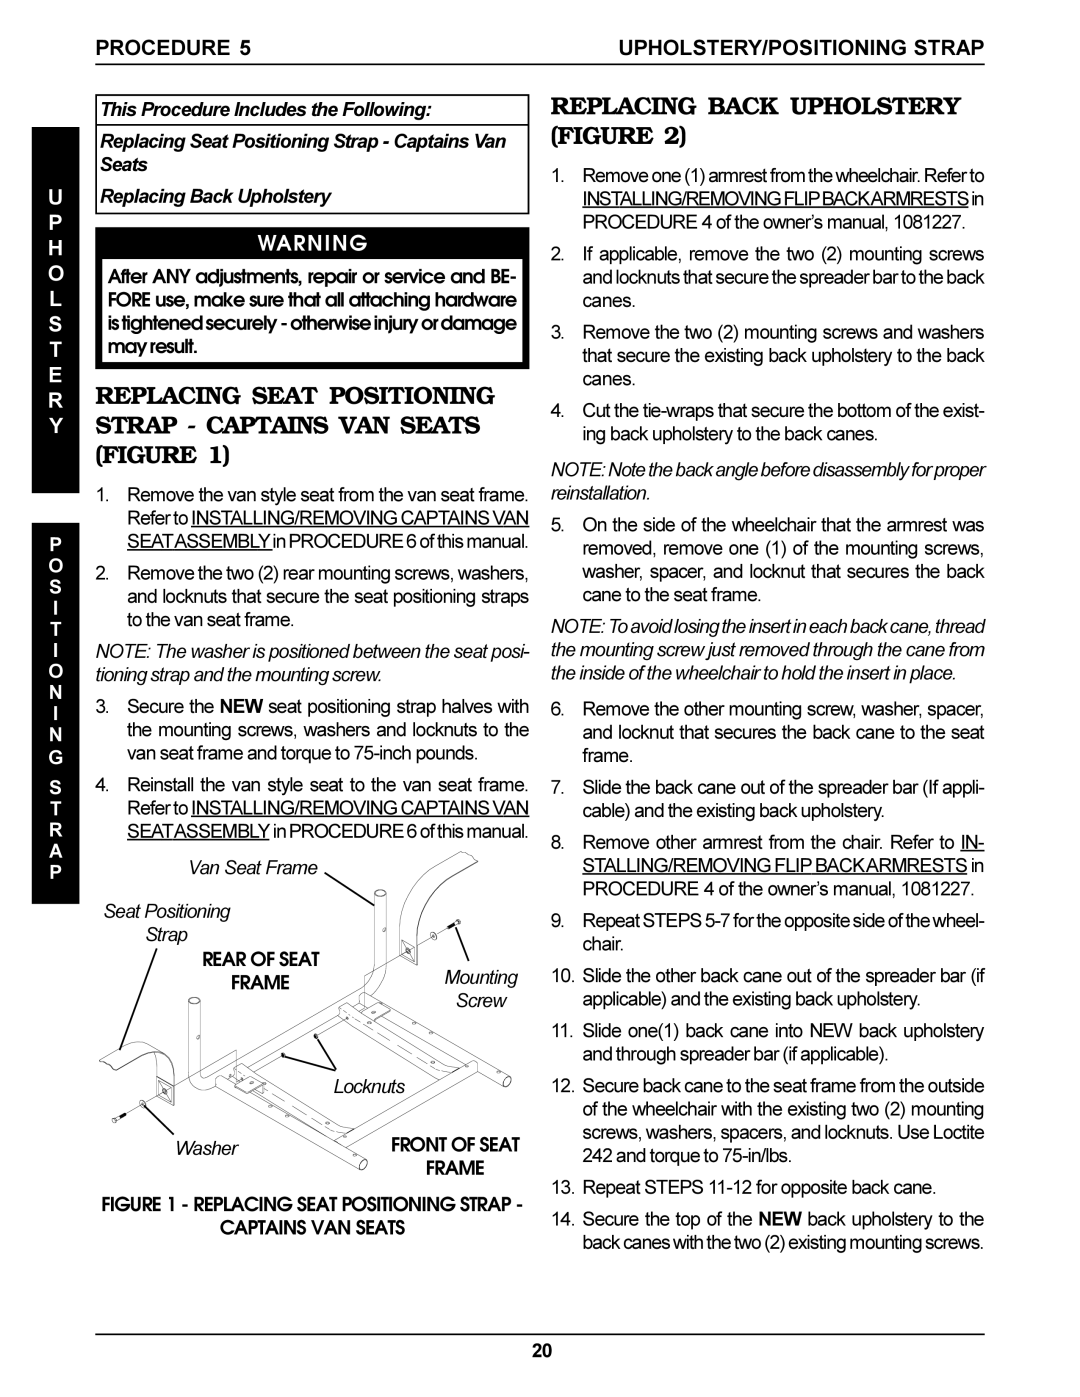
REPLACING SEAT POSITIONING STRAP - CAPTAINS VAN SEATS (FIGURE 1)
1.Remove the van style seat from the van seat frame. Refer to INSTALLING/REMOVING CAPTAINS VAN SEATASSEMBLYin PROCEDURE 6 of this manual.
2.Remove the two (2) rear mounting screws, washers, and locknuts that secure the seat positioning straps to the van seat frame.
NOTE: The washer is positioned between the seat posi- tioning strap and the mounting screw.
3.Secure the NEW seat positioning strap halves with the mounting screws, washers and locknuts to the van seat frame and torque to
4.Reinstall the van style seat to the van seat frame. Refer to INSTALLING/REMOVING CAPTAINS VAN SEATASSEMBLY inPROCEDURE6ofthismanual.
Van Seat Frame
Seat Positioning
Strap
REAR OF SEAT | Mounting |
FRAME | |
| Screw |
Locknuts
Washer | FRONT OF SEAT |
FRAME
FIGURE 1 - REPLACING SEAT POSITIONING STRAP -
CAPTAINS VAN SEATS
REPLACING BACK UPHOLSTERY (FIGURE 2)
1.Remove one (1) armrest from the wheelchair. Refer to INSTALLING/REMOVINGFLIPBACKARMRESTSin PROCEDURE 4 of the owner’s manual, 1081227.
2.If applicable, remove the two (2) mounting screws and locknuts that secure the spreader bar to the back canes.
3.Remove the two (2) mounting screws and washers that secure the existing back upholstery to the back canes.
4.Cut the
NOTE:Notethebackanglebeforedisassemblyforproper reinstallation.
5.On the side of the wheelchair that the armrest was removed, remove one (1) of the mounting screws, washer, spacer, and locknut that secures the back cane to the seat frame.
NOTE:Toavoidlosingtheinsertineachbackcane,thread the mounting screw just removed through the cane from the inside of the wheelchair to hold the insert in place.
6.Remove the other mounting screw, washer, spacer, and locknut that secures the back cane to the seat frame.
7.Slide the back cane out of the spreader bar (If appli- cable) and the existing back upholstery.
8.Remove other armrest from the chair. Refer to IN- STALLING/REMOVING FLIP BACKARMRESTS in PROCEDURE 4 of the owner’s manual, 1081227.
9.Repeat STEPS
10.Slide the other back cane out of the spreader bar (if applicable) and the existing back upholstery.
11.Slide one(1) back cane into NEW back upholstery and through spreader bar (if applicable).
12.Secure back cane to the seat frame from the outside of the wheelchair with the existing two (2) mounting screws, washers, spacers, and locknuts. Use Loctite 242 and torque to
13.Repeat STEPS 11-12 for opposite back cane.
14.Secure the top of the NEW back upholstery to the back canes with the two (2) existing mounting screws.
20
