PROCEDURE 14 | RECLINER |
|
|
R E C L I N E R
If the seat width required is within the range of the original back canes, spreader bar and headrest pillow, the original components can still be used.
IftheseatwidthrequiredisNOTwithintherangeoftheorigi- nal back canes, spreader bar and headrest pillow, the origi- nal components can not be used.
EQUIPMENT OPTION
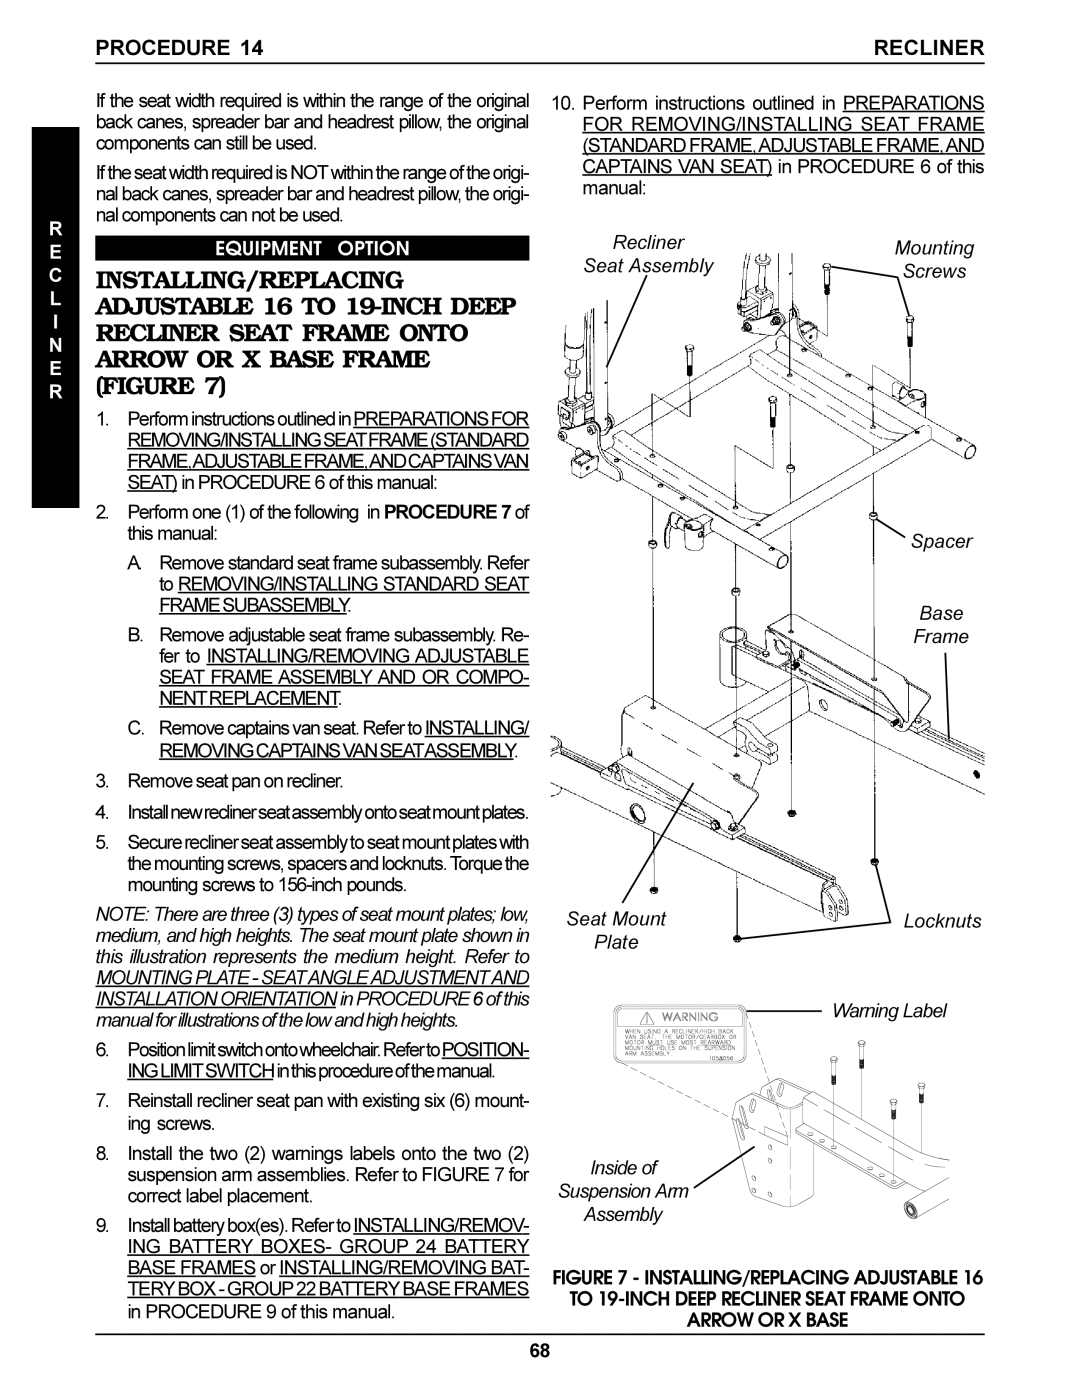
INSTALLING/REPLACING ADJUSTABLE 16 TO
1.PerforminstructionsoutlinedinPREPARATIONSFOR REMOVING/INSTALLINGSEATFRAME(STANDARD FRAME,ADJUSTABLEFRAME,ANDCAPTAINSVAN SEAT) in PROCEDURE 6 of this manual:
2.Perform one (1) of the following in PROCEDURE 7 of this manual:
A.Remove standard seat frame subassembly. Refer to REMOVING/INSTALLING STANDARD SEAT FRAMESUBASSEMBLY.
B.Remove adjustable seat frame subassembly. Re- fer to INSTALLING/REMOVING ADJUSTABLE SEAT FRAME ASSEMBLY AND OR COMPO- NENTREPLACEMENT.
C.Remove captains van seat. Refer to INSTALLING/ REMOVINGCAPTAINSVANSEATASSEMBLY.
3.Remove seat pan on recliner.
4.Installnewreclinerseatassemblyontoseatmountplates.
5.Securereclinerseatassemblytoseatmountplateswith themountingscrews,spacersandlocknuts.Torquethe mounting screws to
NOTE: There are three (3) types of seat mount plates; low, medium, and high heights. The seat mount plate shown in this illustration represents the medium height. Refer to
MOUNTING PLATE - SEATANGLEADJUSTMENTAND INSTALLATION ORIENTATION in PROCEDURE 6 of this manualforillustrationsofthelowandhighheights.
6.Positionlimitswitchontowheelchair.RefertoPOSITION- INGLIMITSWITCHinthisprocedureofthemanual.
7.Reinstall recliner seat pan with existing six (6) mount- ing screws.
8.Install the two (2) warnings labels onto the two (2) suspension arm assemblies. Refer to FIGURE 7 for correct label placement.
9.Installbatterybox(es).RefertoINSTALLING/REMOV-
ING BATTERY BOXES- GROUP 24 BATTERY BASE FRAMES or INSTALLING/REMOVING BAT-
10.Perform instructions outlined in PREPARATIONS FOR REMOVING/INSTALLING SEAT FRAME (STANDARD FRAME,ADJUSTABLE FRAME,AND CAPTAINS VAN SEAT) in PROCEDURE 6 of this manual:
Recliner | Mounting | |
Seat Assembly | ||
Screws | ||
|
Spacer
Base
Frame
Seat Mount | Locknuts |
Plate |
|
Warning Label
Inside of
Suspension Arm
Assembly
FIGURE 7 - INSTALLING/REPLACING ADJUSTABLE 16 TO 19-INCH DEEP RECLINER SEAT FRAME ONTO ARROW OR X BASE
68
