PROCEDURE 13 | ELECTRONICS |
|
|
Arrow Fwd Model
REMOVING.
E1. Remove the front shroud. Refer to REMOVING/IN-
STALLING FRONT SHROUD in PROCEDURE 17 ofL
E | this manual. |
|
C2. Remove the counterweight. Refer to REMOVING/IN-
TSTALLING COUNTERWEIGHT in PROCEDURE 17
of this manual.R
O3. Remove the battery box(es). Refer to INSTALLING/RE-
NMOVING GROUP 24 BATTERY BOXES in PROCE-
IDURE 9 of this manual.
C4. Disconnect the joystick cable from the top of the control-
Sler.
5.Disconnectthebatterywiringharnessandcontrollercon- nection.
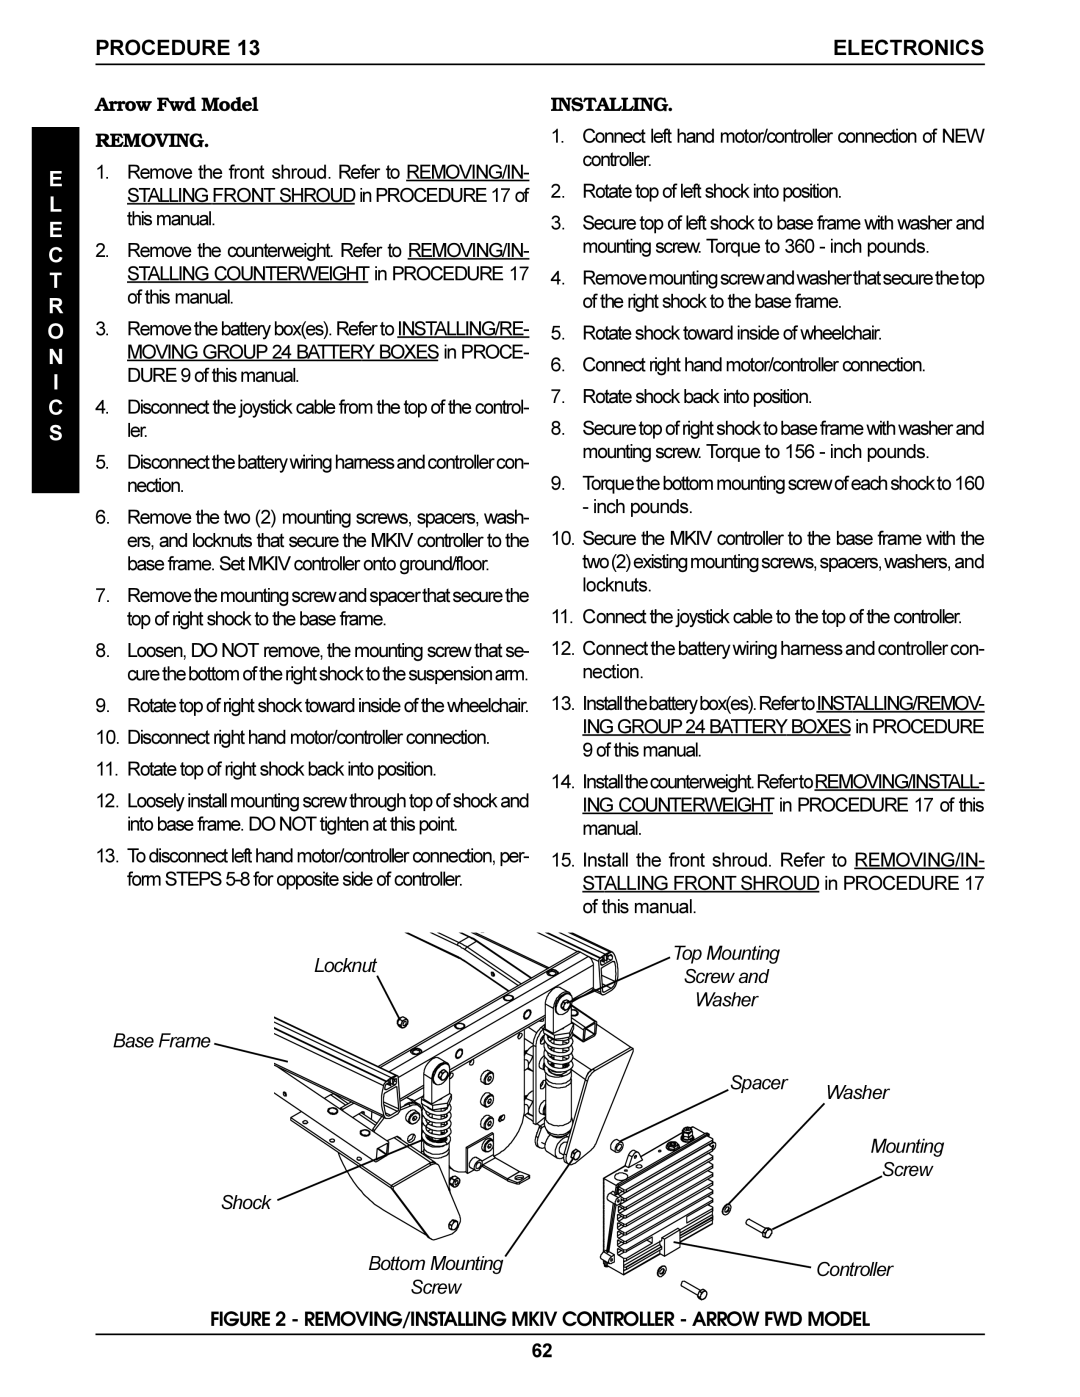
6.Remove the two (2) mounting screws, spacers, wash- ers, and locknuts that secure the MKIV controller to the base frame. Set MKIV controller onto ground/floor.
7.Removethemountingscrewandspacerthatsecurethe top of right shock to the base frame.
8.Loosen, DO NOT remove, the mounting screw that se- curethebottomoftherightshocktothesuspensionarm.
9.Rotate top of right shock toward inside of the wheelchair.
10.Disconnect right hand motor/controller connection.
11.Rotate top of right shock back into position.
12.Loosely install mounting screw through top of shock and into base frame. DO NOT tighten at this point.
13.To disconnect left hand motor/controller connection, per- form STEPS
INSTALLING.
1.Connect left hand motor/controller connection of NEW controller.
2.Rotate top of left shock into position.
3.Secure top of left shock to base frame with washer and mounting screw. Torque to 360 - inch pounds.
4.Removemountingscrewandwasherthatsecurethetop of the right shock to the base frame.
5.Rotate shock toward inside of wheelchair.
6.Connect right hand motor/controller connection.
7.Rotate shock back into position.
8.Securetopofrightshockto baseframewithwasherand mounting screw. Torque to 156 - inch pounds.
9.Torquethebottommountingscrewofeachshockto 160 - inch pounds.
10.Secure the MKIV controller to the base frame with the two(2)existingmountingscrews,spacers,washers, and locknuts.
11.Connect the joystick cable to the top of the controller.
12.Connectthebatterywiringharnessandcontrollercon- nection.
13.Installthebatterybox(es).RefertoINSTALLING/REMOV- ING GROUP 24 BATTERY BOXES in PROCEDURE 9 of this manual.
14.Installthecounterweight.RefertoREMOVING/INSTALL- ING COUNTERWEIGHT in PROCEDURE 17 of this manual.
15.Install the front shroud. Refer to REMOVING/IN- STALLING FRONT SHROUD in PROCEDURE 17 of this manual.
Locknut | Top Mounting |
|
Screw and |
| |
|
| |
| Washer |
|
Base Frame |
|
|
| Spacer | Washer |
|
|
Mounting
Screw
Shock
Bottom Mounting | Controller | |
Screw | ||
|
FIGURE 2 - REMOVING/INSTALLING MKIV CONTROLLER - ARROW FWD MODEL
62
