PROCEDURE 6 | SEAT FRAME |
|
|
B.
S
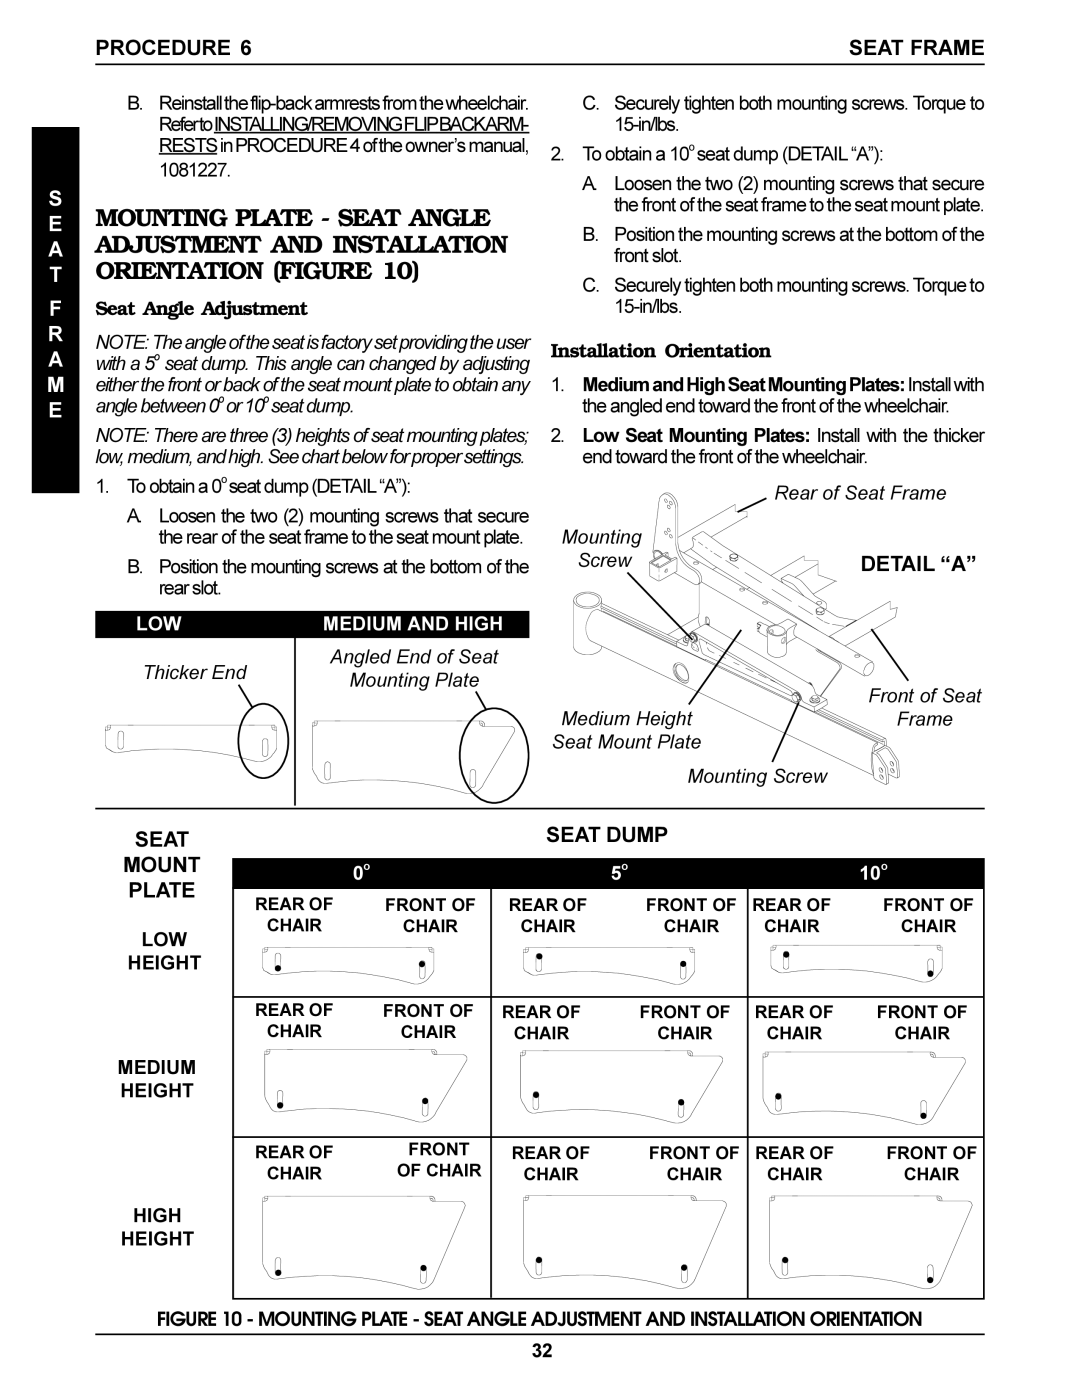
EMOUNTING PLATE - SEAT ANGLE
AADJUSTMENT AND INSTALLATION
TORIENTATION (FIGURE 10)
FSeat Angle Adjustment
RNOTE:Theangleoftheseatisfactorysetprovidingtheuser A with a 5o seat dump. This angle can changed by adjusting
M either the front or back of the seat mount plate to obtain any
Eangle between 0o or 10o seat dump.
NOTE: There are three (3) heights of seat mounting plates; low,medium,andhigh.Seechartbelowforpropersettings.
1.To obtain a 0o seat dump (DETAIL“A”):
A.Loosen the two (2) mounting screws that secure the rear of the seat frame to the seat mount plate.
B.Position the mounting screws at the bottom of the rear slot.
| LOW |
|
| MEDIUM AND HIGH |
| |
| Thicker End |
|
| Angled End of Seat |
| |
|
|
| Mounting Plate |
| ||
|
|
|
|
|
| |
|
|
|
|
|
|
|
|
|
|
|
|
|
|
|
|
|
|
|
|
|
|
|
|
|
|
|
|
|
|
|
|
|
|
|
C.Securely tighten both mounting screws. Torque to
2.To obtain a 10o seat dump (DETAIL “A”):
A.Loosen the two (2) mounting screws that secure the front of the seat frame to the seat mount plate.
B.Position the mounting screws at the bottom of the front slot.
C.Securely tighten both mounting screws. Torque to
Installation Orientation
1.MediumandHighSeatMountingPlates:Installwith the angled end toward the front of the wheelchair.
2.Low Seat Mounting Plates: Install with the thicker end toward the front of the wheelchair.
Rear of Seat Frame
Mounting
Screw | DETAIL “A” |
| Front of Seat |
Medium Height | Frame |
Seat Mount Plate |
|
Mounting Screw |
|
SEAT |
|
| SEAT DUMP |
|
| ||
MOUNT | o |
|
| o |
| o | |
PLATE | 0 |
|
| 5 |
| 10 | |
REAR OF | FRONT OF | REAR OF | FRONT OF | REAR OF | FRONT OF | ||
| |||||||
LOW | CHAIR | CHAIR | CHAIR | CHAIR | CHAIR | CHAIR | |
|
|
|
|
|
| ||
HEIGHT |
|
|
|
|
|
| |
| REAR OF | FRONT OF | REAR OF | FRONT OF | REAR OF | FRONT OF | |
| CHAIR | CHAIR | CHAIR | CHAIR | CHAIR | CHAIR | |
MEDIUM |
|
|
|
|
|
| |
HEIGHT |
|
|
|
|
|
| |
| REAR OF | FRONT | REAR OF | FRONT OF | REAR OF | FRONT OF | |
| CHAIR | OF CHAIR | CHAIR | CHAIR | CHAIR | CHAIR | |
HIGH |
|
|
|
|
|
| |
HEIGHT |
|
|
|
|
|
| |
FIGURE 10 - MOUNTING PLATE - SEAT ANGLE ADJUSTMENT AND INSTALLATION ORIENTATION
32
