OPERATION

WELDING SEQUENCE OF

OPERATION

WIRE LOADING

Refer to Figures 7 and 8.

The machine power switch should be turned to the OFF (“O”) position before working inside the wire feed enclosure.

The welder is shipped from the factory ready to feed 8" (200

mm)diameter spools with 2.2" (56 mm) maximum width. These spools fit on a 2" (51 mm) diameter spindle that has a built in, adjustable friction brake to prevent overrun of the spool and excess slack in the wire.

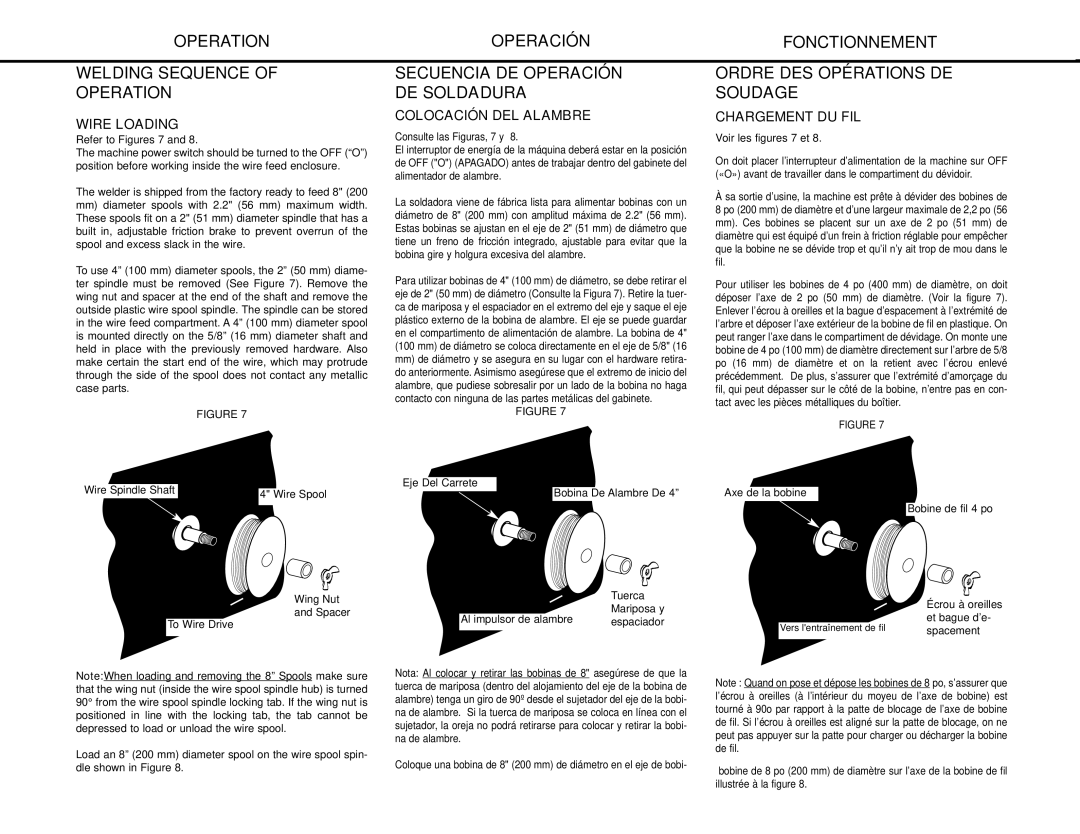
To use 4” (100 mm) diameter spools, the 2” (50 mm) diame- ter spindle must be removed (See Figure 7). Remove the wing nut and spacer at the end of the shaft and remove the outside plastic wire spool spindle. The spindle can be stored in the wire feed compartment. A 4” (100 mm) diameter spool is mounted directly on the 5/8” (16 mm) diameter shaft and held in place with the previously removed hardware. Also make certain the start end of the wire, which may protrude through the side of the spool does not contact any metallic case parts.

FIGURE 7

Wire Spindle Shaft

4" Wire Spool


Wing Nut

and Spacer

To Wire Drive

OPERACIÓN

SECUENCIA DE OPERACIÓN DE SOLDADURA

COLOCACIÓN DEL ALAMBRE

Consulte las Figuras, 7 y 8.

El interruptor de energía de la máquina deberá estar en la posición de OFF ("O") (APAGADO) antes de trabajar dentro del gabinete del alimentador de alambre.

La soldadora viene de fábrica lista para alimentar bobinas con un diámetro de 8" (200 mm) con amplitud máxima de 2.2" (56 mm). Estas bobinas se ajustan en el eje de 2" (51 mm) de diámetro que tiene un freno de fricción integrado, ajustable para evitar que la bobina gire y holgura excesiva del alambre.

Para utilizar bobinas de 4" (100 mm) de diámetro, se debe retirar el eje de 2" (50 mm) de diámetro (Consulte la Figura 7). Retire la tuer- ca de mariposa y el espaciador en el extremo del eje y saque el eje plástico externo de la bobina de alambre. El eje se puede guardar en el compartimento de alimentación de alambre. La bobina de 4" (100 mm) de diámetro se coloca directamente en el eje de 5/8" (16

mm)de diámetro y se asegura en su lugar con el hardware retira- do anteriormente. Asimismo asegúrese que el extremo de inicio del alambre, que pudiese sobresalir por un lado de la bobina no haga contacto con ninguna de las partes metálicas del gabinete.

FIGURE 7

Eje Del Carrete

Bobina De Alambre De 4”


Tuerca

Al impulsor de alambre

Mariposa y

espaciador

FONCTIONNEMENT

ORDRE DES OPÉRATIONS DE SOUDAGE

CHARGEMENT DU FIL

Voir les figures 7 et 8.

On doit placer l’interrupteur d’alimentation de la machine sur OFF («O») avant de travailler dans le compartiment du dévidoir.

Àsa sortie d’usine, la machine est prête à dévider des bobines de

8 po (200 mm) de diamètre et d’une largeur maximale de 2,2 po (56 mm). Ces bobines se placent sur un axe de 2 po (51 mm) de diamètre qui est équipé d’un frein à friction réglable pour empêcher que la bobine ne se dévide trop et qu’il n’y ait trop de mou dans le fil.

Pour utiliser les bobines de 4 po (400 mm) de diamètre, on doit déposer l’axe de 2 po (50 mm) de diamètre. (Voir la figure 7). Enlever l’écrou à oreilles et la bague d’espacement à l’extrémité de l’arbre et déposer l’axe extérieur de la bobine de fil en plastique. On peut ranger l’axe dans le compartiment de dévidage. On monte une bobine de 4 po (100 mm) de diamètre directement sur l’arbre de 5/8 po (16 mm) de diamètre et on la retient avec l’écrou enlevé précédemment. De plus, s’assurer que l’extrémité d’amorçage du fil, qui peut dépasser sur le côté de la bobine, n’entre pas en con- tact avec les pièces métalliques du boîtier.

FIGURE 7

Axe de la bobine

Bobine de fil 4 po


Écrou à oreilles

Vers l'entraînement de fil

et bague d’e-

spacement


Note:When loading and removing the 8” Spools make sure that the wing nut (inside the wire spool spindle hub) is turned 90° from the wire spool spindle locking tab. If the wing nut is positioned in line with the locking tab, the tab cannot be depressed to load or unload the wire spool.

Load an 8” (200 mm) diameter spool on the wire spool spin- dle shown in Figure 8.

Nota: Al colocar y retirar las bobinas de 8" asegúrese de que la tuerca de mariposa (dentro del alojamiento del eje de la bobina de alambre) tenga un giro de 90º desde el sujetador del eje de la bobi- na de alambre. Si la tuerca de mariposa se coloca en línea con el sujetador, la oreja no podrá retirarse para colocar y retirar la bobi- na de alambre.

Coloque una bobina de 8" (200 mm) de diámetro en el eje de bobi-

Note : Quand on pose et dépose les bobines de 8 po, s’assurer que l’écrou à oreilles (à l’intérieur du moyeu de l’axe de bobine) est tourné à 90o par rapport à la patte de blocage de l’axe de bobine de fil. Si l’écrou à oreilles est aligné sur la patte de blocage, on ne peut pas appuyer sur la patte pour charger ou décharger la bobine de fil.

bobine de 8 po (200 mm) de diamètre sur l’axe de la bobine de fil illustrée à la figure 8.

21

Page 21
Image 21
Lincoln Electric MIG-PAK 10 manual Operation Welding Sequence, Operación Secuencia DE Operación DE Soldadura

MIG-PAK 10 specifications

The Lincoln Electric MIG-PAK 10 is a versatile and user-friendly MIG welding machine tailored for light industrial applications and DIY enthusiasts. This compact welder is designed for both professionals and hobbyists, offering a perfect blend of performance and portability. It is particularly suitable for welding light to medium-gauge steel, stainless steel, and aluminum.

One of the standout features of the MIG-PAK 10 is its economy of size without compromising on power. Weighing in at just around 40 pounds, it is easily transportable, making it a practical choice for on-site jobs or small workshops. Its compact dimensions allow it to fit into tight spaces, facilitating accessibility for various welding tasks.

The MIG-PAK 10 employs a built-in gas solenoid that facilitates gas shielding for improved arc stability and weld quality. It is compatible with both shielding gas and flux-cored wire, offering flexibility depending on the application requirements and working environment. This dual capability is particularly beneficial for outdoor welding, where wind can disrupt gas shielding.

Lincoln Electric has integrated an adjustable output that offers a wide range of voltage settings, allowing users to fine-tune their settings for different materials and thicknesses. This feature, accompanied by a smooth and stable arc, contributes to high-quality welds and ease of operation.

Ease of use is further enhanced by the machine’s simple control panel, which features clear indicators and settings. Novice welders will appreciate the intuitive layout, while experienced users will value the precision controls for intricate tasks.

Another key technology utilized in the MIG-PAK 10 is Lincoln Electric’s professional-grade drive system, which ensures reliable wire feed performance. This system minimizes downtime and improves welding efficiency by reducing the chances of wire tangling or feeding issues.

Finally, the MIG-PAK 10 is constructed with durability in mind. Its robust casing is designed to withstand the rigors of welding environments, ensuring longevity and consistent performance.

In summary, the Lincoln Electric MIG-PAK 10 is a well-rounded MIG welder suitable for various welding needs. Its exceptional portability, dual wire feeding options, adjustable output, user-friendly controls, and sturdy construction make it a compelling choice for both beginners and professionals in the welding industry.