LEARNING TO WELD

APRENDIENDO A SOLDAR

APPRENTISSAGE DU SOUDAGE

When using the GMAW process on light gauge material, weld from right to left (if you are right handed). This results in a colder weld and has less tendency for burn through.

2.The Correct Way To Strike An Arc

1.Be sure the work clamp makes good electrical con- tact to the work.

2.Position gun over joint. End of wire may be lightly touching the work.

3.Position face shield to protect face and eyes, close gun trigger, and begin welding. Hold the gun so that the contact tip to work distance is about 3/8 to 1/2 inch (10 – 12 mm).

4.To stop welding, release the gun trigger and pull the gun away from the work after the arc goes out.

5.A ball may form at the tip end of the wire after weld- ing. For easier restrikes, the ball may be removed by feeding out a few inches of wire and cutting off the end of the wire with wire cutters.

6.When no more welding is to be done, close the valve on the gas cylinder, momentarily operate the gun trigger to release gas pressure, then turn off the machine.

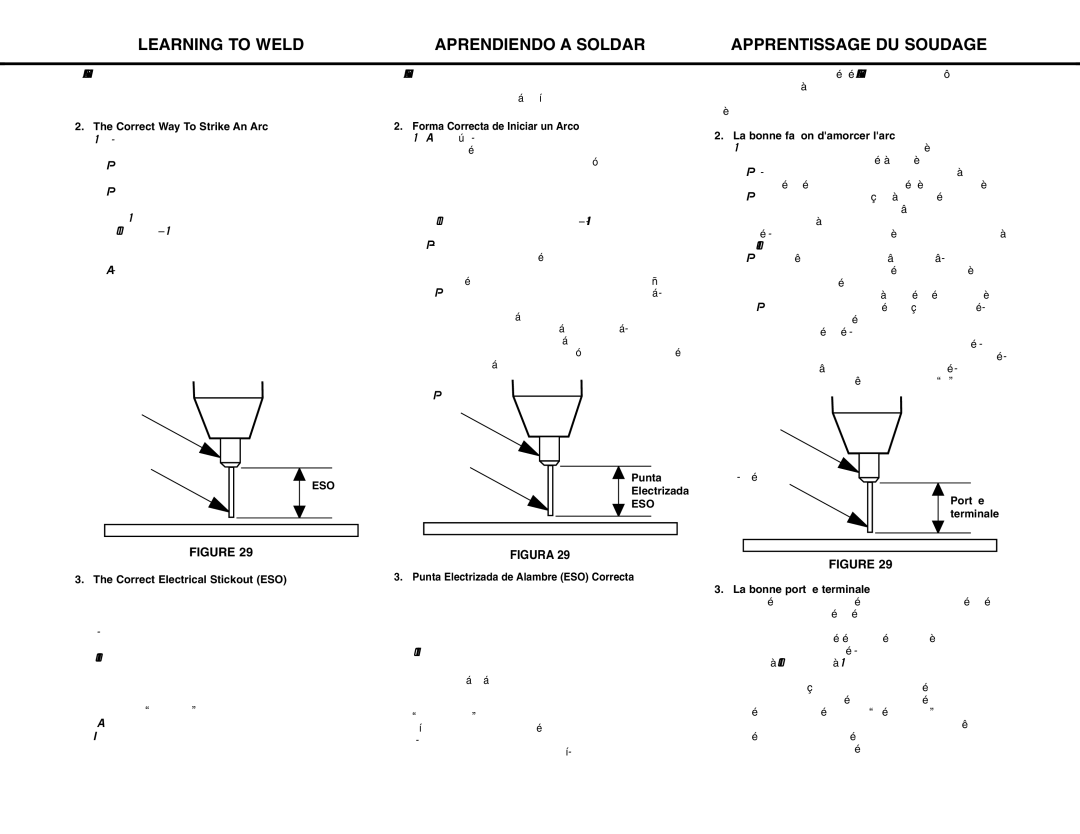
Contact Tip

Wire Electrode

ESO

Cuando se utiliza el proceso GMAW en un material delgado, suelde de derecha a izquierda (si es diestro). Esto da como resultado una soldadura más fría y disminuye las posibilidades de quemadura.

2.Forma Correcta de Iniciar un Arco

1.Asegúrese de que la pinza de trabajo haga buen con- tacto eléctrico con la pieza de trabajo.

2.Coloque la antorcha sobre la unión. El extremo del alambre puede tocar ligeramente el trabajo.

3.Use la careta para proteger su cara y los ojos, aplane el gatillo de la antorcha y comience a soldar. Sujete la antorcha de tal forma que la distancia entre la punta de contacto y el trabajo sea de 10 – 12 mm (3/8 a 1/2 pul- gadas) aproximadamente.

4.Para dejar de soldar, libere el gatillo y separe la antor- cha del trabajo después de que se haya apagado el arco.

5.Después de soldar, tal vez se forme una pequeña bola en la punta del alambre. Para inicios de arco más sen- cillos, la bola puede eliminarse desplazando un tramo de alambre y cortándolo con unas pinzas.

6.Cuando no vaya a soldar más, cierre la válvula del cilin- dro de gas, opere momentáneamente el gatillo de la antorcha para liberar la presión del gas, y después apague la máquina.

Punta de contacto

Electrodo


de alambre

Punta


Electrizada


ESO

Quand on utilise le procédé GMAW sur des tôles minces, souder de droite à gauche (pour les droitiers). On obtient ainsi une soudure plus froide et on risque moins de trouer la pièce.

2.La bonne façon d'amorcer l'arc

1.S'assurer que le connecteur de pièce (ou prise de masse) est bien connecté à la pièce.

2.Placer le pistolet au-dessus du joint à souder. L'extrémité du fil peut toucher légèrement la pièce.

3.Placer le masque de façon à se protéger le visage et les yeux, appuyer sur la gâchette du pistolet et commencer à souder. Tenir le pistolet de sorte que l'écartement tube contact-pièce soit d'environ 3/8 à 1/2 po (10-12 mm).

4.Pour arrêter le soudage, relâcher la gâchette du pis- tolet et tirer le pistolet pour l'éloigner de la pièce une fois que l'arc est éteint.

5.Une boule peut se former à l'extrémité du fil après le soudage. Pour faciliter le réamorçage on peut élimin- er cette boule en dévidant quelques pouces et en coupant l'extrémité du fil avec un coupe-fil.

6.Quand les travaux de soudage sont terminés, fer- mer le robinet de la bouteille, appuyer momentané- ment sur la gâchette du pistolet pour libérer la pres- sion du gaz, puis arrêter la machine (“O”).

Tube contact

Fil-électrode

Portée terminale

FIGURE 29

3.The Correct Electrical Stickout (ESO)

The electrical stickout (ESO) is the distance from the end of the contact tip to the end of the wire. See Figure 29.

Once the arc has been established, maintaining the cor- rect ESO becomes extremely important. The ESO should be approximately 3/8 to 1/2 inch (10 to 12 mm) long.

The easiest way to tell whether the ESO is the correct length is by listening to its sound. The correct ESO has a distinctive “crackling” sound, very much like eggs frying in a pan. A long ESO has a hollow, blowing or hissing sound. If the ESO is too short, you may stick the contact tip or nozzle to the weld puddle and/or fuse the wire to the contact tip.

FIGURA 29

3.Punta Electrizada de Alambre (ESO) Correcta

La punta electrizada de alambre (ESO) es la distancia que hay entre el extremo de la punta de contacto y el extremo del alambre. Vea la Figura 29.

Una vez que el arco se ha establecido, es muy importante mantener una punta de alambre ESO correcta. La distancia ESO debe ser de 10 a 12 mm de largo (3/8 a 1/2 pulgadas) aproximadamente.

La forma más fácil para saber si la punta de alambre ESO tiene la longitud correcta, es escuchando su sonido. Una punta de alambre ESO correcta tiene un sonido distintivo de “chisporroteo”, muy similar al que se produce cuando se fríen alimentos en una sartén. Una punta de alambre ESO larga tiene un sonido hueco o como de silbido. Si la distan- cia ESO es muy corta, usted podría colocar la punta de con- tacto o la tobera en el charco de soldadura, y/o fusionar el alambre con la punta de contacto.

FIGURE 29

3.La bonne portée terminale

La portée terminale est l'écartement entre l'extrémité du tube contact et l'extrémité du fil. Voir la figure 29.

Une fois que l'arc a été amorcé, il est très important de maintenir la bonne portée terminale. Elle doit faire envi- ron 3/8 à 1/2 po (10 à 12 mm) de longueur.

La meilleure façon de savoir si la portée terminale a la bonne longueur est d'écouter le son émis. La bonne portée terminale émet un “crépitement” distinctif, tout comme les oeufs que l'on fait frire dans une poêle. Une portée terminale longue émet un son creux, un souffle ou un sifflement. Si la portée terminale est trop courte le tube contact ou la buse peut coller dans le bain de fusion et/ou le fil peut fondre sur le tube contact.

41

Page 41
Image 41
Lincoln Electric MIG-PAK 10 manual Punta, Portée terminale Correct Electrical Stickout ESO

MIG-PAK 10 specifications

The Lincoln Electric MIG-PAK 10 is a versatile and user-friendly MIG welding machine tailored for light industrial applications and DIY enthusiasts. This compact welder is designed for both professionals and hobbyists, offering a perfect blend of performance and portability. It is particularly suitable for welding light to medium-gauge steel, stainless steel, and aluminum.

One of the standout features of the MIG-PAK 10 is its economy of size without compromising on power. Weighing in at just around 40 pounds, it is easily transportable, making it a practical choice for on-site jobs or small workshops. Its compact dimensions allow it to fit into tight spaces, facilitating accessibility for various welding tasks.

The MIG-PAK 10 employs a built-in gas solenoid that facilitates gas shielding for improved arc stability and weld quality. It is compatible with both shielding gas and flux-cored wire, offering flexibility depending on the application requirements and working environment. This dual capability is particularly beneficial for outdoor welding, where wind can disrupt gas shielding.

Lincoln Electric has integrated an adjustable output that offers a wide range of voltage settings, allowing users to fine-tune their settings for different materials and thicknesses. This feature, accompanied by a smooth and stable arc, contributes to high-quality welds and ease of operation.

Ease of use is further enhanced by the machine’s simple control panel, which features clear indicators and settings. Novice welders will appreciate the intuitive layout, while experienced users will value the precision controls for intricate tasks.

Another key technology utilized in the MIG-PAK 10 is Lincoln Electric’s professional-grade drive system, which ensures reliable wire feed performance. This system minimizes downtime and improves welding efficiency by reducing the chances of wire tangling or feeding issues.

Finally, the MIG-PAK 10 is constructed with durability in mind. Its robust casing is designed to withstand the rigors of welding environments, ensuring longevity and consistent performance.

In summary, the Lincoln Electric MIG-PAK 10 is a well-rounded MIG welder suitable for various welding needs. Its exceptional portability, dual wire feeding options, adjustable output, user-friendly controls, and sturdy construction make it a compelling choice for both beginners and professionals in the welding industry.