MAINTENANCE

MANTENIMIENTO

ENTRETIEN

5.To remove gun tube from gun, remove gas nozzle or gas- less nozzle and remove diffuser from gun tube. Remove both collars from each end of the gun handle and sepa- rate the handle halves. Loosen the locking nut holding the gun tube in place against the gun end cable connec- tor. Unscrew gun tube from cable connector. To install gun tube, screw the locking nut on the gun tube as far as possible. Then screw the gun tube into the cable con- nector until it bottoms. Then unscrew (no more than one turn) the gun tube until its axis is perpendicular to the flat sides of the cable connector and pointed in the direction of the trigger. Tighten the locking nut so as to maintain the proper relationship between the gun tube and the cable connector. Replace the gun handle, trigger and dif- fuser. Replace the gas nozzle or gasless nozzle.

5.Para retirar el tubo de la antorcha de la misma, retire la tobera de gas o la tobera simple y retire el difusor del tubo de la antorcha. Retire los dos collarines de cada extremo de la manija dela antorcha y sepárela por la mitad. Afloje la tuerca de sujeción que sujeta el tubo de la antorcha contra la antorcha y el cable del conector. Destornille el tubo de la antorcha del conector del cable. Para instalar el tubo de la antorcha, atornille la tuerca de seguridad en el tubo de la antorcha tan lejos como sea posible. Después atornille el tubo de la antorcha dentro del conector del cable hasta el tope. Posteriormente, destonrille el tubo de la antorcha (no más de una vuelta) hasta que el eje quede perpendicular en ralación con los laterales planos del conector del cable y apuntando hacia el gatillo. Apriete la tuerca de sujeción de manera tal que mantenga una relación adecuada entre el tubo de la antorcha y el conector del cable. Reemplace la manija de la antorcha, el gatillo y el difusor. Reemplace la tobera de gas y la tobera simple.

5.Pour enlever le tube du pistolet du pistolet, enlever la buse de gaz ou la buse sans gaz et enlever le diffuseur du tube du pistolet. Enlever les deux colliers de chaque extrémité de la poignée du pistolet et séparer les moitiés de la poignée. Desserrer l'écrou de blocage qui main- tient le tube du pistolet contre le pistolet et le connecteur de câble. Dévisser le tube du pistolet du connecteur de câble. Pour monter le tube du pistolet, visser à fond l'écrou de blocage sur le tube du pistolet. Puis visser le tube du pistolet dans le connecteur de câble jusqu'à ce qu'il soit bien enfoncé. Puis dévisser (un tour au maxi- mum) le tube du pistolet jusqu'à ce que son axe soit per- pendiculaire aux côtés plats du connecteur de câble en direction de la gâchette. Serrer l'écrou de blocage pour que le tube du pistolet et le connecteur du câble soient bien en contact. Replacer la poignée du pistolet, la gâchette et le diffuseur. Replacer la buse de gaz ou la buse sans gaz.

CONFIGURATION OF

CONFIGURACION DE LOS

CONFIGURATION DES COM-

COMPONENTS IN WIRE

COMPONENTES DEL SISTEMA

POSANTS

FEEDING SYSTEM

DE ALIMENTACION DE

DANS LE SYSTÈME DE


ALAMBRE


DÉVIDAGE


Contact Tip

Cable Liner

Drive Roll


Punta de Contacto

Guía de Alambre

Rodillo Impulsor


Components shipped with

S19726-1

M16291-6

KP665-035


MIG-PAK 10•

.025” (0.6mm)

.030” - .035”

2 Smooth grooves/ranuras Lisas


Componentes enviados


(0.8 - 0.9 mm)

Small/Pequeño .023-.025” (Side/Lado Bisel)


con la MIG PAK 10


Large/Grande .030-.035”


Innershield Conversion Kit

S19726-3

M16291-6

Use Large groove of KP665-035 or


K549-1 .035” (0.9 mm)

.035A (0.9 mm)

.030” - .035”

either groove of KP665-045C


Juego de Conversión Innershield


(0.8 - 0.9 mm)

Uso de KP665-035 o de KP665-045C


Aluminum or Stainless Kit*

S24221-1

M1897-1

M19631


K664-2 .035 (0.9mm)

.035A (0.9mm)

(.035” - 0,9 mm)


Juego de Acero Aluminio


If .030 Solid wire feeding is desired obtain an S19726-2 Contact Tip.

*It is important when changing between welding with steel wire and aluminum to exchange feeding components due to the lubricant applied to steel wire. Failure to do so may result in contaminated welds when welding aluminum.

Si se alimenta electrodo tubular de .030 se recomienda obtener una punta de contacto S19726-2.

*Es importante que al cambiar entre soldadura con alambre o alu- minio, intercambiar los componentes de alimentación debido al lubri- cante utilizado para el alambre de acero. El no hacer podría resultar en soldadura contaminadas.

Pour dévider le fil plein de 0,030 Ø se procurer un tube contact S19726-2.

*Quand on remplace le fil en acier par le fil en aluminium il est important de rem- placer également ces composants en raison du lubrifiant qui est appliqué sur le fil en aluminium. Sinon, les soudures sur l'aluminium peuvent être contaminées.

51

Page 51
Image 51
Lincoln Electric MIG-PAK 10 Maintenance, Entretien, Contact Tip Cable Liner Drive Roll, Rodillo Impulsor, Guía de Alambre

MIG-PAK 10 specifications

The Lincoln Electric MIG-PAK 10 is a versatile and user-friendly MIG welding machine tailored for light industrial applications and DIY enthusiasts. This compact welder is designed for both professionals and hobbyists, offering a perfect blend of performance and portability. It is particularly suitable for welding light to medium-gauge steel, stainless steel, and aluminum.

One of the standout features of the MIG-PAK 10 is its economy of size without compromising on power. Weighing in at just around 40 pounds, it is easily transportable, making it a practical choice for on-site jobs or small workshops. Its compact dimensions allow it to fit into tight spaces, facilitating accessibility for various welding tasks.

The MIG-PAK 10 employs a built-in gas solenoid that facilitates gas shielding for improved arc stability and weld quality. It is compatible with both shielding gas and flux-cored wire, offering flexibility depending on the application requirements and working environment. This dual capability is particularly beneficial for outdoor welding, where wind can disrupt gas shielding.

Lincoln Electric has integrated an adjustable output that offers a wide range of voltage settings, allowing users to fine-tune their settings for different materials and thicknesses. This feature, accompanied by a smooth and stable arc, contributes to high-quality welds and ease of operation.

Ease of use is further enhanced by the machine’s simple control panel, which features clear indicators and settings. Novice welders will appreciate the intuitive layout, while experienced users will value the precision controls for intricate tasks.

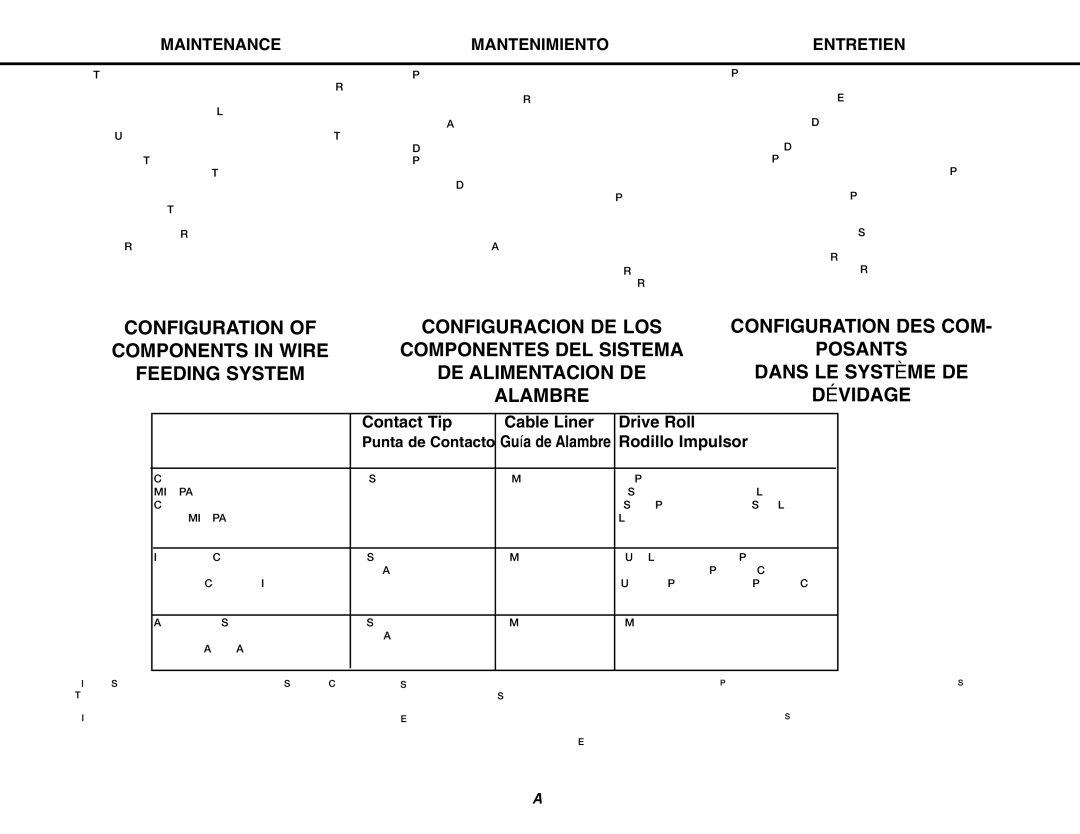
Another key technology utilized in the MIG-PAK 10 is Lincoln Electric’s professional-grade drive system, which ensures reliable wire feed performance. This system minimizes downtime and improves welding efficiency by reducing the chances of wire tangling or feeding issues.

Finally, the MIG-PAK 10 is constructed with durability in mind. Its robust casing is designed to withstand the rigors of welding environments, ensuring longevity and consistent performance.

In summary, the Lincoln Electric MIG-PAK 10 is a well-rounded MIG welder suitable for various welding needs. Its exceptional portability, dual wire feeding options, adjustable output, user-friendly controls, and sturdy construction make it a compelling choice for both beginners and professionals in the welding industry.