OPERATION

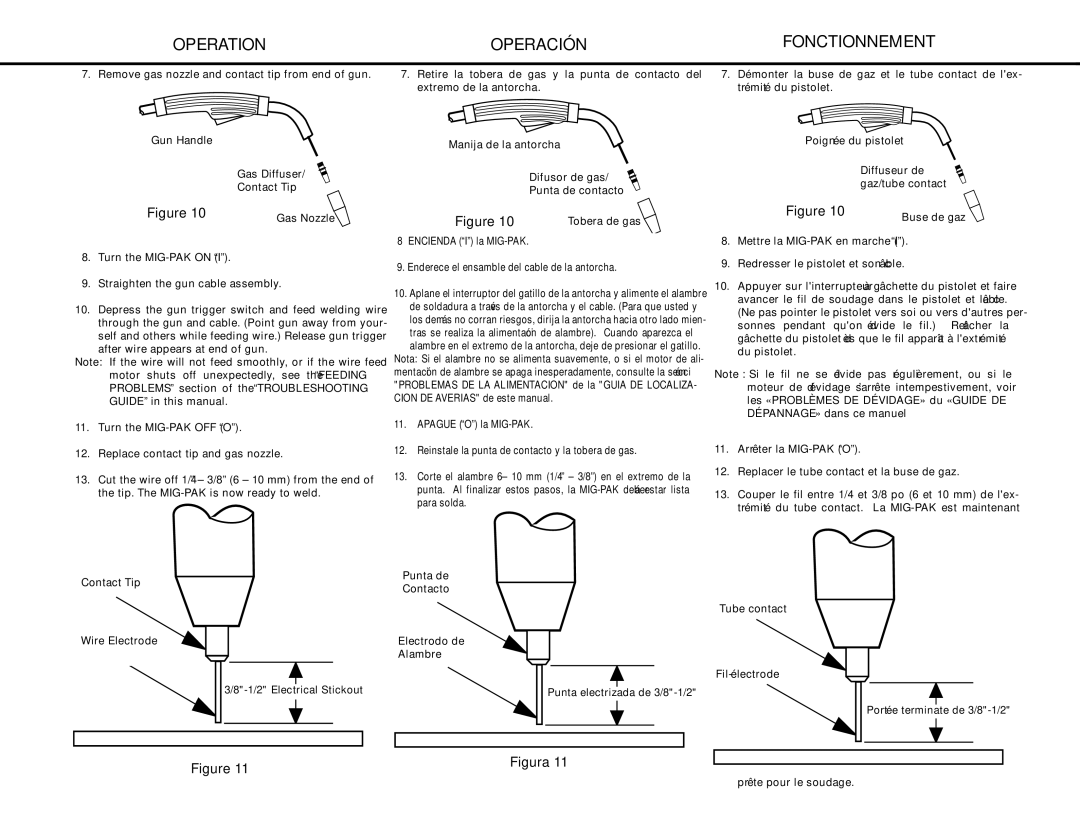
7. Remove gas nozzle and contact tip from end of gun.

OPERACIÓN

FONCTIONNEMENT

7. Retire la tobera de gas y la punta de contacto del

7. Démonter la buse de gaz et le tube contact de l'ex-

extremo de la antorcha.

trémité du pistolet.

Gun Handle

Gas Diffuser/

Contact Tip

Figure 10

Gas Nozzle


8.Turn the MIG-PAK ON (“I”).

9.Straighten the gun cable assembly.

10.Depress the gun trigger switch and feed welding wire through the gun and cable. (Point gun away from your- self and others while feeding wire.) Release gun trigger after wire appears at end of gun.

Note: If the wire will not feed smoothly, or if the wire feed motor shuts off unexpectedly, see the “FEEDING PROBLEMS” section of the “TROUBLESHOOTING GUIDE” in this manual.

11.Turn the MIG-PAK OFF (“O”).

12.Replace contact tip and gas nozzle.

13.Cut the wire off 1/4” – 3/8” (6 – 10 mm) from the end of the tip. The MIG-PAK is now ready to weld.

Contact Tip

Wire Electrode

3/8"-1/2" Electrical Stickout

Manija de la antorcha

Difusor de gas/

Punta de contacto

Figure 10

Tobera de gas


8 ENCIENDA (“I”) la MIG-PAK.

9. Enderece el ensamble del cable de la antorcha.

10.Aplane el interruptor del gatillo de la antorcha y alimente el alambre de soldadura a través de la antorcha y el cable. (Para que usted y los demás no corran riesgos, dirija la antorcha hacia otro lado mien- tras se realiza la alimentación de alambre). Cuando aparezca el alambre en el extremo de la antorcha, deje de presionar el gatillo.

Nota: Si el alambre no se alimenta suavemente, o si el motor de ali- mentación de alambre se apaga inesperadamente, consulte la sección "PROBLEMAS DE LA ALIMENTACION" de la "GUIA DE LOCALIZA- CION DE AVERIAS" de este manual.

11.APAGUE (“O”) la MIG-PAK.

12.Reinstale la punta de contacto y la tobera de gas.

13.Corte el alambre 6 – 10 mm (1/4” – 3/8”) en el extremo de la punta. Al finalizar estos pasos, la MIG-PAK deberá estar lista para solda.

Punta de

Contacto

Electrodo de

Alambre

Punta electrizada de 3/8"-1/2"

Poignée du pistolet

Diffuseur de gaz/tube contact

Figure 10

Buse de gaz


8.Mettre la MIG-PAK en marche (“I”).

9.Redresser le pistolet et son câble.

10.Appuyer sur l'interrupteur à gâchette du pistolet et faire avancer le fil de soudage dans le pistolet et le câble. (Ne pas pointer le pistolet vers soi ou vers d'autres per-

sonnes pendant qu'on dévide le fil.) Relâcher la gâchette du pistolet dès que le fil apparaît à l'extrémité du pistolet.

Note : Si le fil ne se dévide pas régulièrement, ou si le moteur de dévidage s’arrête intempestivement, voir les «PROBLÈMES DE DÉVIDAGE» du «GUIDE DE DÉPANNAGE» dans ce manuel

11.Arrêter la MIG-PAK (“O”).

12.Replacer le tube contact et la buse de gaz.

13.Couper le fil entre 1/4 et 3/8 po (6 et 10 mm) de l'ex- trémité du tube contact. La MIG-PAK est maintenant

Tube contact

Fil-électrode

Portée terminate de 3/8"-1/2"

Figure 11

Figura 11


prête pour le soudage.

24

Page 24
Image 24
Lincoln Electric MIG-PAK 10 manual Operación Fonctionnement, Remove gas nozzle and contact tip from end of gun

MIG-PAK 10 specifications

The Lincoln Electric MIG-PAK 10 is a versatile and user-friendly MIG welding machine tailored for light industrial applications and DIY enthusiasts. This compact welder is designed for both professionals and hobbyists, offering a perfect blend of performance and portability. It is particularly suitable for welding light to medium-gauge steel, stainless steel, and aluminum.

One of the standout features of the MIG-PAK 10 is its economy of size without compromising on power. Weighing in at just around 40 pounds, it is easily transportable, making it a practical choice for on-site jobs or small workshops. Its compact dimensions allow it to fit into tight spaces, facilitating accessibility for various welding tasks.

The MIG-PAK 10 employs a built-in gas solenoid that facilitates gas shielding for improved arc stability and weld quality. It is compatible with both shielding gas and flux-cored wire, offering flexibility depending on the application requirements and working environment. This dual capability is particularly beneficial for outdoor welding, where wind can disrupt gas shielding.

Lincoln Electric has integrated an adjustable output that offers a wide range of voltage settings, allowing users to fine-tune their settings for different materials and thicknesses. This feature, accompanied by a smooth and stable arc, contributes to high-quality welds and ease of operation.

Ease of use is further enhanced by the machine’s simple control panel, which features clear indicators and settings. Novice welders will appreciate the intuitive layout, while experienced users will value the precision controls for intricate tasks.

Another key technology utilized in the MIG-PAK 10 is Lincoln Electric’s professional-grade drive system, which ensures reliable wire feed performance. This system minimizes downtime and improves welding efficiency by reducing the chances of wire tangling or feeding issues.

Finally, the MIG-PAK 10 is constructed with durability in mind. Its robust casing is designed to withstand the rigors of welding environments, ensuring longevity and consistent performance.

In summary, the Lincoln Electric MIG-PAK 10 is a well-rounded MIG welder suitable for various welding needs. Its exceptional portability, dual wire feeding options, adjustable output, user-friendly controls, and sturdy construction make it a compelling choice for both beginners and professionals in the welding industry.