Operating Instructions
Important Information
Table of Contents
Advanced Features
Basic Operations
Table of Contents
Network Features
Problem Solving
Troubleshooting 139
Print out Journals and Lists
Appendix
Memo
Safety Information
Manufacturers name and address Factory ID
Safety Information
Important Safety Instructions
Precaution
Function Key
Any function can be started by first pressing
External View
Control Panel
LCD Display
Control Panel
Used to start Abbreviated Dialing. See page 49
Main Unit and Accessories
Installing the Accessories
Installing the Toner Cartridge
Remove the protective seal
Push the Release Button to open the Printer Cover
Installing the Toner Cartridge
Paper Specifications
How to Load the Recording Paper
Loading the Recording Paper
Loading the Recording Paper
Power Cord
Telephone Line Cable
Connecting the Telephone Line Cable and Power Cord
Power Switch
External Telephone Optional
Setting the Dialing Method Tone or Pulse
For Pulse For Tone
Adjusting the Volume
Setting the Monitor Volume
Setting the Ringer Volume
You will hear the dial tone through the speaker
Setting the Date and Time
User Parameters
General Description
Setting Your Logo
User Parameters
Setting Your Character ID
Setting Your ID Number Fax Telephone Number
201 555
One-Touch/Abbreviated Dialing Numbers
Entering One-Touch/Abbreviated Dialing Numbers
Pause 5 5 5 Space 1 2 3
One-Touch/Abbreviated Dialing Numbers
001 to
Enter the telephone number
Up to 36 digits including pauses and spaces
To change the settings of a One-Touch/ABBR dialing number
Editing One-Touch/Abbreviated Dialing Numbers
Then enter a new station name. See Note
To erase the settings of One-Touch/ABBR Dialing number
Printing Out a Directory Sheet
Your machine prints out the directory sheet
Setting the Fax Parameters
Customizing Your Machine
For Contrast
For Lighter
Parameter Setting Comments Number
Customizing Your Machine
Fax Parameter Table
On the next
Access Code
Print Collation
Loading Documents
Documents You Can Send
Documents You Cannot Send
You must never try to send documents that are
How to Load Documents
Loading Documents
Basic Transmission Settings
Resolution
Contrast
Basic Transmission Settings
Halftone
Verification Stamp
Communication Journal COMM. Journal
For OFF For on Always print out For Incomplete only
Sending Documents
Memory Transmission
Store document Memory Transmit
Receive
Sending Documents
Store * Completed Total PAGES=005 30%
Manual Number Dialing
Make sure that the Memory lamp is on
One-Touch Dialing
If not, press On. Memory Press a One-Touch key
To set On
Abbreviated Dialing
If not, press On
Press Then enter a 3-digit code
Directory Search Dialing
If not, press On. Memory to set On
Multi-Station Transmission Broadcasting
After each
Station is entered For details, see page 47 to 50. Ex
Then starts dialing the telephone numbers in sequence
Direct Transmission
Manual Number Dialing Direct Transmission
Your machine starts to dial the telephone number
One-Touch Dialing Direct Transmission
Abbreviated Dialing Direct Transmission
Make sure that the lamp goes off
Press a One-Touch key
Directory Search Dialing Direct Transmission
Full number e.g will be dialed
Voice Mode Transmission
Off-Hook Dialing
Hang up the handset
When you hear a beep
On-Hook Dialing
You will hear dial tone through the monitor speaker
Dial the telephone number from the keypad
Transmission Reservation
Memory Transmission Reservation Multi-tasking
Your machine will store the documents into memory
Dial by using any one of the following methods
To reserve your machine for sending the urgent documents
Your machine is on-line, the on Line lamp is blinking or
Printing received documents
Then remove the document from ADF
Redialing
Automatic Redialing
Manual Redialing
To redial the last dialed number through memory
Receiving Documents
Automatic Reception
Manual Reception
Selecting the Print Reduction Mode
Receiving Documents
Print Reduction
Automatic Reduction
Receiving Oversize Documents
Transmitted Document Received Document
Print Collation Mode
Substitute Memory Reception
Making Copies
Enter the number of copies
Ex 1
Machine stores the document, then prints the copies
Delayed Batch Transmission
Batch Transmission
Real-time Batch Transmission
Timer Controlled Communications
Deferred Transmission
Station is entered For details, see page 47 to
To store documents into the memory
Timer Controlled Communications
Enter a 4-digit polling password
Deferred Polling
Setting the Polling Password
To set the polling password, follow the steps below
Polling
Enter a 4-digit polling password. See Note Ex 4 3 2
Polling
Preparing to be Polled
Documents will be stored into memory
Enter a 4-digit polling password. See Note Ex 1 1 1
To Poll Documents from Another Station
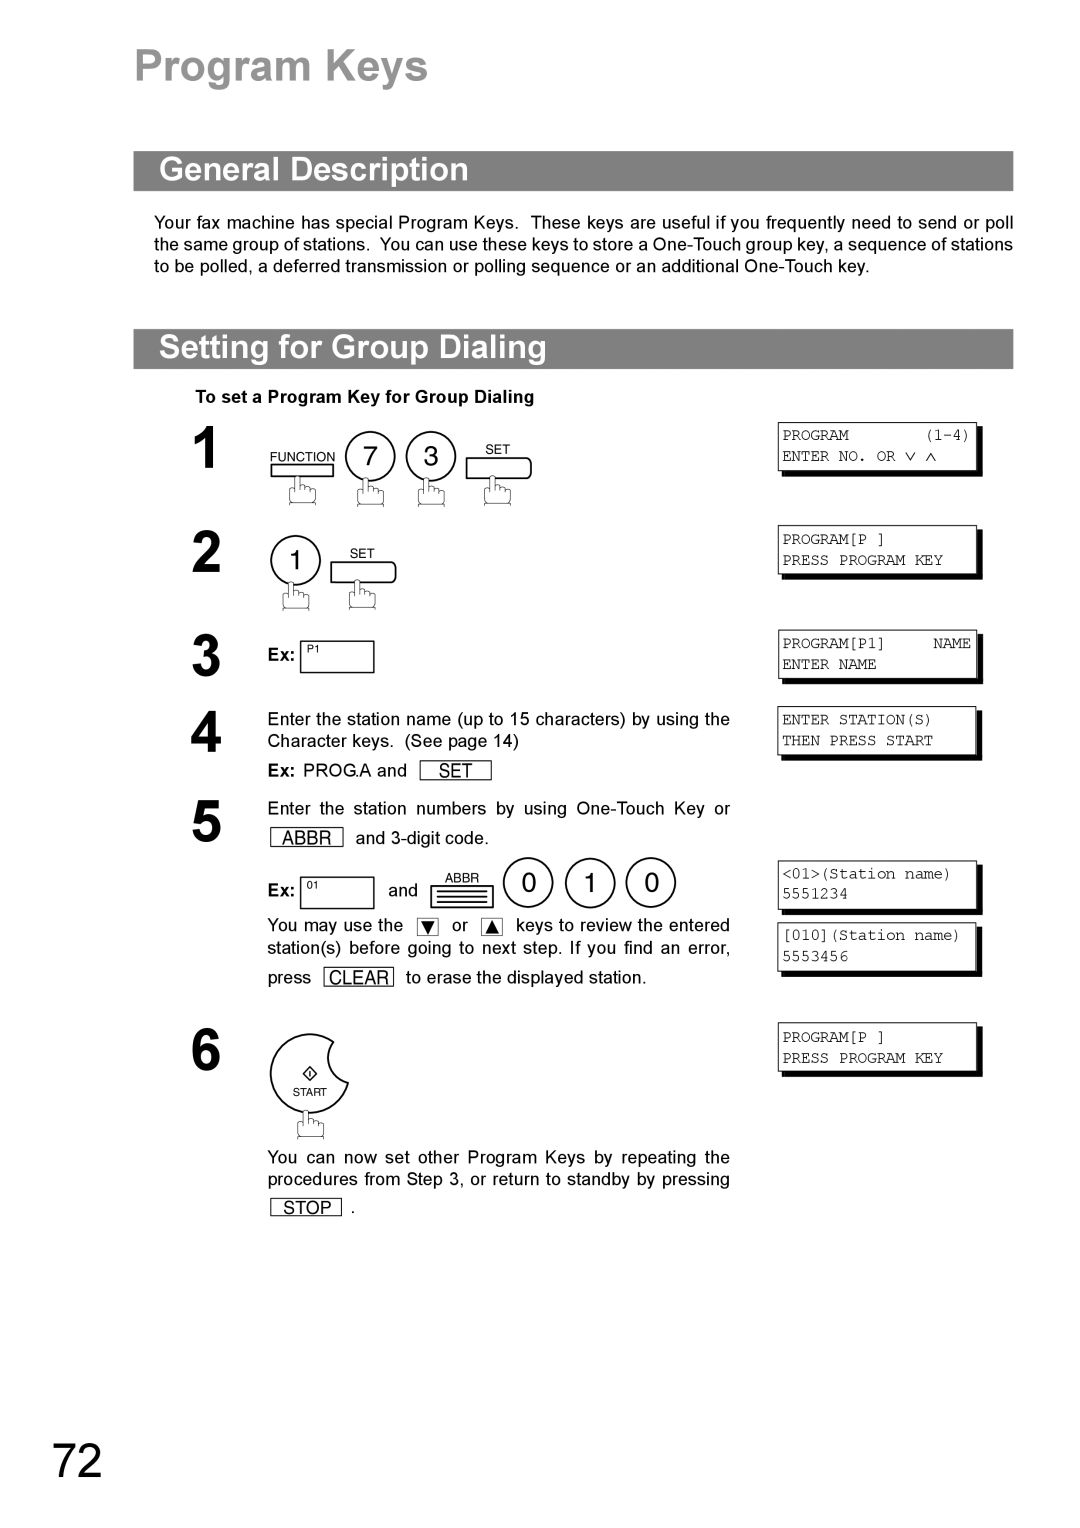
Setting for Group Dialing
Program Keys
To set a Program Key for Group Dialing
Setting for Deferred Transmission
Enter the starting time using 4 digits 1130 p.m.
Program Keys
To set a Program Key for deferred transmission
Setting for Deferred Polling
To set a Program Key for deferred polling
Character keys. See
Setting for Normal Polling
To set a Program Key for normal polling
SET
Setting for One-Touch Key
To set a Program Key for One-Touch Key
Enter a telephone number up to 36 digits including
Pauses and spaces
Changing or Erasing the Program Key Settings
To erase the settings in a Program Key
Procedures from , or return to standby by pressing
Press the Program key you want to erase
Edit File Mode
Explanation of Contents
Printing a File List
Sample File List
Viewing the Contents of a File List
Changing the Start Time or the Station of a File
Enter the file number or use that you want to change Ex 0 0
See Note To select the file
Features
Deleting a File
To delete the file in memory, follow the steps below
Printing Out a File
Adding Documents into a File
Your machine will start storing the documents into a file
Retry an Incomplete File
Access Code
Setting the Access Code
Access Code
Enter the Access Code Ex 1 2 3
Enter a 4-digit Access Code Ex 1 2 3
Now you can operate the machine normally
Setting the RCV To Memory Password
Setting RCV To Memory
Enter a 4-digit RCV to Memory Password
Receive To Memory
Receive To Memory
Printing Out Documents
To print the document, follow the steps below
Machine will start to print the documents
Distinctive Ring Detector DRD
Telephone No Usage Distinctive Ring Sound Ring Pattern
Fax Cover Sheet
To use the Fax Cover Sheet
Dial the stations you wish to send the documents to
Fax Cover Sheet
Fax Cover Sheet Sample
PIN Code Access
Selecting the Access Method Prefix or Suffix
For suffix code For prefix code
PIN Code Access
Dialing with a PIN Code
If you want to confirm the number of stations you have
Entered, press
Setting Fax Forward
Fax Forward
File Transmission
Storing the Documents
File Transmission
Sending the Stored Documents
To send the stored documents, follow the steps below
Deleting the Stored Documents
Printing the Stored Documents
To delete the stored documents, follow the steps below
To print the stored documents, follow the steps below
Department Code
Setting the Department Code
100
Department Code
Ex P
101
Changing or Erasing the Department Code
Then enter a new Department Code Ex 5 6 7
102
LOGO/DEPT. Name
103
Sending Document with Department Code
Enter a 4-digit Department Code Ex 1 2 3
104
Printing a Department Code List
105
106
Printing a Department Code Journal
Sample Department Code Journal / Originated Calls
107
Sample Department Code Journal / Received Calls
Setting the Multiple Logo
108
Multiple Logo
109
Multiple Logo
Changing or Erasing the Multiple Logo
110
Sending Document with Multiple Logo
111
Printing a Multiple Logo List
Setting the Selective Reception
112
Selective Reception
Password Communications
Model Special Settings
113
Compatibility with Other Machines
Password Communications
Setting Password Transmission
114
Setting Password Reception
To set receiving password and parameter
For OFF password is not checked For on password is checked
115
Using Password Transmission
116
Using Password Reception
117
118
Confidential Mailbox
Confidential Mailbox
Compatibility with Other Machines
119
Confidential Mailbox
Enter a 4-digit Confidential Code Ex 2 2 3
120
121
Receiving a Confidential Document to Your Machines Mailbox
Sample CONF. RCV Report
122
Storing a Confidential Document in Your Machines Mailbox
123
Machine will print out the confidential documents
To delete a file using Confidential Code
124
Enter a 4-digit Confidential Code
To delete all confidential files in memory
Setting of Routing, Forwarding or Relaying
125
Sub-Addressing
Compatibility with Other Machines
126
Sub-Addressing
Enter the station name
Using One-Touch/ABBR. Number Dialing
Using Manual Number Dialing
127
To send a Document with Sub-address
128
Journals and Lists
Transaction Journal
129
Journals and Lists
Individual Transmission Journal IND. XMT Journal
130
Sample Transaction Journal
Sample Individual Transmission Journal IND. XMT Journal
131
132
Sample COMM. Journal
133
134
One-Touch/Abbreviated and Directory Search List
For One-Touch/ABBR. Number List
For Directory Search List
135
Sample One-Touch List
Sample ABBR. Number List
136
Sample Directory Search List
137
Program List
Sample Program List
138
FAX Parameter List
Sample FAX Parameter List
Troubleshooting
If You Have Any of These Problems
Mode Symptom Cause / Action
139
Troubleshooting
140
141
Information Codes
Info Meaning Action Code
142
143
144
Clearing a Recording Paper Jam
To clear the jam, Info. Code 001, 002, 003
To clear the jam, Info. Code
145
Clearing a Document Jam
To clear the jam
Open the ADF Door Remove the jammed document
Cleaning the Document Scanning Area
To clean the Scanning Area
146
Open the ADF Door
Cleaning the Printer Roller
To clean the Printer Rollers
147
Adjusting the Automatic Document Feeder ADF
To adjust the ADF
148
Position Condition
149
To remove the stamp
Replacing the Lithium Battery
To replace the battery, follow the procedure below
150
151
Checking the Telephone Line
Specifications
152
Horizontal Vertical
Specifications
153
154
Recording Paper Specifications
155
156
Options and Supplies
Please contact your local Panasonic dealer for availability
Options Order No Picture Description
157
Options and Supplies
Supplies Order No Picture Description
158
159
FCC Notice for User in USA
Example of Header Format LOGO, ID Number setting
160
FCC Notice for User in USA
161
162
Avis
Glossary
ADF
164
Glossary
165
166
ITU-T Image No
167
168
Index
155
157
169
Warranty
For Service, Call