■Connections
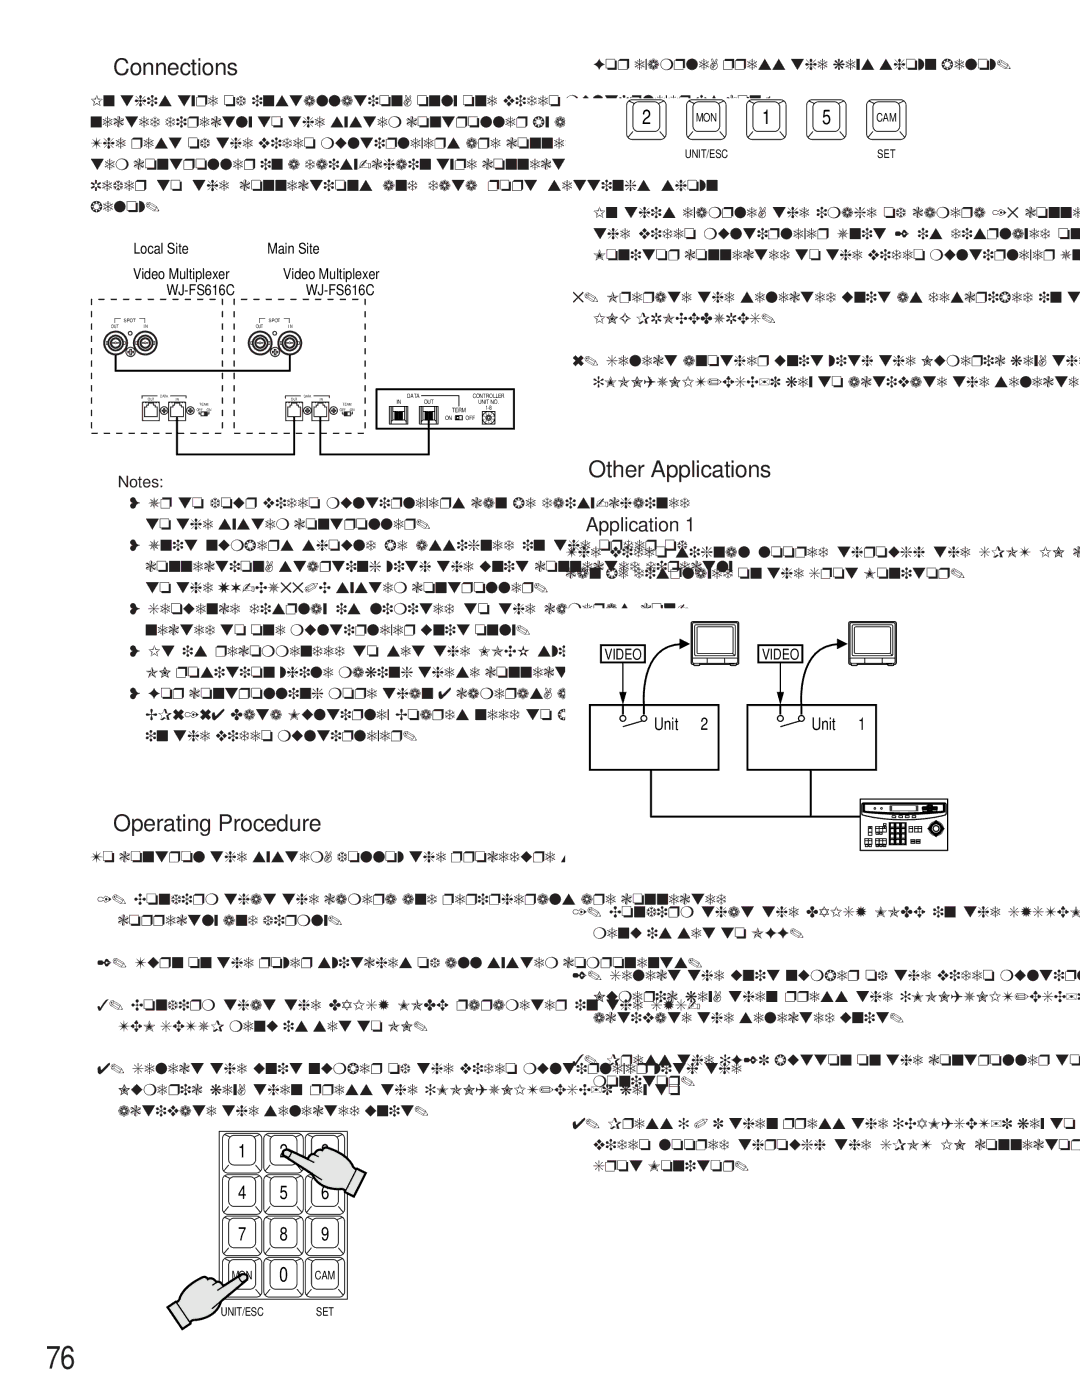
In this type of installation, only one video multiplexer is con- nected directly to the system controller by a control cable. The rest of the video multiplexers are connected to the sys- tem controller in a
Refer to the connections and data port settings shown below.
| Local Site |
| Main Site |
|
|
|
|
|
| ||
| Video Multiplexer |
| Video Multiplexer |
|
|
|
|
|
| ||
|
|
|
|
|
|
|
|
|
| ||
| SPOT |
|
| SPOT |
|
|
|
|
|
|
|
OUT | I N |
| OUT | I N |
|
|
|
|
|
|
|
| OUT | DATA |
| OUT | DATA |
| DATA | CONTROLLER | |||
| IN |
| IN | IN | OUT |
| UNIT NO. | ||||
|
| TEAM. |
|
| TEAM. |
| |||||
|
| OFF ON |
|
| OFF ON |
| TERM | 9 | 0 | 1 | |
|
|
|
|
|
|
| |||||
|
|
|
|
|
|
| ON | OFF | 8 |
| 2 |
|
|
|
|
|
|
| 7 |
| 3 | ||
|
|
|
|
|
|
|
|
| 6 | 5 | 4 |
For example, press the keys shown below.
2 | MON | 1 | 5 | CAM |
| UNIT/ESC |
|
| SET |
In this example, the image of camera 15 connected to the video multiplexer Unit 2 is displayed on the Spot Monitor connected to the video multiplexer Unit 1.
5.Operate the selected unit as described in the OPERAT-
ING PROCEDURES.
6.Select another unit with the Numeric key, then press the [MON(UNIT/ESC)] key to activate the selected unit.
Notes:
•Up to four video multiplexers can be
•Unit numbers should be assigned in the order of connection, starting with the unit connected directly to the
•Sequence display is limited to the cameras con- nected to one multiplexer unit only.
•It is recommended to set the LOCK switch to the ON position while making these connections.
•For controlling more than 4 cameras, additional WV- BP6164 Data Multiplex Boards need to be installed in the video multiplexer.
■Other Applications
●Application 1
The video signal looped through the SPOT IN connector can be displayed on the Spot Monitor.
VIDEO | VIDEO |
Unit 2 | Unit 1 |
■Operating Procedure
To control the system, follow the procedure shown below.
1.Confirm that the camera and peripherals are connected correctly and firmly.
2.Turn on the power switches of all system components.
3.Confirm that the DAISY MODE parameter in the SYS- TEM SETUP menu is set to ON.
4.Select the unit number of the video multiplexer with the Numeric key, then press the [MON(UNIT/ESC)] key to activate the selected unit.
1 2 3
4 5 6
7 8 9
MON 0 CAM
UNIT/ESC SET
1.Confirm that the DAISY MODE in the SYSTEM SETUP menu is set to OFF.
2.Select the unit number of the video multiplexer with the Numeric key, then press the [MON(UNIT/ESC)] key to activate the selected unit.
3.Press the [F2] button on the controller to select the spot monitor.
4.Press [ 0 ] then press the [CAM(SET)] key to display the video looped through the SPOT IN connector on the Spot Monitor.
76
