System Administrators Guide
Canadian D.O.C. Warning
Table of Contents
Restricting Data Types by Character
Recording Batch Information
Using Check Digits
Editing and Reviewing Formats
Printing
11-1
Establishing Daily Procedures 10-1
Quick References 12-1
Diagnostics 13-1
Appendix D. Format Design Tools
Appendix C. Printable Characters
Viii
About this Manual
Introduction
Equipment Requirements
What is a Format?
Standard features
Format Name
Standard Formats
9401/9402 System Administrators Guide
How to Use this Manual
Chapter Description
Checking for Optional Formats
Set B Format Name
Set a Format Name
Setting the Administrator Password
Format Worksheet
Designing a Format
Format Design Tools
Supply Layout Grids
Steps to Designing a Format
Determining Format Contents
Graphics
Overlays
Constant Text Overlays
Lines and Boxes
Field Options
Check Digits
Incrementing/Decrementing Fields
Date/Time Fields
Unit Supply Size Maximum Print Area Measure
Print Area
Draw Rough Sketches
Type Examples
Filling in the Format Worksheet
Defining the Format Header
Supply Length
English 075 Metric 190 Dots144
System Units Example
Defining Text Fields
9401/9402 System Administrators Guide
Bold Font
Standard Font
OCRA-Like 1x only
Standard
Reduced
Bold
Width Mag Standard Reduced Bold
Metric 0 Dots 0
Reduced Dot Bold
Sample
Designing a Format
9401/9402 System Administrators Guide
Defining Constant Text Overlays
Dot
Metric 0 Dots0
Dots
Write L in box C9 to align text properly in the field
9401/9402 System Administrators Guide
Designing a Format
Defining Bar Code Fields
Bar Code
Number
Code
English 600 Metric 1525 Dots 1152
Number Bar Code
Interleaved 2
Barcode Density Narrow Data Appearance Char Type
9401/9402 System Administrators Guide
Designing a Format
Prompt Data Field Type
Defining Non-Printable Text Fields
Designing a Format
Defining Lines as Segments
Lines and Boxes
Defining Lines
Dots0
Thickness Example
Defining Lines as Vectors
Defining Boxes
Thickness Example
Designing a Format
9401/9402 System Administrators Guide
Applying Field Options
OptionDescription
Entire Field Fixed Character Definition
Defining Fixed Data Option
Monarch Marking
Partial Field Fixed Character Definition
General Restrictions
Data Type Restrictions and Data Entry Templates Options 2
Restricting Data Types
Detailed Character Restrictions
Do not use with Option Description
Restricting Data Types by Character Position
Indicator
9401/9402 System Administrators Guide
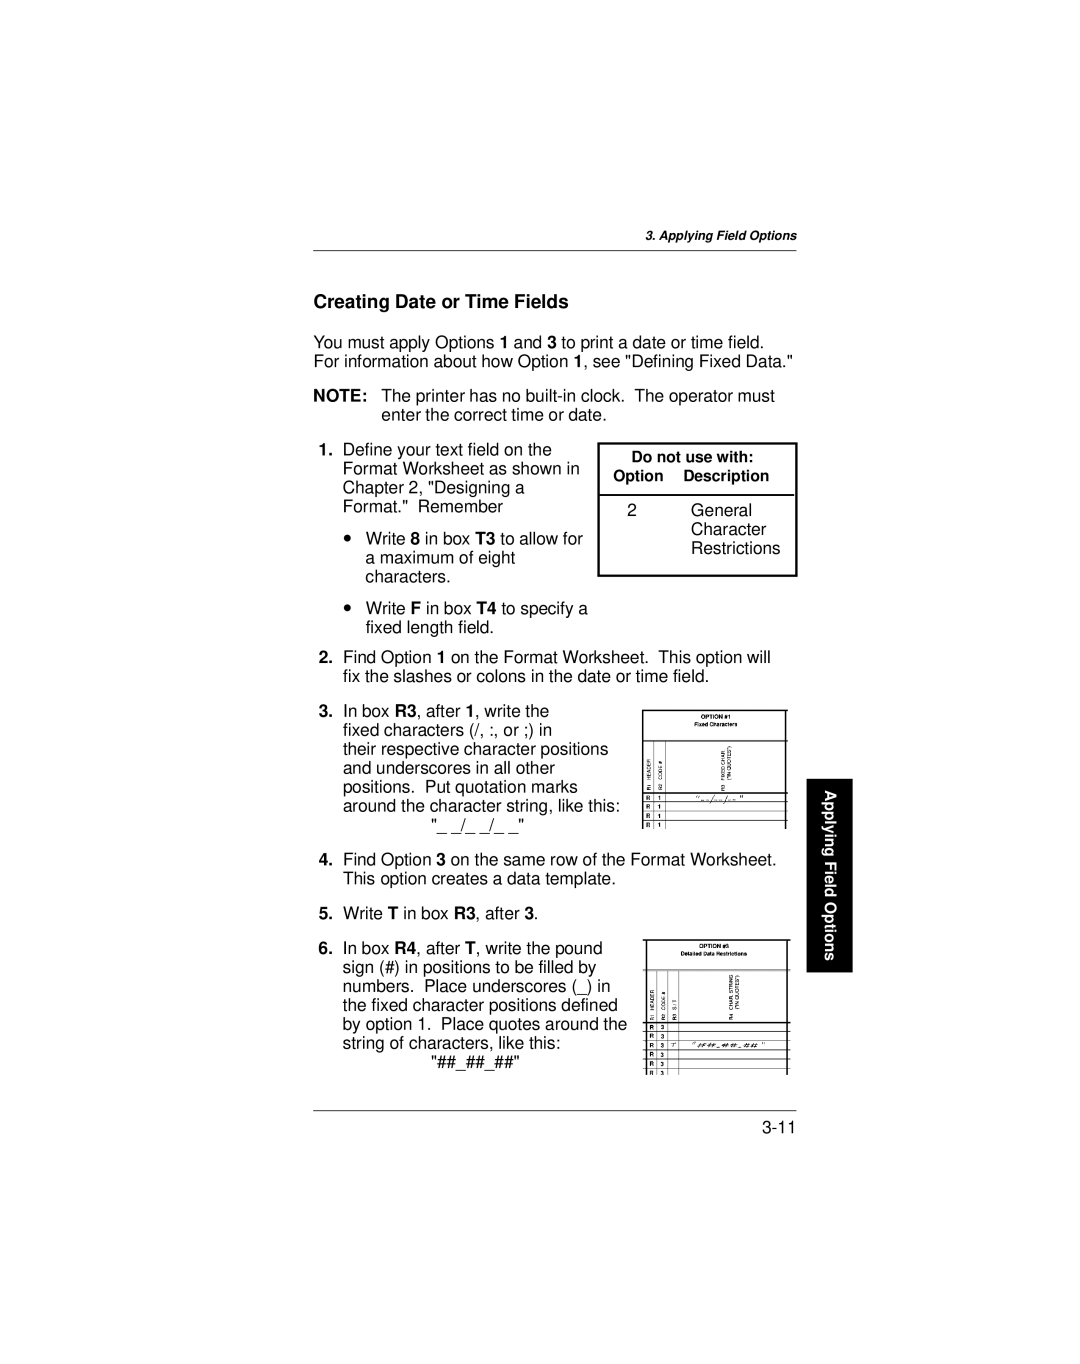
Creating Date or Time Fields
9401/9402 System Administrators Guide
Copying Data Into a Field Option
9401/9402 System Administrators Guide
On Option 5.Applying FieldOptions
Sub-Fields
Merging Fields
To create this sequence
Code Data Source
Defining Data Entry Sources Option
Eliminating the Operator Prompt
Defining a Data Entry Prompt Option
Adding Characters to Pad Fields Option
Creating a Price Field Option
Incrementing Fields Option
Fixing the first number in the incrementing sequence
Entering data for incrementing fields
Using Check Digits
Defining a Check Digit Scheme
Check Digit Record
Generating Check Digits
Check Digit Verification on Copied Fields
Verifying Check Digits
8 2 7 C
Clearing a Check Digit Scheme
Sample Check Digit Calculation
Sum of Products
Sum of Digits
Using Check Digits
9401/9402 System Administrators Guide
Using Check Digits
Defining a Check Digit Scheme
Generating Check Digits
Verifying Check Digits
Clearing a Check Digit Scheme
Sum of Digits
Using Check Digits
9401/9402 System Administrators Guide
Recording Batch Information
Preparing Batches for Downloading
Merged or sub-fields
Fields with Fixed Characters
Batch Worksheet
Incrementing fields
Guideline
Guidelines for Preparing Batch Data
9401/9402 System Administrators Guide
Entering Data Streams
Creating Format Files
Entering Text Fields
A,R,E,375,200,Textiles p
Entering Non-Printable Text Fields
Entering Bar Code Fields
Entering Constant Text Overlays
Entering Lines
Entering Boxes
Line record should look something like this
Applying Field Options
Your file should look something like this
Sample format file is shown on the next
Sample Format Batch File
Sample Format File
9401/9402 System Administrators Guide
Creating Check Digit Files
Creating Batch Data Files
Refer to the Batch Data section of the Batch Worksheet
9401/9402 System Administrators Guide
Online Communication Requirements
Configuring the Printer
Connecting the Printer
Option Values Default
Communication Values Definitions
Do this
Setting Communication Values
When you see
At the Printer
Stop Bits User Comm
At the Computer
Example Mode COM12400,N,8,1,P
Pin Description
Cable Interface
Placing the Printer Online
Printing
Downloading from a MS-DOS System
Downloading
Format Tracking
Downloading from Other Computer Systems
Clearing Formats
Determining the Number of Formats
Keypad Batch Entry
Printing Batches
Batch Downloading
Batches Check Digits
Printer Storage Capacity
Formats
Printing
9401/9402 System Administrators Guide
Deleting a Format from the Printer
Using Printer Menus
Editing and Reviewing Formats
Modifying Formats
From a Host
Data Entry Instructions for Operators
Establishing Daily Procedures
Daily Startup Checklist
Creating DOS Batch Files for Downloading
Print Logs
Backing up Format and Batch Files
10-4
Data Stream Structure
Online Information
Symbol Description
Message Structure Syntax
Format Header
∙ named Textiles
Syntax Checklist
Message Structure
Text Field
Example T,1,10,V,250,50,0,1,1,1,B,C,0,0 p
11-7
B1,B2,B3,B4,B5,B6,B7,B8,B9,B10,B11,B12 p
Bar Code Field
11-9
Syntax Checklist
D1,D2,D3 p
Non-Printable Text Record
C8.color
Constant Text Overlays
11-13
Syntax Checklist
L1,L2,L3,L4,L5,L6,L7,L8 p
Line Records
Example L,S,110,30,110,150,10, p
Q1,Q2,Q3,Q4,Q5,Q6,Q7 p
Box Records
Example Q,240,30,270,150,3, p
Option#,arguments........ p
Defining fixed characters for part of field
Definitions
Defining fixed characters for entire field
Example R,2,1 p
Detailed data type restrictions
Template of allowable data types
Example R,4,2,1,4,3,2 p
Example R,5,N p
Example
Defined in , Using
= incrementing field
11-29
Format Syntax Checklist
Batch Header Section
Batch Packets
Example B,3,N,100 p
Field#,data string p
Batch Data Record
Syntax Checklist
Syntax A1,A2,A3,A4,A5,A6,A7,A8 p
Check Digits
Example A,1,A,M,10,5,P,65432 p
Copy FRMT1.FMT COM1
Transmitting Data
Here is a sample format data stream
Sample Format Data Stream
12345678901 p
Processing Overview
Interactive Mode
Printer Status Codes
Exception Packets
Set Auto Enter to
Using a Scanner in Interactive Mode
Example Printer/Host Dialog
Operator enters the quantity of items
11-44
Text Fonts
Quick References
12-2
Character Height
Character Width
These bar codes are available on the 9401 and 9402 printers
Bar Codes
Line Thickness
Key Keypad
Diagnostics
Setting Passwords
Main Menu Setup
Monarch Computer Keyboard
Version
Checking the Software Version
Printing a Test Label
Test Pattern Test Label
Checking Supply Quality
When you see Do this
9401/9402 System Administrators Guide
Device Selection
Checking Printer Memory Usage
9401/9402 System Administrators Guide
Scan
Testing Your Scanner
Calling for Service
Format Set a
Format Name FMT Number70 Dimensions h x w
Appendix a Optional Formats
Format Name FMT Number72 Dimensions h x w
Format Name FMT Number71 Dimensions h x w
Format Name FMT Number76 Dimensions h x w
Format Name FMT Number73 Dimensions h x w
Format Name FMT Number74 Dimensions h x w
Format Name FMT Number75 Dimensions h x w
Format Name FMT Number79 Dimensions h x w
Format Name FMT Number77 Dimensions h x w
Format Name FMT Number78 Dimensions h x w
Format Name FMT Number83 Dimensions h x w
Format Name FMT Number80 Dimensions h x w
Format Name FMT Number81 Dimensions h x w
Format Name FMT Number82 Dimensions h x w
Format Set B
Format Name FMT Number84 Dimensions h x w
Format Name FMT Number85 Dimensions h x w
Format Name FMT Number54 Dimensions h x w
Format Name FMT Number57 Dimensions h x w
Format Name FMT Number55 Dimensions h x w
Format Name FMT Number56 Dimensions h x w
Format Name FMT Number60 Dimensions h x w
Format Name FMT Number58 Dimensions h x w
Format Name FMT Number59 Dimensions h x w
Format Name FMT Number62 Dimensions h x w
Format Name FMT Number61 Dimensions h x w
Format Name FMT Number64 Dimensions h x w
Format Name FMT Number63 Dimensions h x w
Format Name FMT Number68 Dimensions h x w
Format Name FMT Number65 Dimensions h x w
Format Name FMT Number66 Dimensions h x w
Format Name FMT Number67 Dimensions h x w
Format Name FMT Number69 Dimensions h x w
Format Number
Appendix B Data Stream Examples
Sample Batch Data Stream
Format Name FMT-2 Format Number
Format Name FMT-3 Format Number
Format Name FMT Format Number
Optional Format Set a
42,1 p
72,N,2 p 123 p 12 p 123456 p 12345678901 p 99999 p
Sample Batch Data Stream
74,N,3 p 123 p 123456 p 12 p 40000123456 p 99999 p
75,N,3 p 123 p 12345678910 p 123456 p Large p 99999 p
76,N,3 p 076 p LAZ p Casual p BL p Jumpsuit p Small p 9999 p
77,N,3 p 123 p 123456 p 01234567890 p 99999 p
78,N,3 p 123 p 123456 p 99999 p
79,N,3 p 123 p 123456 p Xlarge p 99999 p
80,N,3 p 111 p 222 p 333 p 444444 p 55555555555 p 99999 p
81,N,3 p 11111111111 p 222 p 333333 p 99999 p
82,N,3 p 12345678901 p 99999 p
83,N,3 p 123 p 12 p 123456 p 99999 p
84,N,3 p 111 p 222 p 33333 p 77777777777 p 99999 p
Data Stream Examples
Format Name FMT Number
Optional Format Set B
Sample Batch
Data Stream
Online Offline Function
Appendix C Printable Characters
Entering Special Characters in Data Streams
Code 128 Function Codes
Function Codes For Special Characters
Appendix D Format Design Tools
Batch Header Batch Data
Appendix D Format Design Tools
9401/9402 System Administrators Guide
Data Entry Guide
Page
Data Entry Guide
Page
Index
Index
9401/9402 System Administrators Guide
Index
Requirements 1-2 communication
Time fields 3-11 transmitting data
Index
Page
Inthe U.S.A Canada