Polycom CX5500 Unified Conference Station for Microsoft Lync
Polycom, Inc
Contents
Use Advanced Features
Change Your Office Hours Change Timeouts
Administrative Tasks
Who Should Read this Guide?
About This Guide
Conventions Used in this Guide
Terms and Writing Conventions
Icons Used in this Guide
Information Elements
Bold
Typographic Conventions
Get Help and Support Resources
Use the CX5500 System with Microsoft Lync Client
Get Started
About the Polycom CX5500 Unified Conference Station
How the CX5500 system works during conference calls
Use the CX5500 System as a Conference Phone
Polycom CX5500 system
Understand the CX5500 System Hardware
Active video indicator lights
Understand the Indicator Lights
Microphone Indicator Lights
HD Transmit
Connect the CX5500 System to a Computer
Basic Video Transmit
To access the Web Configuration Utility for your phone
Access the Web Configuration Utility
Web Info Information on using the Web Configuration Utility
Sign in to the CX5500 System with Lync
Best Practices for Effective Camera Tracking
Troubleshooting I can’t sign-in using my login credentials
User Tip Using strong passwords
Answer a Video Call
Use the CX5500 System with Microsoft Lync
Place a Video Call
Hang Up a Call
Adjust Audio and Video
Navigate Phone Views
To switch among views
Use the CX5500 System as a Conference Phone
Home view
Troubleshooting Why can’t I access a certain view?
Home View
Lines and favorites from Home view
Additional home icons
To display Lines view
Lines View
To display all your calls
Active Call View
To view Active Call view
Active and held calls in Lines view
Dark green Active call
Calls View
To display Calls view
Status bar in Home and other views
Understand Phone Icons and Status Indicators
Phone icons and status indicators
Navigating your phone interface
Navigate Your Phone’s Interface
To enter a URL or telephone number in the Contact field
Enter Data and Update Fields
To change how numbers and text are formatted
To use the onscreen keyboard
Use the Onscreen Keyboard
Using the onscreen keyboard to enter information
To clean the touchscreen
Clean the Touchscreen
Manage Calls on Your Phone
Place and End Calls
Call from the Dialer
User Tip Choosing URLs or numbers mode from the dialer
To display the dialer
To place a call from the Dialer
To call from your Favorites list
To call from the Recent Calls list
To call from your Directory
Timesaver Automatically dialing favorites
Redial Numbers
Manage Active Calls
End Calls
Hold a Call
To resume a held call
Transfer Calls
To transfer a call
To perform a blind transfer
Answer Incoming Calls
Manage Incoming Calls
To answer an incoming call
To answer an incoming call from Home or Calls view
To answer another incoming call
Answer Additional Calls
To answer another incoming call from Home view
Incoming Call window
Answer Calls Automatically
Answer Calls on a Shared Line
Ignore Incoming Calls
Redirect Calls
Reject Incoming Calls
Forward Incoming Calls
To forward all calls a contact
Forward Calls to a Contact
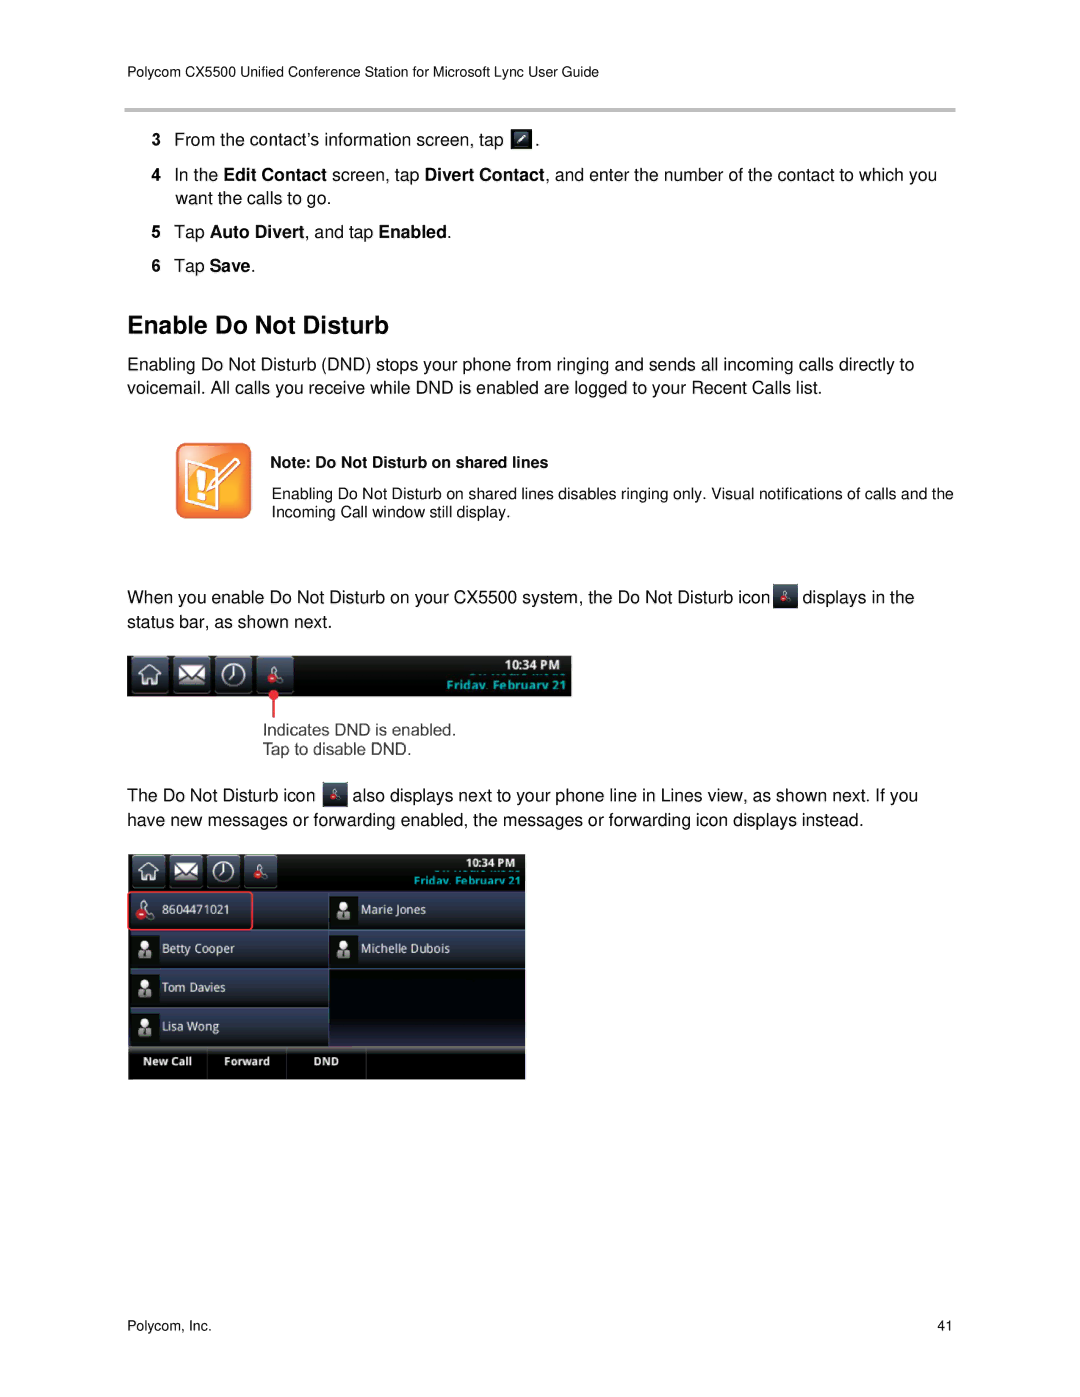
Call-forwarding enabled icon in Lines view
To disable call forwarding
Reject Calls from a Contact
Divert Calls from a Contact
Tap Auto Divert, and tap Enabled
Enable Do Not Disturb
To enable and disable Do Not Disturb
Enable Do Not Disturb on Multiple Lines
To enable or disable Do Not Disturb for a particular line
From the Do Not Disturb screen, tap Enable or Disable
Calls on separate lines in Calls view
Manage Multiple Calls
Calls on two lines in Lines view
Manage Conference Calls
Dial in to Conference Calls
To dial in to a conference call
User Tip Best practices for conference calls
Initiate Conference Calls
To initiate a conference call using the Confrnc soft key
Hold and Resume Conference Calls
Tap Confrnc
Manage Conference Call Participants
End Conference Calls
Split Conference Calls into Two Held Calls
To manage a participant in a conference call
Timesaver How to manage a participant without tapping manage
Use Your Contact Directory
Manage Contacts and Directories
To view your Contact Directory from Home view
Contact Directory
To search for a contact
To view contact information
To dial a contact
To add a contact
To delete a contact
To update a contact’s information
Add Contacts from Recent Calls list
Manage Favorites
To add recent callers to your Contact Directory
To make a contact a favorite
Favorites in Home view
Favorites list
Favorites in Lines view
Work with a Corporate Directory
To perform an advanced search Tap AdvFind
To perform a quick search of the Corporate Directory
To dial a Corporate Directory contact
To add a contact to your Contact Directory
Listen to Voicemail
To remove message indicators temporarily
To listen to voicemail messages
Tap Message Center
To view your Recent Calls list
Timesaver Quickly access the Recent Calls list
View Recent Calls
To manage a call record
Control Audio and Volume
To customize the list
To remove certain calls from the list
Update the Incoming Call Ringtone
Change the Speaker and Ringer Volume
Update a Contact’s Ringtone
Edit Contact screen, tap Ring Type
Mute the Microphone
Work with Shared Lines
Icons and status indicators for shared lines
Use the Contact List
Use Advanced Features
Update Your Status
Manage Your Contact List
To update your presence setting
Lync Status and Presence Icons
View Lync Contacts’ Presence Status
To view your Contact List
To view contacts in Home view
To view your contacts in Lines view
Group Paging Mode
Broadcast Messages Using Group Paging
Integrate with Microsoft Lync Server
Send and Receive Pages
To send a
Receive Pages
Change the Default Paging Group
Adjust the Volume of Pages
Enable Pages to Play during Active Calls
Update Paging Group Subscriptions
To hear the page when Accept While Busy is disabled
Use the Calendar
To open the calendar
Troubleshooting Why doesn’t the calendar display anymore?
Open and Close the Calendar
Navigate Month View
Troubleshooting Why doesn’t the calendar display?
Navigate Day View
To close the Calendar
To see Meeting view
Navigate Meeting View
To navigate in Day view
To navigate in Meeting view
Troubleshooting Why don’t my meeting reminders display?
Work with Meeting Reminders
To join a meeting from a meeting reminder
Join Meetings from the Calendar
To use another number to join the meeting from a reminder
To join a meeting from Meeting view
Log In and Out of a Phone
Log in to a Phone
Place Calls from Phones That Are in the Logged-Out State
Change Your Password
From the Advanced screen, tap Change User Password
Change Your User Password
Lock the Phone
Lock and Unlock Your Phone
Call and Answer from a Locked Phone
Access Features with Your Login Credentials
To unlock your phone Tap Unlock
To call an authorized number from a locked phone
Change the Language on Your Phone
Troubleshooting What happens if I can’t access features?
Customize the Phone’s Display
Change the Backlight
Change the Time and Date Display
From the Backlight Intensity screen, tap Maximum Intensity
Change the Background Picture
Web Info Adding a web page as the background on your phone
Use Power-Saving Mode
Change Your Office Hours
Change Timeouts
User Tip Determining which idle timeout applies
Polycom, Inc
Restart the Phone
Administrative Tasks
Investigate Phone Warnings
Test Phone Hardware
Update Phone Configuration
Download Logs
Troubleshoot Issues
Test the Speaker, Microphones, and Camera
Polycom and Partner Resources
Get Help
Polycom Community
Service Agreements
Copyright, Safety, and Regulatory Notices
Polycom Limited Warranty and Limitation Liability
Governing Law
Safety, Compliance, and Disposal Information
Warranty Exclusive
Exclusions
Part 15 FCC Rules
Plug Acts as Disconnect Device
Class B Digital Device or Peripheral
Industry Canada IC
Europe Singapore
Class B Statements