350e/450e
Overseas Affiliates
Page
FCC Requirements
355e/455e
355e/455e Operating Instructions
Page
FCC Requirements
Page
Savin Corporation
Page
FCC Requirements
Safety During Operation
Safety Information
Page
Iii
Page
Page
Limitation
How to Read this Manual
Symbols
Preparation
Vii
Viii
What you can do with this Machine Copy Mode
Page
Table of Contents
Other Functions
Program-Storing your Copy Settings in Memory
Sort/Stack/Staple
Copying from the Bypass Tray
If Your Machine does not Operate as You Want 109
Combination Chart 106
Accessing the User Tools Copy Features 141
Image Repeat-Repeating an Image
Xiii
Dos and donts 157 Where to Put your Machine 158
Maintaining your Machine 161
176
Xiv
Machine Types
Guide to Components
Bypass tray
Operation panel
Duplex unit Unit for two-sided copies
Front cover
Ventilation hole
Guide
To copy onto A3, 11 × 17 paper
If the end of the sheet is curled
Options
Place originals On the exposure glass Document feeder
Function List Based on Options
Place originals On the exposure glass Document feeder
This page is intentionally blank
Clear Modes/Energy Saver key
Operation Panel
Program key
User Tools/Counter key
Original Type key
Mixed Sizes key
Auto Reduce/Enlarge key
Clear/Stop key
Keys Cursor keys
Number keys
Start key
Displays items which can be se- lected or specified
Panel Display
Displays and Key Operations
Copy initial display
Common keys
Display when copying
Function menu display
Sample Display for Erasing the Center/Border
Display Panel Layout
Page
Main power switch left side of the ma- chine
Turning On the Power
Power switches
Operation switch right side of the op- eration panel
Press the operation switch to make the On indicator go off
Turning Off the Power
When the Clear Modes/Energy Saver indicator is lit
When the machine is set for user codes
Changing Modes
Inch version
Sizes and Weights of Recommended Originals
Originals
Metric version
Sizes detectable by the Auto Paper Select Metric version
Sizes Difficult to Detect
Exposure glass Document feeder
Original Sizes and Scanning Area/Missing Image Area
Recommended Paper Sizes and Types
Copy Paper
Non-recommended Paper
Paper Storage
Used Toner
Toner
Handling Toner
Toner Storage
Set your originals
Basic Procedure
Make sure that the machine is in Copy mode
Make sure that there are no previ- ous settings remaining
Auto Off
Auto Reset
Lower the platen cover or the doc- ument feeder
Setting Originals
Setting Originals on Exposure Glass
Lift the platen cover or the docu Ment feeder
Setting a stack of originals in the document feeder
Setting Originals Document Feeder
Press the Exit key
Using Sadf and Thin Paper Modes
Sadf mode
Press the Select key
Select Thin Paper with the keys, then press the Select key
Thin paper mode
Set the next original while the Auto Feed indicator is lit
Press the Mixed Original Sizes key
Mixed Size Mode
Basic Functions
Adjusting Copy Image Density
Selecting Original Type Setting
Select the copy paper
Selecting Copy Paper
Auto Paper Select
Manual Paper Select
Make sure that the Auto Auto Paper Select is selected
Auto Paper Select
Manual Paper Select
Rotate Copy
Machine Choose Reproduction Ratios
Where Original is Original size and direc Set Tion
Basic Functions
Staple the optional 1000-sheet finish- er required
Sort/Stack/Staple
Sort
Stack
Sort/Stack/Staple
Shift Sort optional finisher required
Sort-Sorting into Sets 123, 123
Sort Rotate Sort Shift Sort
Punch key
When setting a stack of originals in the document feeder
When setting an original on the exposure glass
Reference Limitation
Shift Stack optional finisher re- quired
Stack-Stacking Together All Copies of a Page 111, 222
Rotate Stack Shift Stack
Rotate Stack
Make sure that on is selected. Then, press the OK key
Press the Sorter key until the Stack indicator bottom is lit
Staple
Sheet finisher
Stapling position and original setting
Metric version Inch version 81/2 ×
Set the next original
Select one of four stapling posi- tions
Press the OK key
To clear scanned images of the originals
When memory reaches 0%
To stop scanning
To resume scanning
Copying from the Bypass Tray
Adjust the guides to the copy pa- per size
Press the # key Press the Ppr. Size key
When copying onto non-standard size copy paper
Make sure the k indicator is selected Press the OK key
Press the ↓Next key until your desired size is displayed
When copying onto standard size copy paper
Make sure the k indicator is selected
Press the Exit key Press the Ppr. Size key
Set your originals, then press the Start key
Select the desired size with the keys, then press the OK key
Select the paper size, then press the OK key
Press the # key. Press the Ppr. Type key
Select OHP or Thick Paper with the keys. Then, press
OK key
Deleting a Program
Program-Storing your Copy Settings in Memory
Storing Your Settings
Storing Your Settings
No key
Deleting a Program
Press the Delete key
Recalling a Program
Press the Interrupt key
Other Functions
Energy Saver Mode-Saving Energy
While a document is being fed
Set your original Press the Start key
User Codes
Original Beeper
Press the Interrupt key. The Interrupt key lights
Original → Copy paper Ratio % Size
Ratio% Original → Copy paper Size
Zoom-Reducing and Enlarging in 1% Steps
When using the n or o key
When using the number keys
Set your originals, then press the Start key
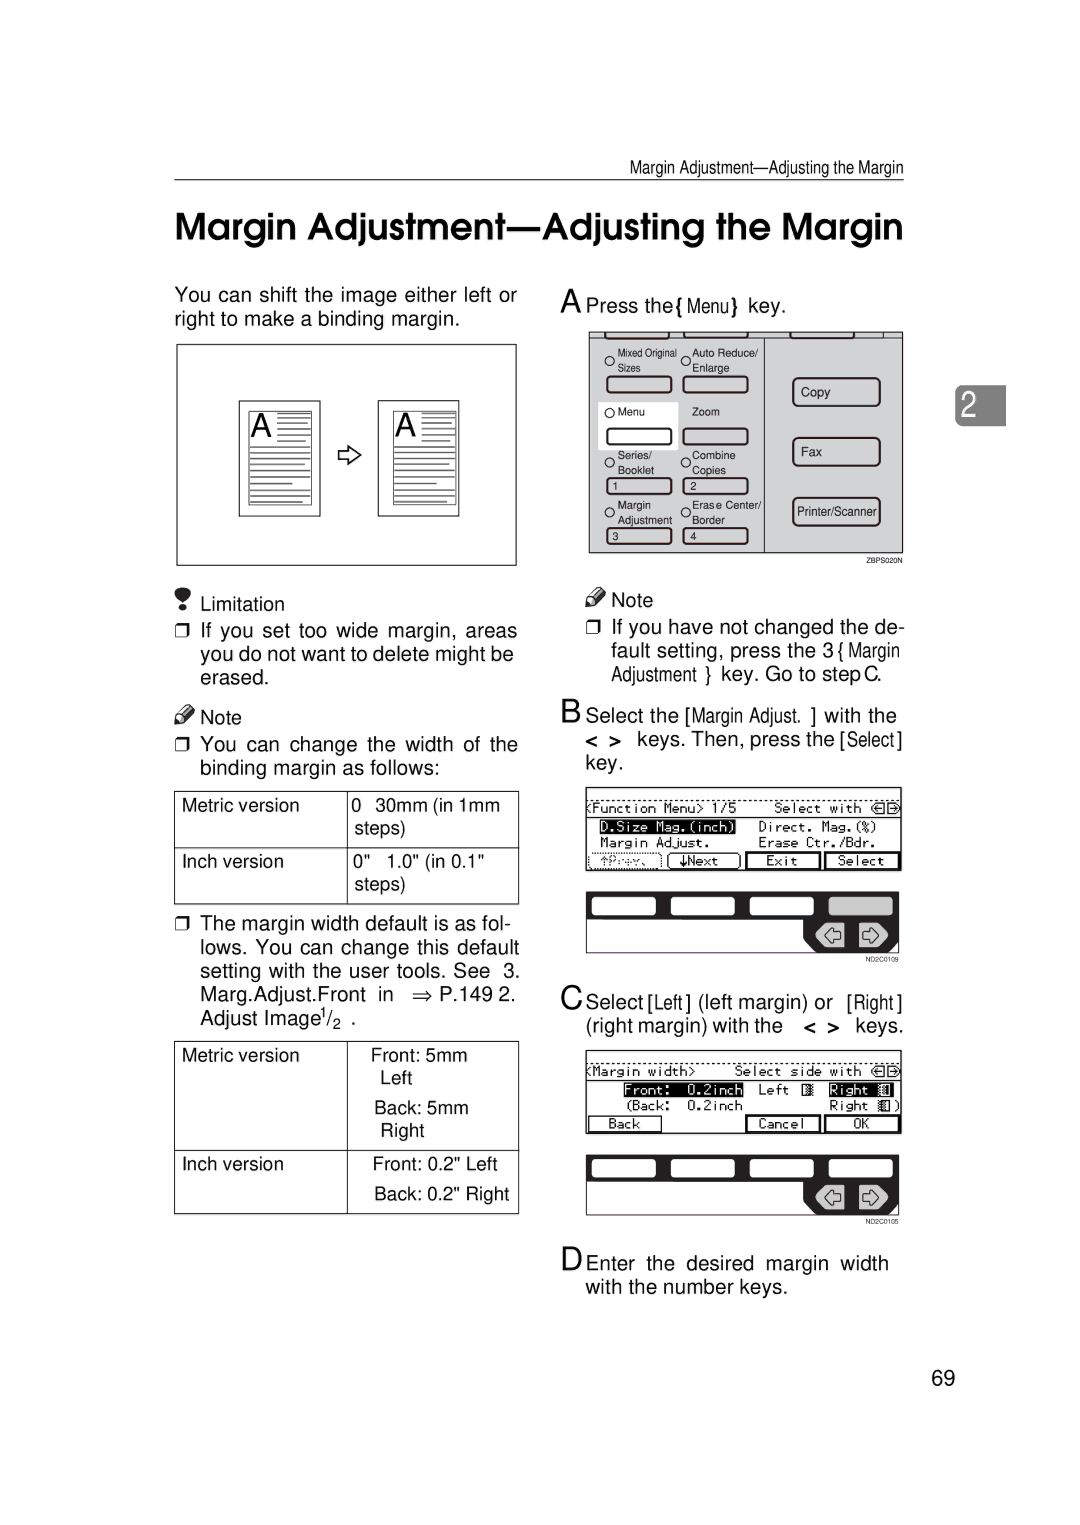
Press the Menu key Press the Select key
To change the value entered
Horizontal % Vertical %
ND2C0104
Enter the desired margin width with the number keys
Margin Adjustment-Adjusting the Margin
Press the Menu key
Select Left left margin or Right right margin with the keys
Enter the desired margin width the number keys. Then, press
Center
Erase Center/Border-Erasing the Center and the Border
Erase Center
Erase Border
Center
Border
Set your originals, then press the Start key
Pages→1-sided, 4 pages→2-sided
Combine-Combining Originals into One Copy
Pages→1-sided
Pages→1-sided Pages→2-sided
One-sided originals are copied onto one side of a sheet
Press the ↓Next key until the Combine is displayed
Portrait K originals
Set the next original, then press the Start key
When setting a stack of original in the document feeder
Sided → 1-Sided The optional doc- ument feeder is required
Book → 1-Sided
Pages→Magazine
Pages→Booklet
Select Book → 1-Sidedwith the keys. Then, press the OK key
With the optional document feeder
Without the optional document feeder
Press the ↓Next key until Series Booklet is displayed
Select
Press ↓Next key Until
Landscape
How to fold and unfold copies to mark a magazine Portrait
Portrait
Select the 4pg→Magazine with the keys. Then, press
Pages → Booklet-Making Booklet from One-sided 16 Originals
Select the 16 pg → Booklet with the keys. Then, press
Series / Booklet is displayed
Making a booklet
Book → 2-sided
Duplex-Making Two-Sided Copies
Sided → 2-sided
Original direction and completed copies
Originals and copy direction
Set the next original Then Press the Start key
Specifying Orientation of Bound Originals
Original Copy paper
Optional document feeder is re- quired to use this function
Cover/Paper Designate-Adding or Inserting Sheets
Press the Front key
Copy Blank
Press the Both key
To specify another page number, repeat Step E
Press the Ppr. Des. key
ND2C0104
OHP Slip Sheet-Copying or Inserting Slip Sheet
ND2C0109
Positive/Negative-Copying Complementary Colors
Image Repeat
Image Repeat-Repeating an Image
Image Twice on One
Press the ↓Next key until Image Repeat is displayed
Original 51/2 × 81/2K/Copy paper
Original image is copied repeat
Edly
Set your original, then press the Start key
81/ L/Copy paper 81/ × 11K
100
Press the ↓Next key until Image
Recalling The Stored Images
Storing the Images
Storing The Images
Deleting The Stored Images
Select the type of originals with the keys. Then, press
To overwrite images already stored
102
Originals File is displayed
Deleting the Stored Images
103
Start with the first page of your
Press the List key
Printing a List of the Stored Images
104
16pages→2sided with
Recalling the Stored Images
105
Select the 8pages→1sided or
106
Combination Chart
107
Combination Chart
108
109
If Your Machine does not Operate as You Want
Message
110
Display
111
If you cannot Make Clear Copies
112
Adjust Image
If you cannot Make Copies as you Want
113
Combine, Series/Booklet
114
Duplex
Press the Downkey if it is not lit
Loading Paper
Loading Paper in the Large Capacity Tray
115
Close the top cover
116
Place the paper in the tray along the edge on the left
117
Adding Toner
118
119
120
Clearing Misfeeds
121
122
123
124
When R is lit
125
126
127
Fasten the fences with screws
Changing the Paper Size
128
129
To adjust the paper size
Adjust the back fence to the new paper size
130
Adding Staples
Sheet Finisher
131
132
133
134
135
Removing Jammed Staples
136
137
138
139
Pull out the punch waste box and remove punch waste
Reinstall the punch waste box
Removing Punch Waste
140
Press the User Tools/Counter key
Accessing the User Tools Copy Features
141
142
Exiting from User Tools
143
144
User Tools Menu Copy Features
145
146
Settings you can Change with the User Tools
General Features 1/4
147
General Features 2/4
148
General Features 3/4
General Features 4/4
149
Adjust Image 1/2
150
151
Adjust Image 2/2
152
Bound Original
153
154
Input/Output
155
Input/Output
156
Shortcut Keys
157
Dos and donts
Environments to avoid
Where to Put your Machine
Machine Environment
Optimum environmental conditions
159
Power Connection
160
Access to Machine
Maintaining your Machine
Cleaning the Platen Cover
Cleaning the Document Feeder
Cleaning the machine
162
Mainframe
First copy time
Copy paper weight
Copy paper size
Non-reproduction area
Copy paper capacity
Power consumption
Reproduction ratio
Continuous copying count
166
Dimensions W × D × H up to exposure glass
Space for main frame W × D
Noise Emission
167
Weight
Document Feeder Option
169
Paper Tray Unit Option
Available paper size
Paper capacity
170
Internal Tray 2 1bin Tray Option
Number of bins Available paper size
Sheet Finisher Option
172
173
174
Punch Kit Option
Paper size 2 holes version
Paper size 3 holes version
175
Large Capacity Tray LCT Option
176
Index
177
178