Page
Important Safety Instructions
For the U.K
Page
Power Supply
Placement
Before Using Floppy Disks
Maintenance
Additional Precautions
Handling Floppy Disks
How To Use This Manual
How To Use This Manual
Contents
Contents
Creating a Patch
Playing in Multitimbre Mode
Playing Back a Song
Adding Effects
Specifications
Power effects including Cosm effects
Main Features
Top-level sound generator for maximum expressive power
Consolidated interface design with large graphic LCD
Designed to be a true musical instrument
Main Features General MIDI- and General Midi 2- Compatible
Functions that stimulate your creativity
General Midi
Front Panel
Volume Slider
Panel Descriptions
Floppy Disk Drive
Panel Descriptions
Rear Panel
Basic Structure
Overview of the Fantom
How the Fantom Is Organized
Classification of Fantom Sound Types
Multitimbre
Overview of the Fantom Patches
Rhythm Sets
Performances
Calculating the Number of Voices Being Used
Performance Mode
About Simultaneous Polyphony
How a Patch Sounds
Rewritable Memory
About Memory
Temporary Memory
Non-Rewritable Memory
About the Onboard Effects
Effect Types
How Effects Units Work in Different Modes
Overview of the Fantom Performance Mode or Multitimbre Mode
What Is a Song?
What Is a Track?
About the Sequencer
Tempo Track
Songs and the Sound Generator Mode
How Phrase Tracks, Parts and Midi Channels Interact
Beat Track
Positions for Storing a Song
Internal Memory
Disk
Multitimbre Mode Overview
Switching the Sound Generator Mode Mode
Patch Mode
Performance Mode
About the 1-8 Buttons
Switching Screens from the Menu Menu
Viewing a List of Patches or Other Data List
Window
Value Dial
Moving the Cursor
Modifying a Value
INC and DEC
Assigning a Name Using a Name Window
Assigning a Name
Name window appears
About the Patch Play Screen
Playing in Patch Mode
Playing in Patch Mode
Displaying Patch Play Screen
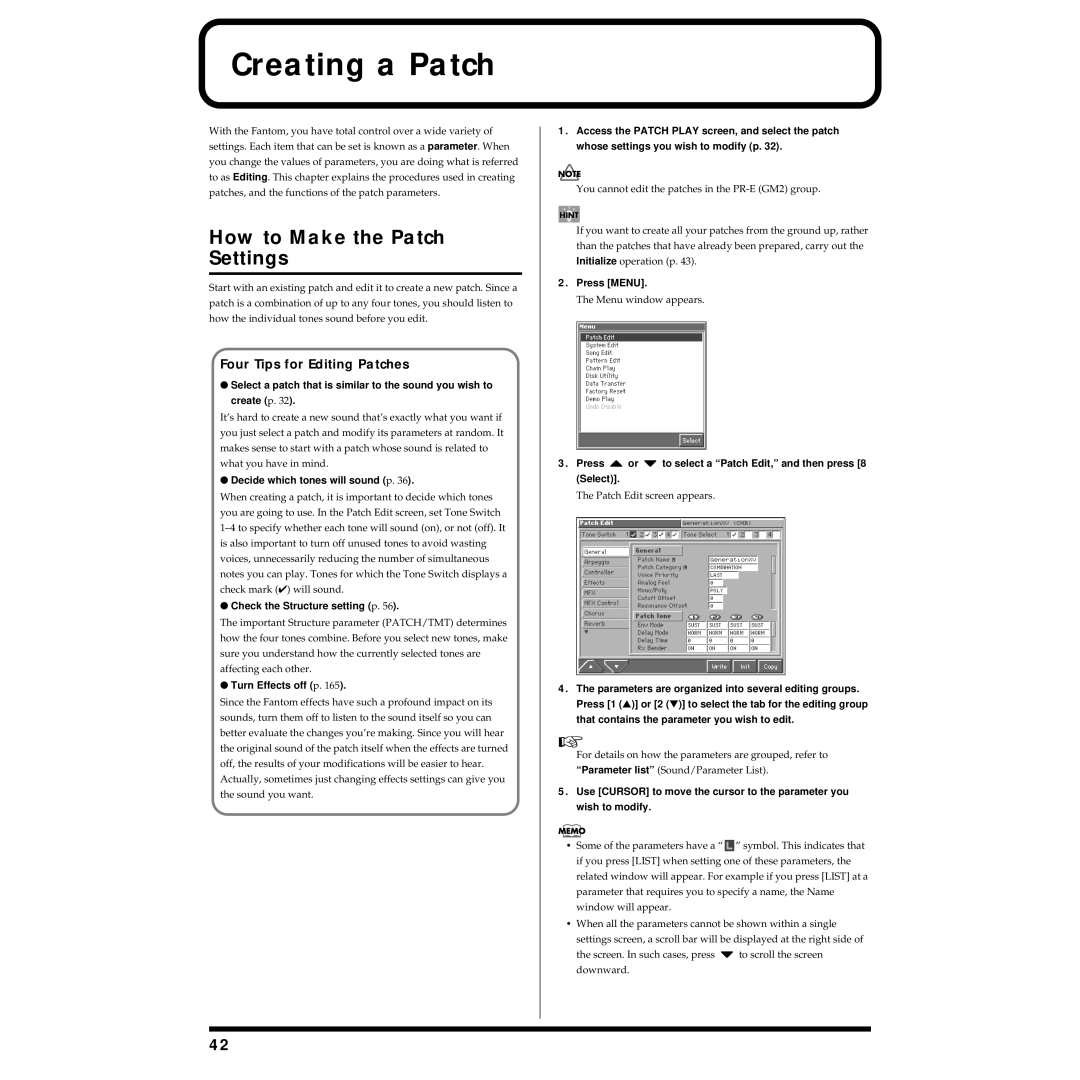
Access the Patch Play screen p
PR-A-E Preset A-E
XP-A-C Wave Expansion Boards installed in EXP-A-C Slots
Selecting a Patch
Selecting from
Selecting Favorite Patches Favorite Sound
Selecting Patches from the List
Selecting from the Favorite List Window
Selecting Patches by Category Patch Finder
Access the Patch List window p Press and hold 8 Prevu
Auditioning Patches Phrase Preview
Selecting from the Patch List Window
Category Contents
Transposing the Keyboard in Octave Units Octave Shift
Transposing the Keyboard in Semitone Steps Transpose
Selecting the Tones That Will Sound Tone On/Off
Patch Edit screen appears
Playing Single Notes Mono
Creating Smooth Pitch Changes Portamento
Press 1 or 2 to select the General tab
Holding an Arpeggio
When Using a Hold Pedal
Playing Arpeggios Arpeggiator
Simulating a Rhythm Guitar
System Edit screen appears
Using an External Midi Keyboard to Play Arpeggios
Making Arpeggiator Settings
Press 1 or 2 to select the Midi tab
Selecting a Rhythm Set
Prst Preset
Playing Percussion Instruments
Selecting Favorite Patches Favorite Sound p
Playing a Rhythm Set
Making Rhythm Pattern Settings
Playing Rhythm Patterns from the Keyboard
Holding the Playback of a Rhythm Pattern
How to Make the Patch Settings
Creating a Patch
Four Tips for Editing Patches
Basic Procedure for Patch Copy
Initializing Patch Settings Init
Copying Patch Settings Copy
Type Initialize Type
Waveform
Creating a Patch Types of Patch Copy
Press or to select a Patch Edit, and then press Select
Saving Patches You’ve Created Write
Waveform
Press 6 Write
Auditioning the Save-Destination Patch Compare
Using 1-8 to Register
Using the Favorite List Window to Register
Registering a Favorite Patch Favorite Sound
Settings Common to the Entire Patch General
Functions of Patch Parameters
General
Portamento Switch
Legato Switch Solo Legato Switch
Legato Retrigger Legato Retrigger Switch
Attack Time Offset
Patch Tone
Rx Bender Tone Receive Pitch Bend Switch
Tone Delay
Delay Time Tone Delay Time
Setting Delay time
Arpeggiator Settings Arpeggio
Creating a Patch Arpeggio
Realtime Controller / D Beam Controller Settings Controller
Switch
Knob
Beam
Source 1-4 Matrix Control Source
Matrix Control Settings Matrix Ctrl
Matrix Control
Pitch Bend Pitch Bend Aftertouch Aftertouch
Opening and Closing the Filter
Changing the Volume, Pan, and Pitch
Destination 1-4 Matrix Control Destination 1
Changing How the Effects Are Applied
Changing How a Tone Is Sounded TMT
Tone 1-4 Tone Control Switch
TMT Control Sw TMT Control Switch
Sns 1-4 Matrix Control Sens
Booster 1&2, 3&4 Booster Gain
Patcha
Ring Modulator
TMT Vel Control TMT Velocity Control Switch
Booster
Key Fade Lower Keyboard Fade Width Lower
Modifying Waveforms Wave
Wave
Modifying Pitch Pitch
Pitch
Env Depth Pitch Envelope Depth
Rnd Pitch Depth Random Pitch Depth
Pitch KF Pitch Key Follow
Env V-Sens Pitch Envelope Velocity Sensitivity
Cutoff Freq Cutoff Frequency
Modifying the Brightness of a Sound with a Filter TVF
Filter Type
Cutoff KF Cutoff Frequency Key Follow
Resonance
Cutoff V-Curve Cutoff Frequency Velocity Curve
Cutoff V-Sens Cutoff Velocity Sensitivity
Reso V-Sens Resonance Velocity Sensitivity
Adjusting the Volume TVA
Level V-Curve TVA Level Velocity Curve
Bias Position
Bias Direction
Level V-Sens TVA Level Velocity Sensitivity
Modulating Sounds LFO
2Fade Mode LFO1/LFO2 Fade Mode
2Delay Time LFO1/LFO2 Delay Time
2Delay Time KF LFO1/LFO2 Delay Time Key Follow
2Rate LFO1/LFO2 Rate
How to Apply the LFO
Creating a Rhythm Set
How to Make the Rhythm Set Settings
Initializing Rhythm Set Settings Init
Creating a Rhythm Set
Mode Initialize Mode
Copying Rhythm Set Settings Copy
Basic Procedure for Rhythm Set Copy
Types of Rhythm Set Copy
Rhythm Set Effects Copy MFX/CHORUS
Rhythm Tone Copy KEY
Set
Rhythm Write window appears
Saving Rhythm Sets You’ve Created Write
Rhythm Edit window appears
Press or to specify the save-destination rhythm set
Registering Favorite Rhythm Sets Favorite Sound
Creating a Rhythm Set Using 1-8 to Register
Auditioning the Save-Destination Rhythm Set Compare
Display will indicate Register OK ?
Settings Common to the Entire Rhythm Set General
Functions of Rhythm Set Parameters
Rhythm Tone
Rhythm Pattern Settings Rhythm Ptn
Rhythm Ptn Rhythm Pattern
Realtime Controller / D Beam Controller Settings Controller
Changing How a Rhythm Tone Is Sounded WMT
Tips on Creating a Rhythm Tone
Wave Gain
Rnd Pan Sw Random Pan Switch
Alter Pan Sw Alternate Pan Switch
Coarse Tune
Tone Coarse Tune Rhythm Tone Coarse Tune
Velocity Control Velocity Control Switch
Wave Level
Tone Fine Tune Rhythm Tone Fine Tune
Modifying the Brightness of a Sound with a Filter TVF
Played notes to have less Resonance, use negative settings
Cutoff Frequency
Resonance V-Sens Resonance Velocity Sensitivity
Tone Pan Rhythm Tone Pan
Rhythm Level Rhythm Set Level
Tone Level Rhythm Tone level
Random Pan Depth
Env T4 V-Sens TVA Envelope Time 4 Velocity Sensitivity
About the Performance Play Screen
Playing in Performance Mode
About the Midi Connection Settings Zone and Part
Displaying Performance Play Screen
Selecting a Performance
Playing in Performance Mode
Access the Performance Play screen p
Functions in the Performance Play Screen
Selecting Favorite Performances Favorite Sound
Selecting Performances from the List
Performance List window appears
Mode
Combining and Playing Sounds Together Layer
Playing Different Sounds Different Areas Keyboard Split
Playing
Playing Arpeggios in a Specific Region of the Keyboard
Use Cursor to move the cursor to Zone Number
Playing Rhythm Patterns in a Specific Region Keyboard
Next, specify the range of the zone. Press 2 to select
Zone tab
Part Settings p
Using the Fantom As a Master Keyboard
Zone Settings p
External Sound Generator Settings
Creating a Performance
How to Make the Performance Settings
Initializing Performance Settings Init
Creating a Performance
Copying Performance Settings Copy
Basic Procedure for Performance Copy
Types of Performance Copy
Press or to specify the save-destination performance
Saving Performance You’ve Created Write
Performance Write window appears
Favorite Performances Favorite Sound p
Settings Common to the Entire Performance General
Creating a Performance Using 1-8 to Register
Functions of Performance Parameters
Performance Settings p
Shuffle Resolution Arpeggio Shuffle
For details on the setting, refer to How to Make
Shuffle Rate Arpeggio Shuffle Rate Creating
Keyboard Velocity Rhythm Pattern Keyboard Velocity
Shuffle Resolution Rhythm Pattern Shuffle Resolution
Zone Number Arpeggio Zone Number
Zone Number Rhythm Pattern Zone Number
Creating a Performance Switch
Zone 1-4 Realtime Control Knob Zone Number
Zone 1-4 Realtime Control Button Zone Number
Zone Settings Zone
Creating a Performance Beam
Control Modulation Control Modulation Switch
Control Bender Control Pitch Bend Switch
Control Aftertouch Control Aftertouch Switch
Control Hold Pedal Control Hold Pedal Switch
Making Settings for Each Part Part
100
101
102
Midi Filter
Making Settings for Receiving Midi Midi
Part Midi
103
Scale Tune Settings Scale Tune
104
Equal Temperament
Changing the Settings of the Patch Assigned to a Part
105
Just Temperament Tonic of C
Displaying the Multitimbre Play screen
Playing in Multitimbre Mode
About the Multitimbre Play screen
Functions in the Multitimbre Play Screen
Selecting Multitimbres from a List
Multitimbre Mode
Selecting a Multitimbre
107
Selecting a Part to Play Individually Solo
Playing Back a Song
Selecting a Part to Play from the Keyboard Current Part
108
Assigning a Different Patch to a Part
Adjusting the Volume and Pan
Silencing the Playback of a Specific Part Mute
Each Part
Recording an Arpeggio Performance
Recording the Performance of a Rhythm Pattern
110
Select the recording method
Confirming Midi Information for Each Part Part Information
111
Press To select Part Information, and then
Creating a Multitimbre
How to Make the Multitimbre Settings
Initializing Multitimbre Settings Init
112
Types of Multitimbre Copy
Copying Multitimbre Settings Copy
Basic Procedure for Multitimbre Copy
113
Saving Multitimbre You’ve Created Write
114
Multitimbre Write window appears
Functions of Multitimbre Parameters
Settings Common to the Entire Multitimbre General
Multitimbre Settings p
115
116
117
Multitimbre
118
Set Phase Lock to on when you want to suppress
119
Is matched, enabling them to be played at the same time
120
121
Creating a Multitimbre
Make sure the Multitimbre Play screen is displayed
Playing Back Songs Consecutively Chain Play
Playing Back a Song
Playing a Song Immediately from Disk Quick Play
Creating a Chain
Songa
Saving a Chain to Disk Save
123
Back
Playing a Chain
Various Playback Methods
Loading a Chain from Disk Load
Fast-Forward and Rewind During Playback
Playing a Song Back at a Fixed Tempo Muting the Tempo Track
Muting the Playback of a Specific Instrument
Changing the Playback Tempo of a Song
Playing Back a S-MRC Format Song
Using the D Beam Controller to Start/Stop Song Playback
126
D Beam window appears
Two Recording Methods
Recording Songs
Before You Record a New Song
Select the Sound to be Used for Recording
Specifying the Time Signature of a Pattern
Specify the Time Signature
Recording Songs
128
129
Mode Recording Mode
Basic Operation for Realtime Recording
Track
Recording Tempo Changes in a Song Tempo Recording
Using Auto Punch-In Recording
Using Manual Punch-In Recording
Loop Recording and Punch-In Recording
131
Inputting Notes and Rests
Inputting Data One Step at a Time Step Recording
Erasing Unwanted Data While You Record Realtime Erase
132
Gate Time Gate Time Ratio
133
Step Time
Velocity
Inputting a Tie
Assigning a Pattern to a Phrase Track
Recording Songs Inputting a Chord
134
File Name and Song Name
Saving a Recorded Song on Disk
135
Use or to select the format in which the song will be saved
Loading the Song You Want to Edit
Using Different Sound Generators for Each Track
Editing Songs
136
Assigning a Name to a Song Song
Overall Settings for the Song
Silencing the Playback of a Track Mute
Name
Assigning a Locate Position
Assigning a Name to a Pattern Pattern Name
Assigning Markers Locate Positions to a Song
Moving to a Locate Position
Basic Operation for Track Editing
Editing Sequencer Data Over Specified Range Track Edit
Specifying the Area of a Song that will Repeat Loop Points
139
Use or to select the desired function, and press 8 Select
Aligning a Song’s Timing Quantize
140
Press or to select Quantize, and then press 8 Select
141
Status
Erasing Unwanted Performance Data Erase
142
Press or to select Erase, and then press 8 Select
143
Deleting Unwanted Measures Delete
Copying Phrases Copy
Track Source Track
→ Track Destination Track
Mode Copy Mode
144
→ Measure Destination Measure
145
Inserting a Blank Measure Insert Measure
Transpose the Key Transpose
Beat
146
Changing the Velocity Volume Change Velocity
When You Want to Change Percussion Sounds
If You Want to Lower the Bass Sound One Octave
Modifying the Length of Notes
Changing the Midi Channel Change Channel
Change Gate Time
147
Combining Two Phrase Tracks or Patterns into One Merge
148
Press or to select Merge, and then press 8 Select
149
Mode Extract mode
Extracting and Moving a Part of Sequencer Data Extract
Editing Songs
Shifting Performance Data Forward and Back Shift Clock
150
Press or to select Shift Clock, and then press 8 Select
Value
Thinning Out the Sequencer Data Data Thin
151
Time
Adjusting the Song’s Playback Time Time Fit
Swapping Two Phrase Tracks or Patterns Exchange
152
Viewing Sequencer Data in the Microscope Window
Editing Individual Items of Sequencer Data Micro Edit
Deleting Blank Measures Truncate
153
Sequencer Data Handled by a Phrase Track/Pattern
Data Handled by the Tempo Track
154
Data Handled by the Beat Track
Viewing sequencer data View
Editing the Sequencer Data
Editing a System Exclusive Message
Inserting Sequencer Data Create
Erasing Sequencer Data Erase
156
Moving Sequencer Data Move
Copying Sequencer Data Copy
157
Changing the Tempo Midway Through the Song
Changing the Time Signature Midway Through the Song
158
Record a Pattern
Settings for the RPS Function
Before You Use the RPS Function
159
Using the RPS Function While You Perform
Playing a Phrase at the Touch of a Finger RPS Function
160
Screen like the following appears
Recording a Performance Using the RPS Function
161
Specify how recording is to take place
162
Making Settings for the D Beam Controller
Modifying the Sound in Real Time
Usable range of the D Beam controller
Realtime Controller Button Settings
Making Realtime Controller Settings
Realtime Controller Knob Settings
Modifying the Sound in Real Time
Press 8 Close to close the Switch window
Using a Pedal to Modify the Sound Control Pedal
Making Control Pedal Settings
164
Turning Effects On and Off
Applying Effects in Patch Mode
Adding Effects
Specifying How the Sound Will Be Output Effects
Signal Flow Diagram and Parameters
Adding Effects
166
Adding Effects When the Patch Output Assign 2 is Set to Tone
167
168
169
170
Applying Effects in Performance Mode or Multitimbre Mode
Using the MFX-A-C Simultaneously
Performance Edit or the Multitimbre Edit screen appears
171
172
MFX-A Source Multi-Effects a Source
When Patch or Rhythm Set Settings Are Selected
173
Effects
Making Multi-Effects Settings MFX/MFX Control
Setting Procedure
174
Functions of Parameters
MFX Control Adding Effects
175
Making Chorus Settings Chorus
176
177
Making Reverb Settings Reverb
Reverb Adding Effects
Type Reverb Type
Initializing the System Settings Init
How to Make the System Function Settings
Saving the System Settings Write
178
Settings Common to the Entire System General
Functions of System Parameters
179
Sequencer Settings Sequencer
Sequencer
180
181
Midi Settings Midi
182
183
Controller Settings Controller
Controller
184
Preview
Equalizer settings EQ
Phrase Preview Settings Preview
185
Scale Tune
Scale Tune Switch
Make scale tune settings for Patch mode Value -64- +63
186
Basic Disk Utility Operations
Disk-Related Functions Disk Utility
About Disk Utility
187
Loading Individual Tracks/Patterns of Song Data
Selecting the Type of Files Displayed in the File List View
Loading a File from Disk into the Fantom Load
188
189
Saving Data on Disk Save
Loading Individual Items of Sound Data
Disk
File Names and Song Names
Copying a File to Another Name Copy
190
Copy File window appears
Executing Disk-Related Functions Tools
Renaming a File Rename
Deleting Unwanted Files Delete
Preparing a Disk for Use by the Fantom
Checking Files Recorded on Disk
Modify the volume label and press 8 OK
Modifying the Name of the Disk
192
193
Backup Floppy Disk window appears
Creating a Duplicate Disk
Display will ask Internal Song will be erased. OK?
194
Transmitting Sound Settings Data Transfer
Transmitting Data to an External Midi Device
Type of Data to Transmit
Transmitting Data to User Memory
Reset to Default Factory Settings Factory Reset
Press 8 Execute to execute the Factory Reset
195
Installing the Wave Expansion Board
How to Install a Wave Expansion Board
196
Checking the Installed Wave Expansion Boards
Installing the Wave Expansion Board
197
French language for Canadian Safety Standard
Installation de la carte d’expansion Wave
Installation d’une carte d’expansion Wave
198
199
Installation de la carte d’expansion Wave
Installation de la carte
’expansion Wave
Synthesizer Section
Specifications
200
Sequencer Section
Index
201
Index
202
203
204
205
206
207
208
209
210
Wave expansion board
196
For EU Countries
For the USA
For Canada
Information
Additional Functions of the Fantom and Changes in Operation
Recording with the Realtime Recording window displayed
Button name Function
Will not be displayed
Recording