ENGLISH


DEUTSCH

Advanced Shooting

Weiterführende Aufnahmefunktionen

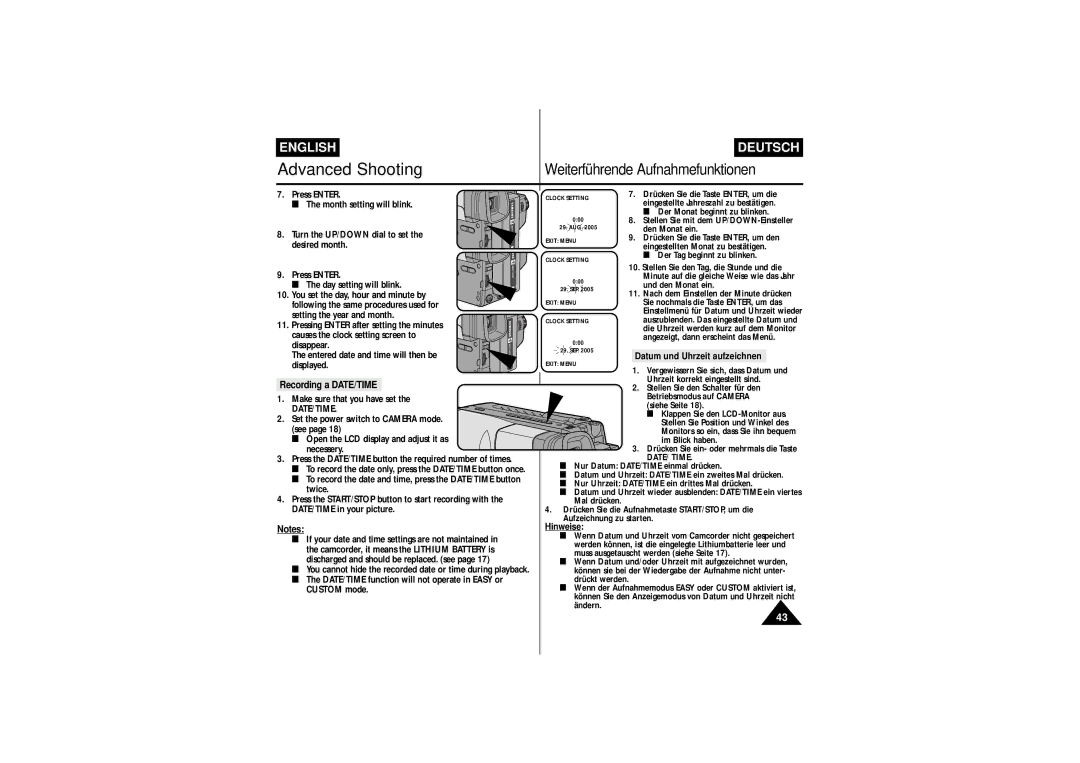
7. Press ENTER.

CLOCK SETTING

7.

Drücken Sie die Taste ENTER, um die

The month setting will blink.


eingestellte Jahreszahl zu bestätigen.


Der Monat beginnt zu blinken.


0:00

8.

Stellen Sie mit dem UP/DOWN-Einsteller

8. Turn the UP/DOWN dial to set the

29. AUG. 2005


den Monat ein.

EXIT: MENU

9.

Drücken Sie die Taste ENTER, um den

desired month.


eingestellten Monat zu bestätigen.

CLOCK SETTING

Der Tag beginnt zu blinken.

9. Press ENTER.

The day setting will blink.

10. You set the day, hour and minute by following the same procedures used for setting the year and month.

11. Pressing ENTER after setting the minutes causes the clock setting screen to disappear.

The entered date and time will then be

0:00

29. SEP. 2005

EXIT: MENU

CLOCK SETTING

0:00

29. SEP. 2005

10.Stellen Sie den Tag, die Stunde und die Minute auf die gleiche Weise wie das Jahr und den Monat ein.

11.Nach dem Einstellen der Minute drücken Sie nochmals die Taste ENTER, um das Einstellmenü für Datum und Uhrzeit wieder auszublenden. Das eingestellte Datum und die Uhrzeit werden kurz auf dem Monitor angezeigt, dann erscheint das Menü.

Datum und Uhrzeit aufzeichnen

displayed.

Recording a DATE/TIME

1.Make sure that you have set the DATE/TIME.

2.Set the power switch to CAMERA mode. (see page 18)

Open the LCD display and adjust it as necessery.

3.Press the DATE/TIME button the required number of times.

To record the date only, press the DATE/TIME button once.

To record the date and time, press the DATE/TIME button twice.

4.Press the START/STOP button to start recording with the DATE/TIME in your picture.

Notes:

If your date and time settings are not maintained in the camcorder, it means the LITHIUM BATTERY is discharged and should be replaced. (see page 17)

You cannot hide the recorded date or time during playback.

The DATE/TIME function will not operate in EASY or CUSTOM mode.

EXIT: MENU

1.Vergewissern Sie sich, dass Datum und Uhrzeit korrekt eingestellt sind.

2.Stellen Sie den Schalter für den Betriebsmodus auf CAMERA (siehe Seite 18).

Klappen Sie den LCD-Monitor aus. Stellen Sie Position und Winkel des Monitors so ein, dass Sie ihn bequem im Blick haben.

3. Drücken Sie ein- oder mehrmals die Taste DATE/ TIME.

Nur Datum: DATE/TIME einmal drücken.

Datum und Uhrzeit: DATE/TIME ein zweites Mal drücken.

Nur Uhrzeit: DATE/TIME ein drittes Mal drücken.

Datum und Uhrzeit wieder ausblenden: DATE/TIME ein viertes Mal drücken.

4.Drücken Sie die Aufnahmetaste START/STOP, um die Aufzeichnung zu starten.

Hinweise:

Wenn Datum und Uhrzeit vom Camcorder nicht gespeichert werden können, ist die eingelegte Lithiumbatterie leer und muss ausgetauscht werden (siehe Seite 17).

Wenn Datum und/oder Uhrzeit mit aufgezeichnet wurden, können sie bei der Wiedergabe der Aufnahme nicht unter- drückt werden.

Wenn der Aufnahmemodus EASY oder CUSTOM aktiviert ist, können Sie den Anzeigemodus von Datum und Uhrzeit nicht ändern.

43

Page 43
Image 43
Samsung VP L 700, VP-L750D, VP-L770, VP L 710, VP L 750 manual Datum und Uhrzeit aufzeichnen, Recording a DATE/TIME

VP L 710, VP-L770, VP L 700, VP L 750, VP-L750D specifications

The Samsung VP-L750D, VP-L750, VP-L700, VP-L770, and VP-L710 are a series of compact camcorders that showcase Samsung's commitment to innovative technology and user-friendly features. These models have earned recognition for their performance, making them a solid choice for amateur videographers and enthusiasts alike.

One of the primary features of these camcorders is their impressive video quality. The VP-L750D and VP-L750 utilize a 680,000 pixel CCD sensor, which ensures that video recordings are clear, vibrant, and lifelike. The VP-L700 and VP-L710 models come with enhanced sensors that improve low-light performance, allowing users to capture high-quality footage even in challenging lighting conditions. The VP-L770 boasts a higher resolution with enhanced image stabilization, making it ideal for capturing action shots without the jitters.

In terms of zoom capabilities, these camcorders are well-equipped to handle various shooting scenarios. The VP-L750D and VP-L750 feature a 22x optical zoom, enabling users to get close to their subjects without sacrificing image quality. The VP-L710 has an even more powerful 25x optical zoom, providing additional versatility for capturing distant subjects. The VP-L770, with its advanced optical capabilities, is designed for users who demand excellence in versatility and performance.

Another standout feature across these models is the intuitive user interface. The camcorders are equipped with a 2.7-inch LCD screen that makes navigating through settings and reviewing footage straightforward and convenient. With their ergonomic designs, these camcorders are comfortable to hold for extended periods, making them suitable for long recording sessions at events, vacations, or personal projects.

Battery life is also a crucial consideration for users, and Samsung has designed these models to offer efficient power consumption. The VP-L750 and VP-L710 provide extended recording times, allowing users to shoot longer durations without frequent recharges.

The VP-L750D, VP-L750, VP-L700, VP-L770, and VP-L710 support various output formats, making it easy to transfer and share videos with others. With USB connectivity, transferring recorded content to computers or external drives is seamless.

In conclusion, the Samsung VP series of camcorders exemplifies technological innovation and user-centric design. With high-quality video capture, versatile zoom capabilities, intuitive interfaces, and solid battery life, these camcorders are perfect for those looking to document life’s moments with style and clarity. Whether for casual use or more serious videography, the Samsung VP-L750D, VP-L750, VP-L700, VP-L770, and VP-L710 cater to a wide range of videography needs.