Printer/Scanner Kit Type
Page
Table of Contents
Storing Data
Troubleshooting
Specifications
Flow of Operations Scanning Originals
Names of Major Options
How to Read This Manual
Symbols
Scanner Reference this manual
General Settings Guide
Manuals for This Machine
Copy Reference
Manuals for ScanRouter V2 Lite
When connected to a mail server
When a dial-up router is connected in a network environment
When connected to a computer that uses dial-up access
When working in a WAN environment
Computer
Outline
Network Twain Scanner
This machine
Delivery server
Network Delivery Scanner
This machine Client computer
Mail server
Mail
This machine Computer
Document Server
Control Panel
Names and Functions of Components
Display Contents
Using E-mail
Using as a network delivery scanner
Network Scanner
Preparation Sequence
Using as a Network Twain Scanner
Using as a Network Delivery Scanner
Preparations for Use as a Network Scanner
Using E-mail
System settings
Initial Scanner Setup
Default Settings
Explanation of scanner settings is provided in this manual
Scanner settings
Scan Type
Setting Scanner Features
Mail Settings
Resolution
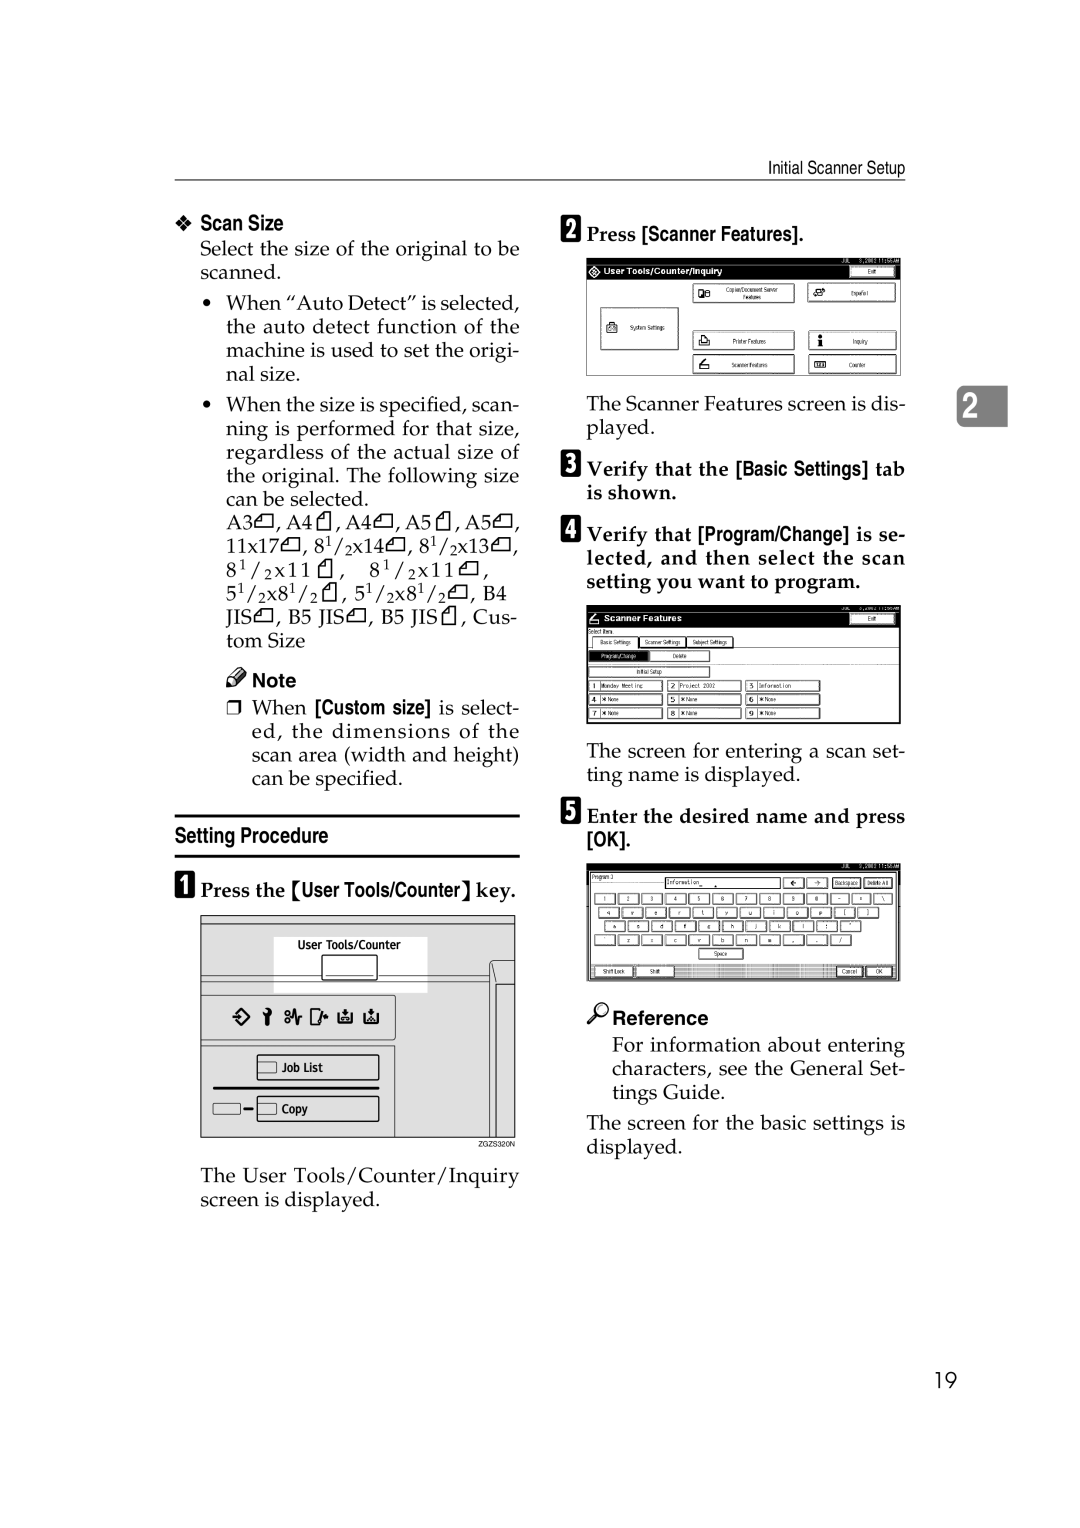
Press the User Tools/Counter key
Setting Procedure
Press Scanner Features
Scan Size
Selecting a custom size
Enter the scan size area with the number keys
Deleting programed scan settings
When all dimensions have been entered, press OK
Press Delete
Making Scanner Settings
Send/Store Connection Timeout
Compression Black & White
Destination List Priority
Update Delivery Scanner Destination List
Sender’s Name Default
Compression Gray Scale
Mail Information Language
Job Reset Time in Adding Original
Original Setting
Switch to Batch
Select Title
Press the Scanner Settings tab
File Type Priority
Print & Delete Scanner Journal
Change the setting
Making Scan Data Subject Settings
Press the Subject Settings tab
Deleting programed subject settings
To delete more subjects, repeat steps E to F Press Exit
Smtp Server Name
Making E-mail Settings
Setting Procedure
DNS Server 1, DNS Server 2, and DNS Server
Verify the Smtp Server Name and Smtp Port Number Click Smtp
Verification of Settings
Click Setting Reference
Verify the IP address of the DNS Server
Auto Run Program
Installing Software
Installation Sequence
Click Type1075 Twain Driver
Software for using a Network Twain Scanner
Select a language used by this component, and then click OK
Software for using a Network Delivery Scanner
Select a setup language, and then click OK
Click the key of the software to be installed
Click DeskTopBinder V2 Lite
DeskTopBinder V2 Lite
Select a language, and then click OK
File storage folder
Software Supplied on CD-ROM
List of Files
Type1075 Twain Driver
DeskTopBinder V2 Lite
ScanRouter V2 Lite
Software installed with DeskTopBinder V2 Lite
Software installed with ScanRouter V2 Lite
Preparations for Use as a Network Scanner
Setting Originals
Lift the exposure glass cover or the ADF
Placing the Original on the Exposure Glass
Place the original so that the top edge is in the ADF tray
Placing the Original in the Automatic Document Feeder ADF
Originals that can and cannot be placed in the ADF
Place the top edge of the origi- nal first
Placing the Divided Original Automatic Document Feeder ADF
On the scanner function screen
Original Orientation and Scan Area Setting
Press Original Settings
Orientation selection
Sided original/2-sided original selection
Mixed size selection
Select / or / from the drop-down menu of the Orien- tation
For a Network Twain Scanner
Open the Scanner Control dialog box
Document group
Setting Originals
Flow of Operations
Scanning Originals Using Network Twain Scanner
Place the original in the scanner
Scanning Originals
File format for scanned images and go to step E
Click Select Scanner Driver
Click Close
When you want to configure the scanning area
Document group Reference
Click Preview
Printing to the Image
Scanning Mode Registration
Functions of the Twain Driver
Automatic Tilt Correction
Attach Sender’s Name Attach Sub- ject
List Displays of Destinations and Senders
Registration No
Manual Input
Destination List
Switch Destination List/ Search by User Name
Make sure that no previous set- tings remain
Delivery Procedure
Press Switch Destination List
Press the Scanner key
Press Recall Program
Making the settings individually
Calling up stored scan settings
Press Scan Settings
Press Registration No
When selecting a destination from the list
Using a short ID number to select a destination
To select more destinations, re- peat step B
Press Search by User Name
Searching for a destination to select
Manual input of a destination
Press Search
Receipt
When selecting a sender from the list
Checking selected destinations
Press Attach Sender’s Name
Select a sender Press Exit
Using a short ID number to select a senders name
Searching for a sender to select
Enter part of the sender name
Press Attach Subject
When selecting a subject from the list
Manual input of the subject
Check the displayed records
Checking the Status of Delivery
Items to be checked
Press File Information to set file in- formation
Using the Network Delivery Scanner with the Document Server
Simultaneous Delivery and Storage
Press Store File
To select multiple files, repeat step B
Delivering Stored Files
Display the list of stored files
Select a file to be delivered
Attach Sender’s Name Attach Sub- ject File Type
Switch Destination List/Search by User Name
Mail Icon
Press E-mail
Procedure for Sending E-mails
Press File Type
Select the file type if necessary
Enter the e-mail address with the soft keyboard
Manual input of the e-mail address
Select the destination to which the scan data is to be sent
Search by User Name and Search by E-mail
Press Search Press Search by User Name
Receipt Return Receipt is highlighted
Specify the sender
To verify receipt, press Return
Using a short ID number to select a senders name
Press Exit To verify receipt, press Return Receipt Press OK
Enter the subject with the soft keyboard Press OK
Manual input of the subject directly
Press Scanned Files Status on the screen for sending e-mail
Checking the Status of E-mail
Simultaneous E-mail and Storage
Using E-mail with the Document Server
Sending Stored Files
Storing Data
Using the Document Server
Make sure that no previous set- ting remains
Storage Procedure
Press OK Specify file information
Making settings individually
Make the settings for storing scanned data files
Press Store Only
Press User Name
Specifying file information
Specifying a user name
Press Store File Press File Information
Press File Name
Specifying a password
Press Password
Specifying a file name
List of stored files is dis- played
When using the network delivery scanner or e-mail
Viewing a List of Stored Files
Viewing the List
Send
Manage/Delete File
All Users
Folder contents display
Connected device name
User name
Searching by file name
Searching for Files
Searching by user name
Select the file to be deleted
Deleting Stored Files
You can delete files that are no longer
Needed
Press Change User Name
Changing File Information
Changing the user name
Change the file information
Press Change File Name
Changing a password
Press Change Password
Changing the file name
When Gray Scale is selected as the Scan Type
Relationship between the Resolution and the Data Size
Delivery Function Does Not Work
Troubleshooting
When Scanning Is Not Performed as Expected
When an Error Message Is Displayed on the Control Panel
Set Divide & Send E-mail to On
Troubleshooting
Work error has occurred and the file could not
Not be sent correctly. Try the operation once
Access Mask settings in User Tools
When an Error Message Is Displayed on the Computer
Administrator
Specifications
Index
100
Means Power ON. b means Power OFF. c means Stand by
UE USA G338-8607


 Note
Note
 Reference