User Guide Laser Printer
Page
Contents
Printing on Card Stock or
Cancelling a Print Job Using a Favorite Setting Using Help
Printing Multiple Pages on One
Problems in the Chooser Printing Errors
Cleaning the Outside Cleaning the Inside
Accessing Printer Properties
Canceling a Print Job
Uninstalling the Remote Control Panel
Configuring Network Parameters on Control Panel
Printer and Paper Storage Environment
Supported Sizes of Paper Guidelines for Using Paper
Laser Safety Statement
Environmental and Safety Consideration
Recycling
Power Saver
Radio Frequency Emissions
FCC regulations
Canadian Radio Interference Regulations
FCC Statement for Wireless LAN use
Federal Communications Commission FCC
Page
Wireless Guidance
European States qualified under wireless approvals
Accept EU
European States with restrictions on use
Xii
Introduction
Special Features Printer Components
Print with excellent quality and high speed
Special Features
Handle paper flexibly
Create professional documents
Expand the printer capacity
Save your time and money
Features TallyGenicom 9025 9025N
Printer Features
Print in various environments
You can print in Windows 95/98/Me/NT 4.0/2000/XP
Front View
Printer Components
Rear output tray Face up
Rear View
Setting UP Your Printer
Components may differ from one country to another
Unpacking
Clearance Space
Selecting a Location
Right 100 mm
Installing the Toner Cartridge
Setting UP Your Printer
Loading Paper
Load paper with the print side facing down
Slide the tray back into the printer
Changing the Paper Size in the Tray
Setting UP Your Printer
Using a Parallel Cable
Connecting a Printer Cable
For Local Printing
See your computer User’s Guide, if you need help
Using a USB Cable
Using a Network Antenna
Using an Ethernet Cable
For Network Printing
Set the antenna upright
Turning the Printer On
Changing the Display Language
Printing a Demo
If you are printing from a Windows
Installing Printer Software
If you are printing from a Macintosh
PCL
Printer Driver Features
Installing printer software
Installing Printer Software in Windows
System Requirements
If the CD-ROM drive does not automatically run
Click Next When the installation is completed, click Finish
Click Install the Software on your PC PCL 6 Driver
Removing Printer Software
Reinstalling Printer Software
Changing the Display Language
Installing the USB Driver in Windows 98/Me
Select TallyGenicom 9025 and Language Selection
Add New Hardware Wizard window appears. Click Next
Setting UP Your Printer
Memo
Understanding the Control Panel Using Control Panel Menus
Using the Control Panel
Understanding the Control Panel
Cancel
Display
Message Description
Orange Minor error occurs
Data from the computer Blinking When the backlight fast
Buttons
Button Description
Button Description
Accessing Control Panel Menus
Using Control Panel Menus
EPSON/IBM
Overview of Control Panel Menus
Paper Menu
Information Menu
Explanation
Select MP Tray or Manual Tray to use
Value is set up by custom
Tray. This Menu is shown when Media size
Media Size
Tray
Auto Select from Tray Source
When you select any other value except
You insert paper into the specified tray
WideA4
Select Off to print on one side of paper
Layout Menu
Top Margin Set the top margin, from
Materials for double-sided printing
To 9.9 mm.increasing by 0.1mm
22 mm.increasing by 1mm
Graphics Menu
Power Save
Setup Menu
Printer Menu
Printer language automatically
On If the paper mismatches, an error
Paper mismatching to your paper setting
This item determines whether or not
Auto Continue Off If the paper mismatch occurs,
Serial interface card is installed in your
When a print time-out occurs, the printer
OPC Cleaning Cleans the OPC drum
Cartridge and produces a cleaning
PCL Menu
PostScript Menu
EPSON/IBM Menu
Network Menu
Config TCP to Yes
Config Netware menu item
Set Config Netware to Yes. This item
Config Netware Netware to On. This item lets you
Reset Network
Default Set Network configuration. This setting
Memo
Using Print Materials
Choosing Paper and Other Materials
Input Source/Capacity*a Size
Sizes and Capacities
Guidelines for Paper and Special Materials
Printing to the Top Output Tray Face down
Selecting the Output Location
To open the rear output tray
Printing to the Rear Output Tray Face up
Paper full Paper empty
Using the Multi-Purpose Tray
Using the Tray1 or the Optional Tray2
To load paper in the Multi-Purpose Tray
Using Print Materials
Using Print Materials
Using the Manual Feed Mode
Using Print Materials
Guidelines
Printing on Envelopes
Adjust the guide to the edge of the envelope stack
Using Print Materials
Printing on Labels
Using Print Materials
Printing on Transparencies
Using Print Materials
Printing on Preprinted Paper
Printing on Card Stock or Custom-sized Materials
Open the Multi-Purpose Tray and the rear output tray
Memo
Printing Tasks
Printing a Document
��Landscape��Portrait
Select the TallyGenicom 9025 PCL 6 printer
There are two ways to cancel a print job
Cancelling a Print Job
From the Windows Start menu, select Settings
To stop a print job from the control panel
Using Help
Using a Favorite Setting
Property Description
Setting Paper Properties
Copies
Size
Type
Source
Color paper
Using the control panel button
Using the Toner Save Mode
Using the control panel menu
There are three ways to enable Toner Save mode
From the software application
Press the Duplex button on the control panel
Printing on Both Sides of Paper
From the software application
Printing Multiple Pages on One Sheet of Paper N-Up Printing
You can scale your print job on a
Printing the Reduced or Enlarged Document
Fitting Your Document to a Selected Paper Size
Printing Posters
Be folded in half after printing to produce a booklet
Printing Booklets
Using an Existing Watermark
Using Watermarks
Click OK and start printing
Creating a Watermark
Editing a Watermark
Click Update to save the changes Click Ok
Deleting a Watermark
What is an Overlay?
Using Overlays
Creating a New Page Overlay
Edit Overlays window, click Create Overlay
Using a Page Overlay
Click Delete Overlay
Deleting a Page Overlay
Click OK until you exit the Print window
Resolution
Setting Graphic Properties
Dpi Normal or 300 dpi Draft
Image
Resolution option
Mode
Toner Save
Download as Bit Image When this
Download as Outline When this
When the Print All Text Black option is
TrueType
Option Description
Using Output Options
Print Order
Use Printer
Maintaining Your Printer
Printing a Configuration
Toner cartridge storage
Maintaining the Toner Cartridge
Toner cartridge life expectancy
Saving toner
Redistributing Toner
Checking the Toner Remains
Maintaining Your Printer
Replacing the Toner Cartridge
Cleaning the Outside
Cleaning the Printer
Cleaning the Inside
Cleaning inside the printer
Maintaining Your Printer
Printing a cleaning sheet
Items Yield Average
Consumables and Replacement Parts
Solving Problems
Check Solution
Troubleshooting Checklist
On Line/Continue
Problem Possible Cause Solution
Solving General Printing Problems
Select TallyGenicom 9025 PCL 6 or
Complex Adjusting the print quality settings
Indicating a system error
If using Windows
Setting may be set PCL 6 printer icon, choose Incorrectly
Method is being used
With the following command At a C\
Face-up instead There may be debris
Inside the machine Printer Printer cable is
Adobe Wrong
Setting Print the document with selecting
Illustrator
Paper Feed Area
Clearing Paper Jams
Message Location of Jam Go to
Optional Tray2
Multi-Purpose Tray
Around the Toner Cartridge
Solving Problems
Paper Exit Area
Duplex Jam
Duplex Area
Tips for Avoiding Paper Jams
Light or faded
Solving Print Quality Problems
Print
Toner specs
Dropouts
Problem Solution
Vertical repetitive Defects
Problem
Background Scatter Misformed characters Skew
Wrinkles or
Loose toner
Message Status Do this
Understanding Display Messages
Memory Overflow Printer does not Job will be automatically
Installing Memory Dimm on E.3 Paper Empty Displayed tray is
Dimm on page E.3 Outbin Full Output bin is full
Paper. Once the paper is
Problem Possible Cause and Solution
Common Windows Problems
Problems in the Chooser
Common Macintosh Problems
Printing Errors
Network or AppleTalk Control Panel from Control
Option to Installed
Troubleshooting PS Errors
Using Your Printer with Macintosh
Click Continue
Installing Software for Macintosh
For Network-connected Macintosh
Setting Up the Printer
Mac OS
Click Add
For USB-connected Macintosh
Double-clickDesktop Printer Utility
Select TallyGenicom 9025 and click Add
Canceling a Print Job
Printing Multiple Pages on One Sheet of Paper
Using Advanced Printing Features
Duplex Printing
Printing Your Document to a Selected Paper Size
Memo
Installing PS Drivers Using PS Printer Driver Features
Using Windows Postscript Driver
Installing PS Drivers
Installing PS Drivers
Click Install the Software-II on your PC PostScript
Removing PS Drivers
Reinstalling PS Drivers
Accessing Printer Properties
Using PS Printer Driver Features
To open the properties window from the Printer folder
Select TallyGenicom 9025 PS
Printing from DOS Applications
Installing the Remote Control Panel
About the Remote Control Panel
Click Install the Software-III on your PC WinRCP
Uninstalling the Remote Control Panel
Starting the Remote Control Panel
Selecting Print Settings
Select TallyGenicom 9025 and then Remote Control Panel
Printing Tab
Using the Remote Control Panel Tabs
Config Tab
Job Tab
Test Tab
PCL Tab
Page. The setting can range from 5 to 128 lines per
Flash Font and Macro Tab
PS 3 Tab
Character Table selects the character sets
EPSON/IBM Tab
Using Your Printer on Network
Locally-Shared Printer
About Sharing the Printer on a Network
Network-connected Printer
Printing Across a Network
Setting Up the Host Computer
Setting Up a Locally Shared Printer
Setting Up the Client Computer
Windows 9x/Me
Windows NT 4.0/2000/XP
Select Local port and click New Port
Setting Up a Network-Connected Printer
Printing a Network Configuration
Configuring Network Parameters on the Control Panel
Supported Operating Systems
Setting Network Protocols
Static Addressing
Configuring TCP/IP
Dynamic Addressing BOOTP/DHCP
Configuring IPX Frame Types
Using Your Printer on a Network D.11
Configuring the Wireless Network
Restoring the Network Configuration
Bit WEP Digits Characters
Hexadecimal Alphanumeric
Memo
Programme Installing Printer Options
Disconnect the Power Cord
Precautions When Installing Printer Options
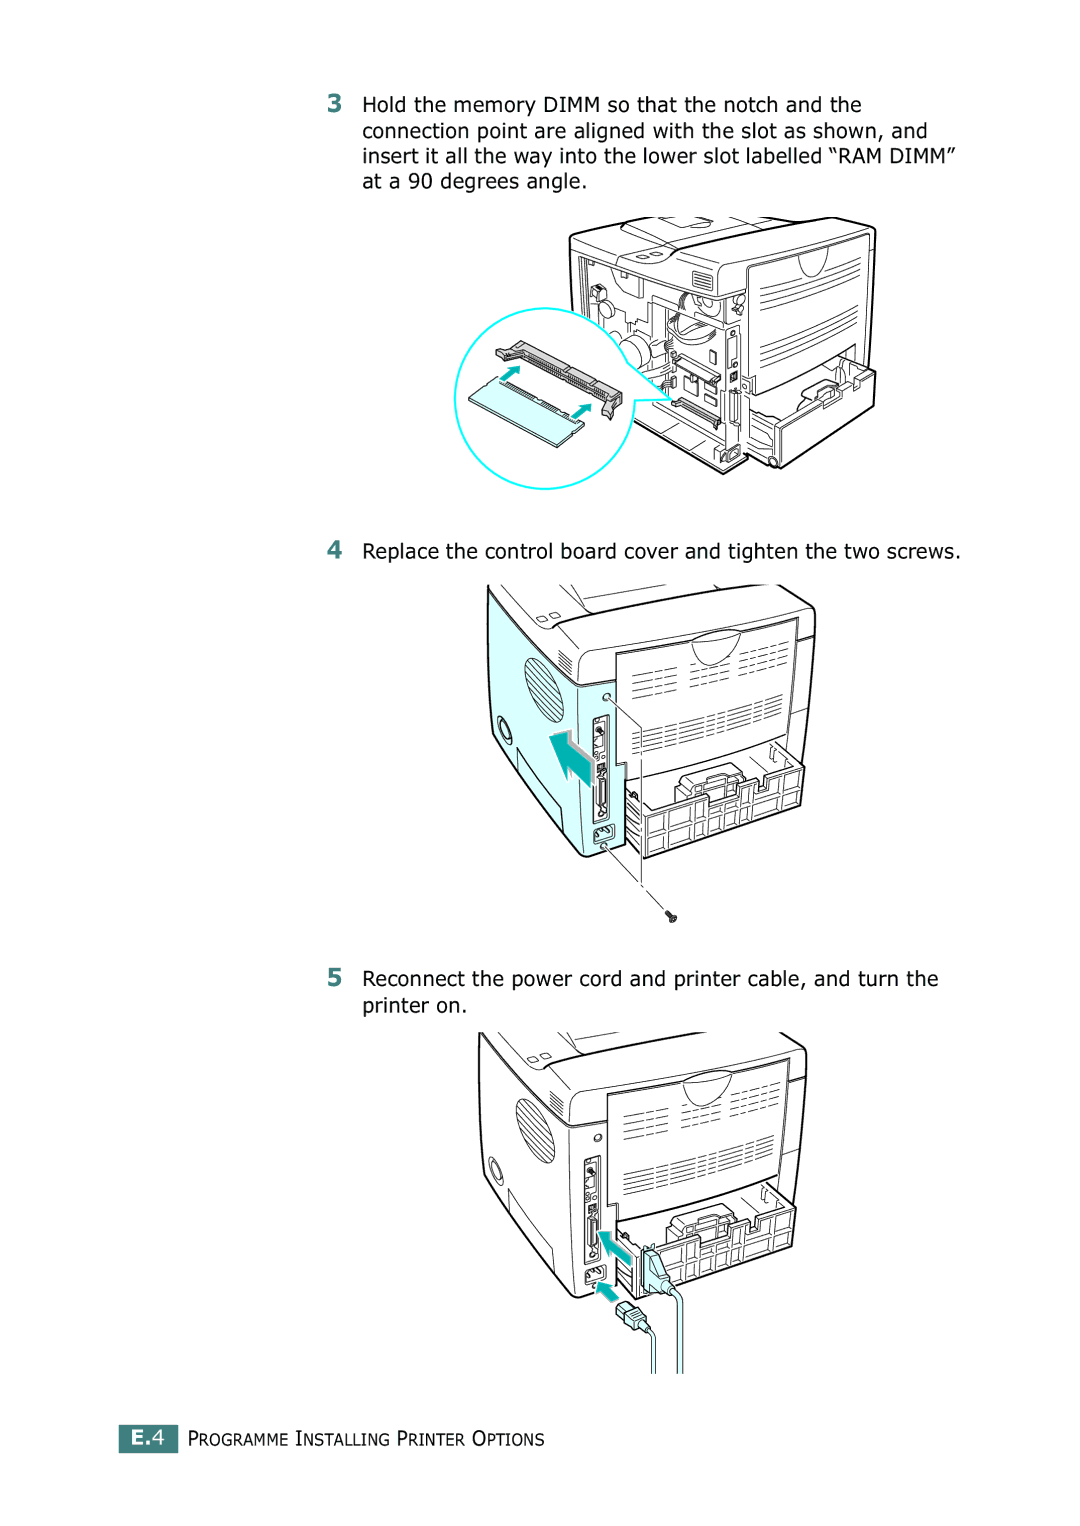
Installing Memory Dimm
Programme Installing Printer Options
Removing the Memory Dimm
Installing a Network or Serial Interface Card
Programme Installing Printer Options E.7
Programme Installing Printer Options
Programme Installing Printer Options E.9
Installing an Optional Paper Tray
Occur. Use the optional Tray 2 with Tray
Memo
Printer Specifications Paper Specifications
Specifications
Specifications and Description
Printer Specifications
Temperature 10 ~ 32 C / 50 ~ 90 F
Humidity 20 ~ 80 % RH
Overview
Paper Specifications
Weight Capacityb
Tray1 Dimensionsa Weight Capacityb
Supported Sizes of Paper
Multi
Symptom Problem with Solution Paper
Guidelines for Using Paper
Category Specifications
Paper Specifications
Paper Output Capacity
Output Tray Capacity
Printer and Paper Storage Environment
Minimum Maximum
Envelopes
Envelopes with Adhesive Strips or Flaps
Envelopes with Double Side Seams
Envelope Margins
Envelope Storage
Transparencies
Labels
See Printing on Transparencies on
Control panel 2.14 double-sided printing
Index
Memory DIMM, install E.3 Multi-Purpose Tray, use