6.4.19. Abbreviation
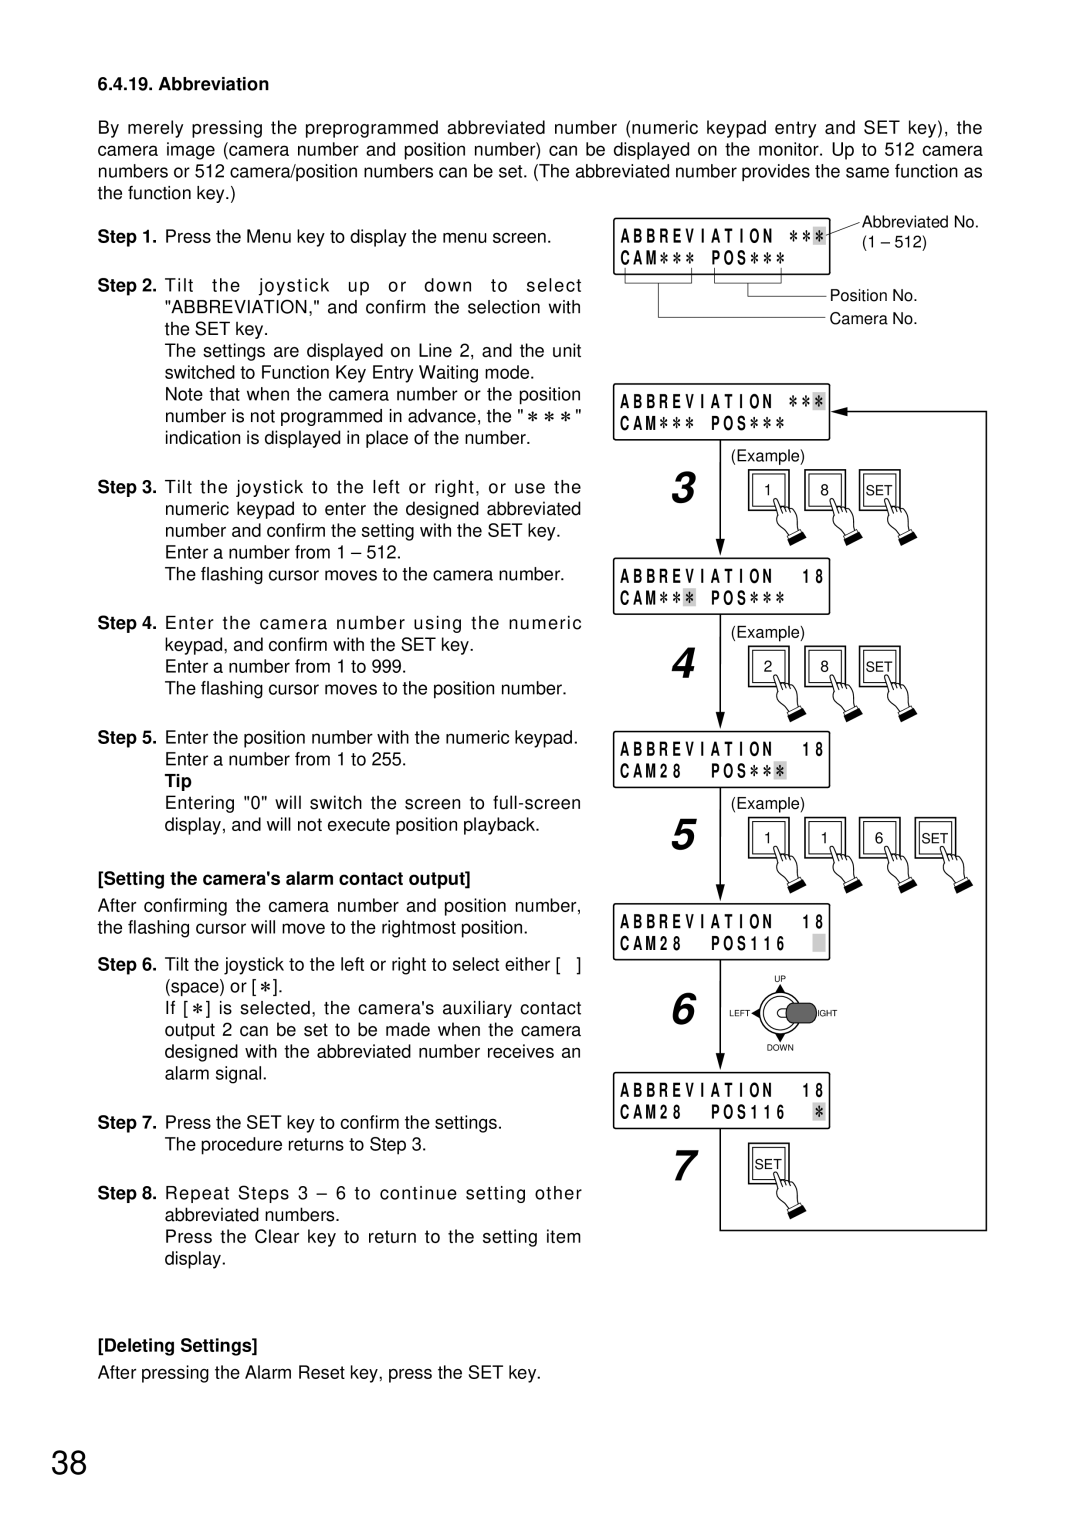
By merely pressing the preprogrammed abbreviated number (numeric keypad entry and SET key), the camera image (camera number and position number) can be displayed on the monitor. Up to 512 camera numbers or 512 camera/position numbers can be set. (The abbreviated number provides the same function as the function key.)
Step 1. Press the Menu key to display the menu screen.
Step 2. Tilt the joystick up or down to select "ABBREVIATION," and confirm the selection with the SET key.
The settings are displayed on Line 2, and the unit switched to Function Key Entry Waiting mode. Note that when the camera number or the position
number is not programmed in advance, the " ![]()
![]()
![]() " indication is displayed in place of the number.
" indication is displayed in place of the number.
Step 3. Tilt the joystick to the left or right, or use the numeric keypad to enter the designed abbreviated number and confirm the setting with the SET key.
Enter a number from 1 – 512.
The flashing cursor moves to the camera number.
Step 4. Enter the camera number using the numeric keypad, and confirm with the SET key.
Enter a number from 1 to 999.
The flashing cursor moves to the position number.
Step 5. Enter the position number with the numeric keypad. Enter a number from 1 to 255.
Tip
Entering "0" will switch the screen to
[Setting the camera's alarm contact output]
After confirming the camera number and position number, the flashing cursor will move to the rightmost position.
Step 6. Tilt the joystick to the left or right to select either [ ] (space) or [ ![]() ].
].
If [ ![]() ] is selected, the camera's auxiliary contact output 2 can be set to be made when the camera designed with the abbreviated number receives an alarm signal.
] is selected, the camera's auxiliary contact output 2 can be set to be made when the camera designed with the abbreviated number receives an alarm signal.
Step 7. Press the SET key to confirm the settings. The procedure returns to Step 3.
Step 8. Repeat Steps 3 – 6 to continue setting other abbreviated numbers.
Press the Clear key to return to the setting item display.
A B B R E V I A T I O N |
|
| Abbreviated No. | ||||||
| |||||||||
|
| (1 – 512) | |||||||
| |||||||||
C A M |
| P O S |
|
|
| ||||
|
|
|
|
|
|
|
|
| Position No. |
|
|
|
|
|
|
|
|
| |
|
|
|
|
|
|
|
|
| |
|
|
|
|
|
|
|
|
| Camera No. |
|
|
|
|
|
|
|
|
| |
A B B R E V I A T I O N |
|
|
| |
C A M | P O S |
|
|
|
3 | (Example) |
|
| |
1 | 8 | SET |
| |
|
|
|
| |
A B B R E V I A T I O N | 1 8 |
|
| |
C A M | P O S |
|
|
|
4 | (Example) |
|
| |
2 | 8 | SET |
| |
|
|
|
| |
A B B R E V I A T I O N | 1 8 |
|
| |
C A M 2 8 | P O S |
|
|
|
5 | (Example) |
|
| |
1 | 1 | 6 | SET | |
|
|
|
| |
A B B R E V I A T I O N | 1 8 |
|
| |
C A M 2 8 | P O S 1 1 6 |
|
|
|
6 | UP |
|
|
|
LEFT | RIGHT |
|
| |
| DOWN |
|
|
|
A B B R E V I A T I O N | 1 8 |
|
| |
C A M 2 8 | P O S 1 1 6 |
|
|
|
7 | SET |
|
|
|
|
|
|
| |
[Deleting Settings]
After pressing the Alarm Reset key, press the SET key.
38
