Operators Manual for Copying Functions
Trademarks
Supplies / Parts
Toshiba Quality is Second to None
Toshiba Quality is Second to None
Toner
General
Preface
Preface
Features of the e-STUDIO211c/311c
Table of Contents
Table of Contents
Selecting finishing modes Using the optional finishers
When the graphic symbols flash on the touch panel
Maintenance
Installation
Precautions
Cool, dry area
General Precautions
Be sure to disconnect the power-cord plug
Handle and use the copier gently and carefully
Copying Prohibition Label Explanatory Label
Precautions
Fixing the adjusters stoppers
Disclaimer Notice
FORGERYPREVENTIONFUNCTION/STORAGEOFCOLOURCOPIES
Before Making Copies
Main Components
Optional Equipment
Optional Equipment Configuration
Control Panel
Stop key
Access Code key
Colour Mode Selection key
Function Clear key
Touch Panel
Message Display
Touch-keys
Set functions confirmation key
Clearing the Functions Selected
Turn on the power switch
Turning on the Power Switch
Controlling the Use of the Copier with Access Codes
Key in a registered access code 5-digit
After Copying is Finished
Following message appears on the basic screen
Turning on the Power Switch
Off-mode Base model
Sleep mode When the copier is used also as a printer
Power consumption and warm-up time at energy saving mode
ENERGY-SAVING Functions
12BEFORE Making Copies
HOW to Make Copies
General Copying Procedures
Place paper in the drawers
Place the originals
When Coming Across the Situations below
Place the next original 2nd side and press the Start key
To make multiple sets of copies
Acceptable Copy Paper Types and Sizes
Setting Copy Paper
Pay attention to the following points
Recommended Paper/Handling and Storing Paper
Recommended Paper
Handling and Storing Paper
Setting Copy Paper
Setting the Drawer for THIN/THICK1/OHP Film
THICK1 or Thin or OHP key
Setting is completed
Acceptable Original Types and Sizes
Setting Originals
Direction shown in the illustration
Setting Originals
When Placing an Original on the Glass
Book-type Originals
When Using the Reversing Automatic Document Feeder optional
Nals
Continuous Feed Mode
When the original starts being pulled in, let go of it
Place paper in the drawers. Place the originals.
Auto JOB Start JOB Preset
Cancelling the auto job start during warming up
During Warming up
During Copying
Cancelling Preset Job during Copying
Auto JOB Start JOB Preset
During Printing optional
Select copy modes as required and press the Start key
Interrupt Copying
Press the Interrupt key
Replace the original with a new one
CANCELLING/RESUMING a Copy Operation
To cancel the copy job
To resume copying
Setting of Basic Copy Modes
Automatic Paper Selection APS
Paper Selection
Place paper in the drawers.
Manual Paper Selection
Using Automatic Magnification Selection AMS
Reduction and Enlargement Copying
Press the AMS key
Press the Original Size key of the same size as the original
Specifying both Original Size and Copy Size
Reduction and Enlargement Copying
Press the Photo Zoom key
Reducing/Enlarging Photos to Standard Size Photo Zoom Key
Press the Start key Photo Size
Press the SET key
Duplex Copying 1-SIDED, 2-SIDED, BOOK-TYPE
Duplex Copying 1-SIDED, 2-SIDED, BOOK-TYPE
Sided Originals 2-Sided Copies
12SETTING of Basic Copy Modes
Press the Start key Book-Type Originals 2-Sided Copies
Press the Book 2 key Select the book copying type
Copy Density Adjustment
Press the desired colour mode selection key
Colour Mode
Original Mode
18SETTING of Basic Copy Modes
Colour Editing and Adjustment
Press the desired copy colour key
Press the Start key Cancelling the Hue Adjustment
HUE Adjustment
Saturation
Press the Start key Cancelling the Saturation Adjustment
Press the Start key Cancelling the Colour Balance Adjustment
Colour Balance Ymck Adjustment
RGB Adjustment
ONE-TOUCH Adjustment
Press the Start key Cancelling the Background Adjustment
Background Adjustment
Press the Start key Cancelling the Sharpness Adjustment
Sharpness Adjustment
10COLOUR Editing and Adjustment
Using the Editing Functions
Providing Right or Left Margin Place paper in the drawers.
Image Shift
Press the Start key Providing a Bookbinding Margin
Adjust the binding margin, then press the SET key
Edge Erase
Book Centre Erase
Select the 1 Side
DUAL-PAGE
Finished key
After all your originals have been scanned, press
Full Image
1 / 4
Select the type of the original
1 / 4 in 1
Place paper in the drawers. Select the paper type
Magazine Sort from the Editing Menu
Adjust the binding margin and press the SET key
Magazine Sort from the Editing Menu
Press Start key
Press the lower SET key
Y Zoom
Image Editing
Trimming/Masking
Press the Trim or Mask key
Enter the distance values read in for Specified area
Place an original on the glass to specify the area
Image Editing
Mirror Image
Press the Mirror key
Press the NEG/POS key
Negative/Positive Reversal
Press the ALL or Part key to select the area for centring
Centring
Enter the distance values read in for the specified area
Page
Press the lower SET key Select the repeat number
Enter the distance values read for the area to be re- peated
22USING the Editing Functions
Using the Special Functions
Continuousoriginalfeeding / Singleoriginalfeeding
Page
MIXED-SIZED Originals
Bypass Copying
Bypass Copy Mode
Bypass Copying
Bypass Copying
Perform steps 1 to 2 on
Bypass Copying on Standard Size or A3-wide Paper
8USING the Special Functions
Bypass Copying on Non-standard Size Paper
Perform steps 1 to 3 on Press the NON-STANDARD key
Then press the lower SET key
Press the desired Memory Number key
Storing a Non-Standard Size in the Memory
Thin Paper/Thick Paper/Special Paper/Sticker Label
Thin Paper/Thick Paper/OHP Film/Special Paper/Sticker Label
Only A4-sized OHP film is acceptable
OHP Films
Mode Memory
Mode Memory
Confirming Stored Copy Modes
Setting the Other Size KEY
User Selection Initial Settings
Right are initial settings default settings
Keys in the shaded pattern on the screens shown on
User Selection Initial Settings
Set the ON/OFF times for each day of the week
Weekly Timer
Cancelling the Use of the WeeklyTimer
Weekly Timer
Setting the Date and Time
Check that the settings are all correct
Setting the Clock to the Daylight Saving Time System
Total Counter
Department management menu appears
Department Management
Printing an Access Code List
An output example of the access code list
Department Management
Setting Access Codes Registration/Change/Deletion
Press the Enable key, then the SET key
Press the key of the desired function
Limit number of prints 7 digits
Registering New Access Code and Limit Number of Outputs
CODE, and press the SET key
Spectively, and then press the SET key
When the ID Change key is selected in step
When the Limitation key is selected in step
Press the SET key Press the ID Change or Limitation key
28USING the Special Functions
Resetting Counters
Automatic Calibration
Press the Calibration key
Press the key of the desired language
Switching Between Languages
Setting the Energy Saving Mode
Is activated
Clearing theAutomaticEnergy SavingMode
Clearing the Off-Mode/Sleep Mode
Setting the OFF-MODE Auto Shutoff
Clearing of Toner Counter
36USING the Special Functions
Selecting Finishing Modes
Using the Optional Finishers
Names of the Main Components
Finishing Modes and Finishers Optional
SORT/GROUP Copying
Staple Sorting
Maximum Number of Sheets that can be Stapled
Place paper in the drawers. Set the paper size
MAGAZINESORT&SADDLESTITCHINGMODEBOOKLETMODE
LT-R
Conditions Making Saddle Stitching Possible
Number of punch holes and available paper sizes
Hole Punching Mode
Network Scanning Function
Using the Optional Printer Controller
Scan to IFax
About the Scanning Function
Scan to Mailbox
Scan to E-mail Scan to Hold Queue
Procedure of Scan Setting
Procedure of Scan Setting Place the originals
Press the PRINTER/NETWORK key
Procedure of Scan Setting
Press the Scan key
Press the Scan key Set the file name
Single/Double sided
10Change the setting as required, then press the Next key
Confirm the entered file name
Select the destination
12Change the setting as required, then press the Next key
11Change the setting as required, then press the Next key
When Using the Optional Reversing Automatic Document Feeder
Procedure of Private Scan Setting
Press the OK key
Select your scan user name
Sending to Mailbox
Press the Scan! key or Start key on the con- trol panel
Press the Enable key, then key in the mailbox ID
Sending E-mail
Confirm the entered E-mail addresses
Press the Next key
To delete the entered E-mail address
Attachment/URL
Change the setting as required,then press the SET key
Sending IFax
File format
To delete the entered IFax address
Confirm the entered IFax addresses
Sending to FTP server
Press the Next key
Set the FTP user name
Confirm the contents filled in, then press the SET key
About the Setting Before Scanning
Setting and Registration of Templates
Setting by the User
About the Setting Before Scanning
Set the template name
Confirming the FTP Server at the Default Setting
Press the Template Setting key Select the scan user name
Setting by the Administrator
Press the NEW key Set the template
Press this key to delete a letter before the cursor
Page
Setting the Scan User
Set your scan user name
To delete the entered scan user name
Setting the Administrator Password
Setting the New Administrator Password
Touch panel Press the Password Setting key
Changing the Administrator Password
Press the Shutdown key Press the YES key
Shutting Downthe Power Supplytothe Printer Controller
When the Graphic Symbols Flash on the Touch Panel
Description Ofthe Flashing Graphic Symbols
ADD Paper Symbol
Adding Paper to the Drawers
Push the drawer straight in until it comes to a stop
Place paper in the large-capacity feeder
ADD Paper Symbol
Adding Paper to the Large-Capacity Feeder optional
Open the cover of the large-capacity feeder optional
Open the front covers in the order of to
Replace Toner Cartridge Symbol
Close the covers in the order of to
Replace Toner Cartridge Symbol
Close the used toner bag
Replace Toner BAG Symbol
Replace Toner BAG Symbol
Clear Paper Symbol
Remove any misfed paper
Clear Paper Symbol
Page
Reset the sheets of paper on the bypass guide
Send any paper to the transfer belt
Exit guide
Lower guide
Push the lever to lift the lower guide plate
Page
Remove any misfed paper in the paper exit area
Page
20WHEN the Graphic Symbols Flash on the Touch Panel
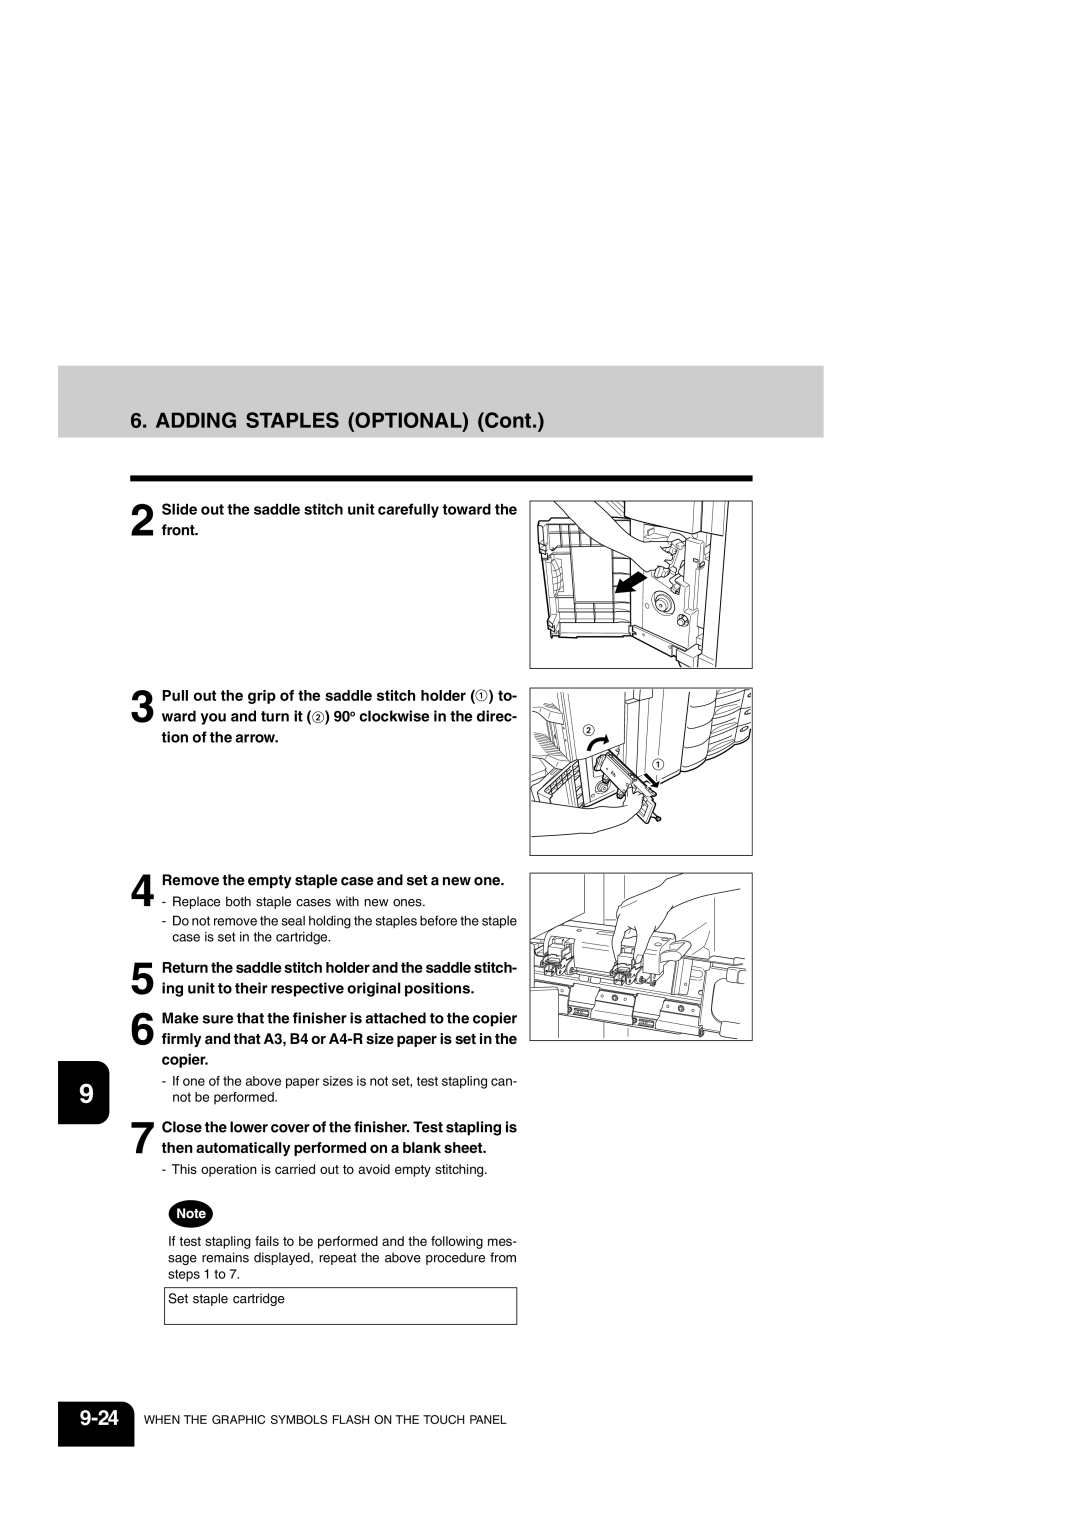
Adding Staples Optional
Adding Staples Optional
Page
Copier
Removing Jammed Staples Optional
Return the staple case to its original position
Removing Jammed Staples OPTIONALCont
Saddle Stitch Unit MJ-1020 only
Remove the empty staple case
Open the cover of the hole punch unit
Clearingaccumulatedpunchedpaperbitsoptional
Call Service Symbol
Periodic Maintenance Message
30WHEN the Graphic Symbols Flash on the Touch Panel
Maintenance
Daily Inspection
Cleaning the Original Glass
Wipe a dry cloth over the glass Cleaning the Original Cover
Power switch ON/OFF status
Cleaning the Reversing Automatic Document Feeder optional
Simple Troubleshooting
Display does not change when keys or icons are pressed
Copier does not start
Copy density is too low
Copy density is too high
Copies are stained
Functions cannot be set
Simple Troubleshooting
Copy images are blurred
Images are partially missing
Specifications & Options
STUDIO211c/311c Specifications
11-3
Continuous Copying Speed
STUDIO211c/311c Specifications
11-5
Specifications of Options
Additional Drawer Module
Specifications of Options
A3,A4-R,B4,FOLIO
Finishers
Hole Punch Unit Options for MJ-1019/MJ-1020
Specification of Options
11-9
Packing List
11-10SPECIFICATIONS & Options
APS
Copying Function Combination
Image Quality Adjustment Combination Matrix
Numbers
Index
Index
Initial settings
11-15
3-4
Memo
Memo
Page
Toshiba TEC Corporation All rights reserved