No. | Part name |
| Procedure | Remarks |
|
|
|
|
|
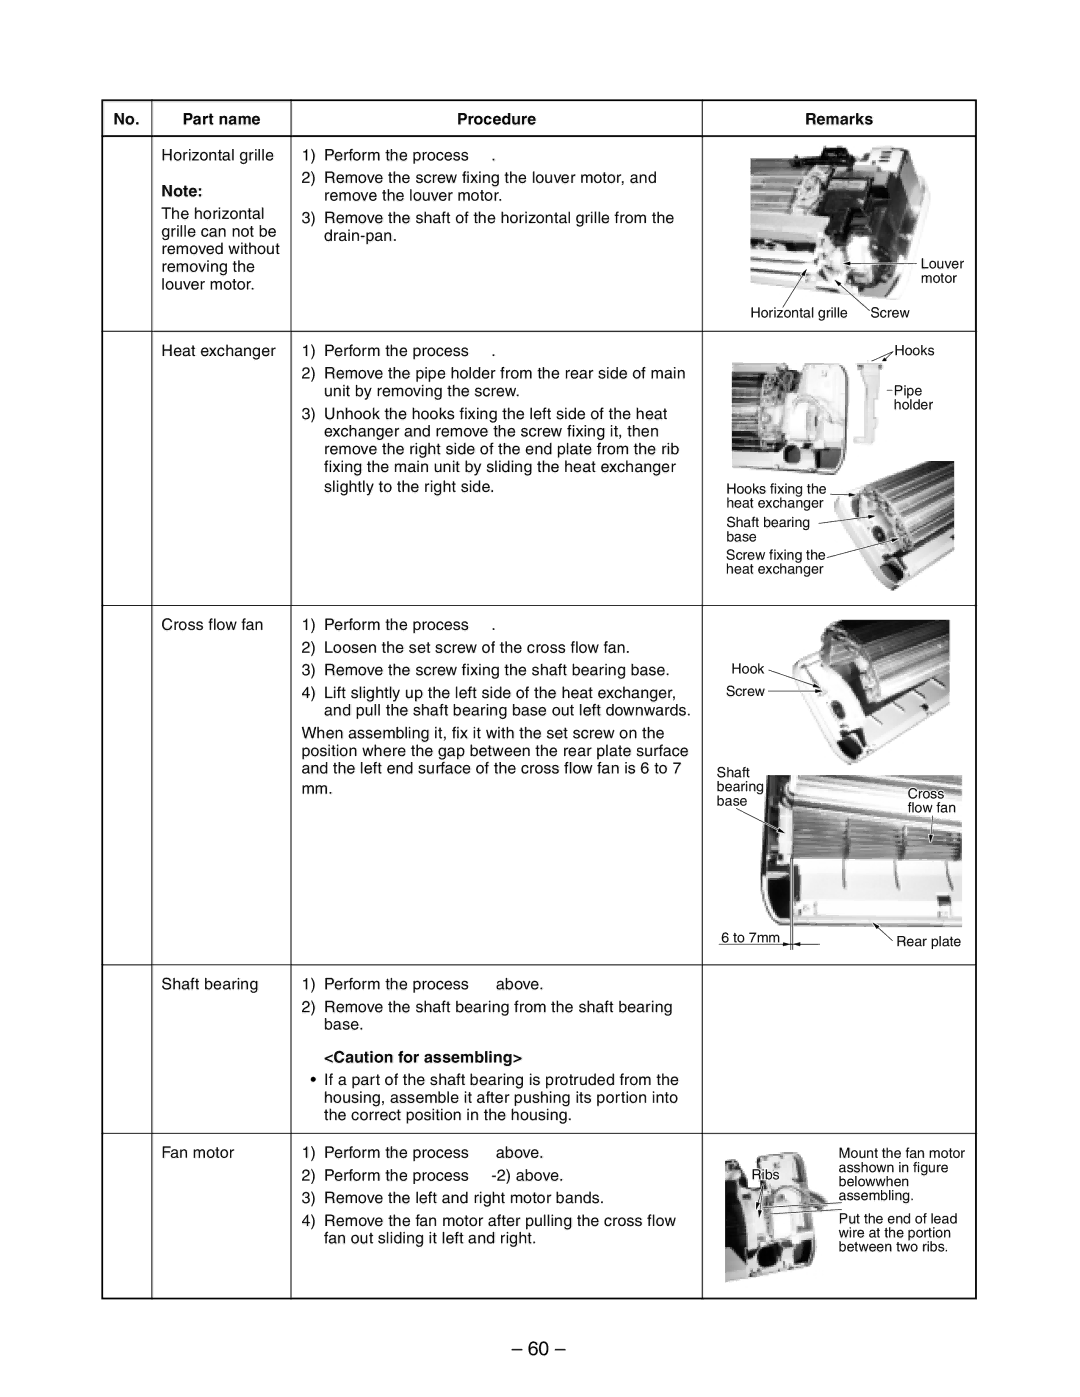
T | Horizontal grille | 1) | Perform the process R. |
|
| Note: | 2) | Remove the screw fixing the louver motor, and |
|
|
| remove the louver motor. |
| |
| The horizontal | 3) | Remove the shaft of the horizontal grille from the |
|
| grille can not be |
|
| |
| removed without |
|
| Louver |
| removing the |
|
| |
| louver motor. |
|
| motor |
|
|
|
| |
|
|
|
| Horizontal grille Screw |
|
|
|
| |
U | Heat exchanger | 1) Perform the process S. | Hooks | |
|
| 2) | Remove the pipe holder from the rear side of main |
|
|
|
| unit by removing the screw. | Pipe |
|
| 3) | Unhook the hooks fixing the left side of the heat | holder |
|
|
| ||
|
|
| exchanger and remove the screw fixing it, then |
|
|
|
| remove the right side of the end plate from the rib |
|
|
|
| fixing the main unit by sliding the heat exchanger |
|
|
|
| slightly to the right side. | Hooks fixing the |
|
|
|
| heat exchanger |
|
|
|
| Shaft bearing |
|
|
|
| base |
|
|
|
| Screw fixing the |
|
|
|
| heat exchanger |
|
|
|
| |
V | Cross flow fan | 1) Perform the process S. |
| |
2) Loosen the set screw of the cross flow fan.
3) Remove the screw fixing the shaft bearing base. | Hook |
|
4) Lift slightly up the left side of the heat exchanger, | Screw |
|
and pull the shaft bearing base out left downwards. |
|
|
When assembling it, fix it with the set screw on the |
|
|
position where the gap between the rear plate surface |
|
|
and the left end surface of the cross flow fan is 6 to 7 | Shaft |
|
mm. | bearing | Cross |
| base | |
| flow fan | |
|
|
|
|
|
| 6 to 7mm |
|
| Rear plate |
|
|
|
|
|
| ||
|
|
|
|
|
|
|
|
W | Shaft bearing | 1) | Perform the process V above. |
|
|
|
|
|
| 2) | Remove the shaft bearing from the shaft bearing |
|
|
|
|
|
|
| base. |
|
|
|
|
|
|
| <Caution for assembling> |
|
|
|
|
|
| • | If a part of the shaft bearing is protruded from the |
|
|
|
|
|
|
| housing, assemble it after pushing its portion into |
|
|
|
|
|
|
| the correct position in the housing. |
|
|
|
|
|
|
|
|
|
|
|
|
X | Fan motor | 1) | Perform the process U above. |
|
|
| Mount the fan motor |
|
| 2) | Perform the process | Ribs |
| asshown in figure | |
|
|
| belowwhen | ||||
|
|
|
|
|
|
| |
|
| 3) | Remove the left and right motor bands. |
|
|
| assembling. |
|
| 4) | Remove the fan motor after pulling the cross flow |
|
|
| Put the end of lead |
|
|
| fan out sliding it left and right. |
|
|
| wire at the portion |
|
|
|
|
|
| between two ribs. | |
|
|
|
|
|
|
| |
– 60 –