Manuals
/
Turbo Chef Technologies
/
Kitchen Appliance
/
Convection Oven
Turbo Chef Technologies
i5
service manual
Figure A-7 Removing Left Side Cover Required
Models:
i5
1
81
85
85
Download
85 pages
17.59 Kb
78
79
80
81
82
83
84
85
Troubleshooting
Specification
Install
Error messages
Oven Schematic
Viewing the Fault Log
Test Mode Status Indicators
Remove and Clean the Wire Rack
Dimension
Maintenance
Page 81
Image 81
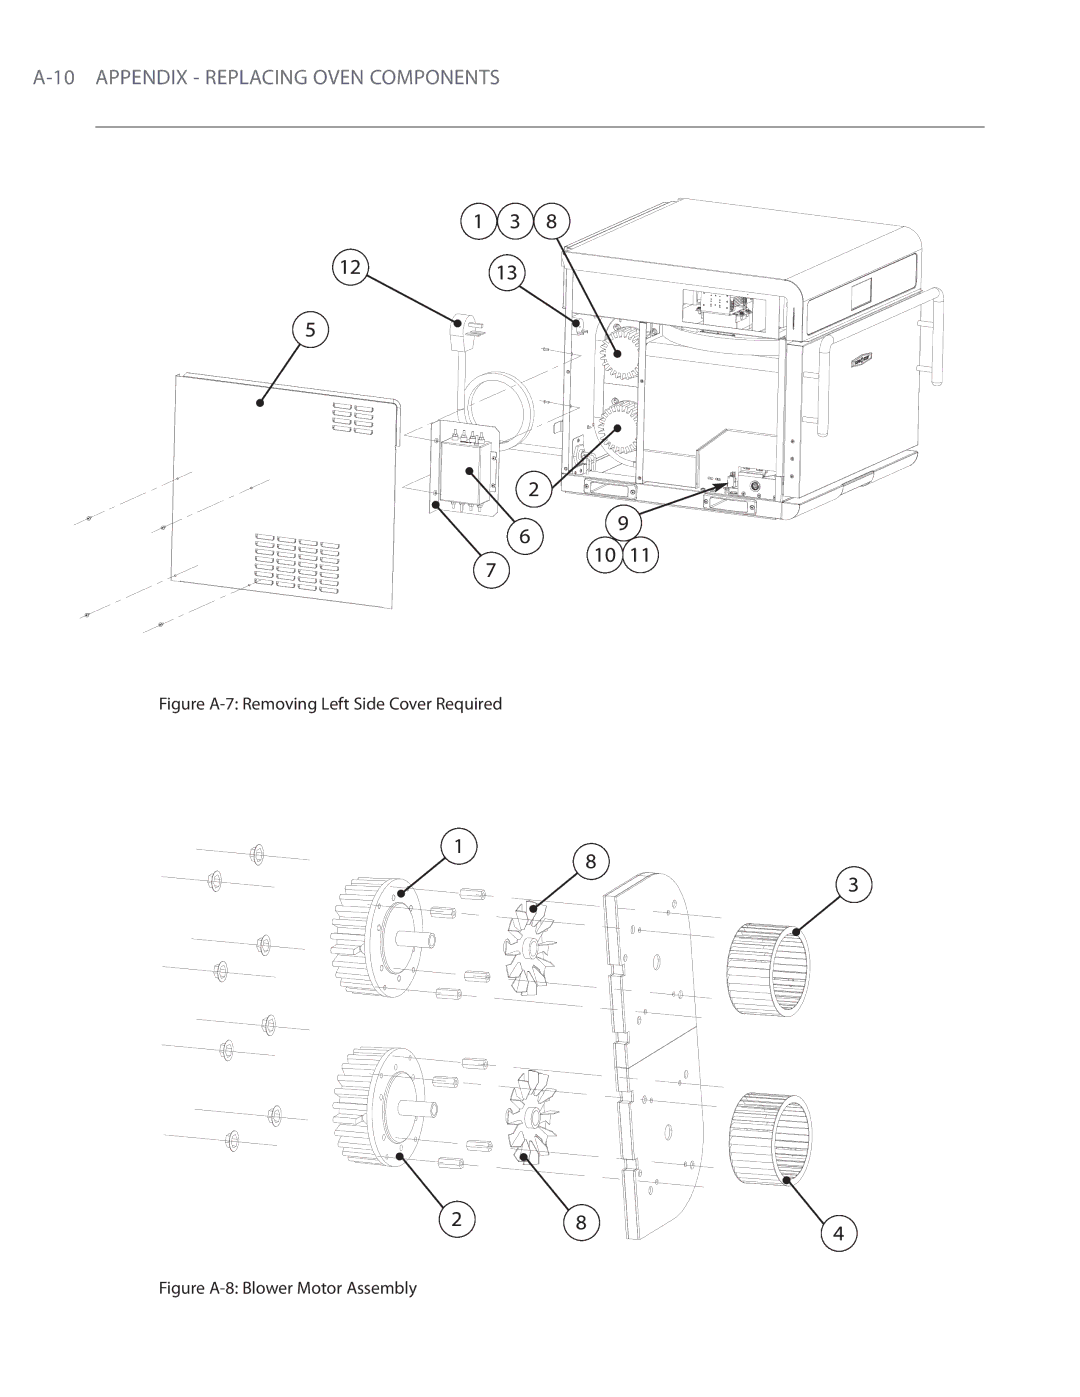
A-10
APPENDIX - REPLACING OVEN COMPONENTS
1
3 8
12
13
5
2
6
9
10 11
7
Figure
A-7:
Removing Left Side Cover Required
1
8
3
2
8
4
Figure
A-8:
Blower Motor Assembly
Page 80
Page 82
Page 81
Image 81
Page 80
Page 82
Contents
Accelerating the World of Cooking TM
Page
For further information, call 800.90TURBO
Page
Table of Contents
Oven Systems
Edit Mode
RTD
Oven Schematic Appendix Replacing Oven Components
Troubleshooting
Reducing Fire Risk
General Safety Information
Power Cord Replacement
Grounding Instructions
RF Interference Considerations
Specifications and Installation
Theory of Operation
Dimensions
Certifications
Oven Construction
Electrical Specifications
Single Phase
Multi Phase
Lifting and Placing the Oven
Unpacking Instructions
Installation Near Open Heat Source
Optional Installation Items
Voltage Selection
32.0 813 mm
This page intentionally Left blank
Daily Maintenance
Remove and Clean the Lower Jetplate
Remove and Clean the Wire Rack
Remove and Clean the Lower Air Diverter
Clean the Oven Interior
Reinstall Components
Clean and Dry the Oven Door
Clean the Drain Pan
Clean the Oven Exterior
Oven Controls and Cooking
Oven Controls
Cooking
Mode 1 Oven Off
Mode 3 Warming Up
Mode 2 Temperature Select
Mode 4 Soak
Mode 5 Ready to Cook or Idle
Mode 7 Cooking
Mode 9 Cook More
Mode 8 Remove Food from Oven
Mode 10 Cooling Down
Viewing the Fault Log
Overview of the Info Mode
Viewing the Service Numbers
Viewing Cook Counter/Time Logs
Info Mode
Setting the Language
Resetting the Oven
Setting the Date/Time
Turning Oven Options On/Off
Test Mode Status Indicators
Test Mode Testing Oven Parts
Test Mode Fault Log
Test Mode Turning On/Off Diagnostic Mode
Test Mode Manufacturing Mode
Test Mode Self Test
Microwave Power Test
Microwave Leakage Test
Erase/Default Oven Settings
Changing Temperature Measurement Setting
Loading a Menu
Serial Number Edit
Inserting Smart Card/USB Device
Updating the Software
Edit Mode
Single vs. Multiple Temperature Mode
Overview of the Edit Mode
Changing Food Group/Recipe Name
Changing Set Temperatures
Changing Recipe Settings
This page intentionally Left blank
Oven Systems
Convection System
Removing/Reinstalling the Oven Door
Troubleshooting Convection System
Adjusting the Oven Door
Oven Door
Oven Systems
Interlock Switches
Adjusting the Door Switches
Hinges and Counter-Balance Assembly
= Loosen = Tighten = Loosen Slightly Step
Measuring RF Leakage for Microwave Safety
Survey Meter Placement
Troubleshooting
Wiring the Filament Transformers
Testing a Capacitor
Microwave System
Capacitors
Testing a Filament or HV Transformer
Wiring the High-Voltage Transformers
High-Voltage Transformers
High-Voltage Diodes
Testing a High-Voltage Diode
Testing a Magnetron for an Open/Shorted Filament
Magnetrons
Wave Guides
Control System
High Limit Thermostat
Power Supply
Magnetron Thermostats
Relay K1 Filament
Relay K7 Magnetron Cooling Fan
Wire Harness
Relay K8 Stirrer Motor
Smart Card Reader
Catalytic Converter
Filtering System
Drain Pan
Air Filter
Troubleshooting
Fault Code Descriptions
Overview of Troubleshooting
F7 RTD Open
Below
Fault Code Troubleshooting
No YES
Is the K6 mechanical
Replace the F3 or F4
Are both cooling fans rotating?
Yesno
Non-Fault Code Troubleshooting
Does the keypad beep when
YES YES no
Did you use a smart card or USB Smart Card
Verify the USB device is Is the connection from
Troubleshooting
Oven Schematic
Delta WYE
This page intentionally Left blank
Appendix Replacing Oven Components
To Replace This First Remove This
Comprehensive Table of Oven Components
2APPENDIX Replacing Oven Components
Replacing Items No Cover Removal Required Figures A-1, A-2
Figure A-1 No Cover Removal Required
16 17
4 5 11 12 13 15 16
Replacing Items Opening Top Cover Required Figure A-3
Cover, Top I5-9243
Figure A-4 Removing Top Cover Required
13 14 15
Figure A-6 Top Cover Detail
Qty
Figure A-7 Removing Left Side Cover Required
Replacing Oven Components
I5-9316 Screw, 10-32 x 3/8 lg, PFLH, 100 Deg, SS 101401 qty
Oven Components
For service or information
Top
Page
Image
Contents