Accelerating the World of Cooking TM
Page
For further information, call
800.90TURBO or +1
Please carefully read this manual and retain it for future reference
Safety Instructions
Specifications and Installation
Daily Maintenance
Oven Controls and Cooking
Edit Mode
Oven Systems
Testing a Capacitor
Wiring the Filament Transformers
Wiring the High-Voltage Transformers
Testing a Filament or High-Voltage Transformer
Oven Schematic
Troubleshooting
Appendix - Replacing Oven Components
General Safety Information
i SAFETY INSTRUCTIONS
Reducing Fire Risk
Safety Instructions
Power Cord Replacement
ii SAFETY INSTRUCTIONS
Grounding Instructions
RF Interference Considerations
Specifications and Installation
Dimensions
SPECIFICATIONS AND INSTALLATION
Theory of Operation
Certifications
Electrical Specifications
2 SPECIFICATIONS AND INSTALLATION
Single Phase
Multi Phase
Lifting and Placing the Oven
Unpacking Instructions
SPECIFICATIONS AND INSTALLATION
Installation Near Open Heat Source
Optional Installation Items
4 SPECIFICATIONS AND INSTALLATION
Voltage Selection
SPECIFICATIONS AND INSTALLATION
32.0” 813 mm
27.8” 706 mm
26.625” 676 mm
6 SPECIFICATIONS AND INSTALLATION
This page intentionally left blank
Daily Maintenance
Step 2 Remove and Clean the Wire Rack
Step 3 Remove and Clean the Lower Jetplate
Step 4 Remove and Clean the Lower Air Diverter
Step 6 Clean the Oven Interior
8 DAILY MAINTENANCE
Step 7 Clean and Dry the Oven Door
Step 10 Reinstall Components
Step 11 Clean the Drain Pan
Oven Controls and Cooking
Oven Controls
1. Info Key
2. On/Off Key
5. Back/Stop Key
10 OVEN CONTROLS AND COOKING
Cooking
Mode 1 Oven Off
Mode 2 Temperature Select
Mode 6 Adjust Time
Mode 3 Warming Up
Mode 4 Soak
12 OVEN CONTROLS AND COOKING
Mode 9 Cook More
Mode 7 Cooking
Mode 8 Remove Food from Oven
Viewing the Fault Log
Viewing the Service Numbers
Overview of the Info Mode
Viewing Cook Counter/Time Logs
Info Mode
Resetting the Oven
Setting the Language
Setting the Date/Time
Turning Oven Options On/Off
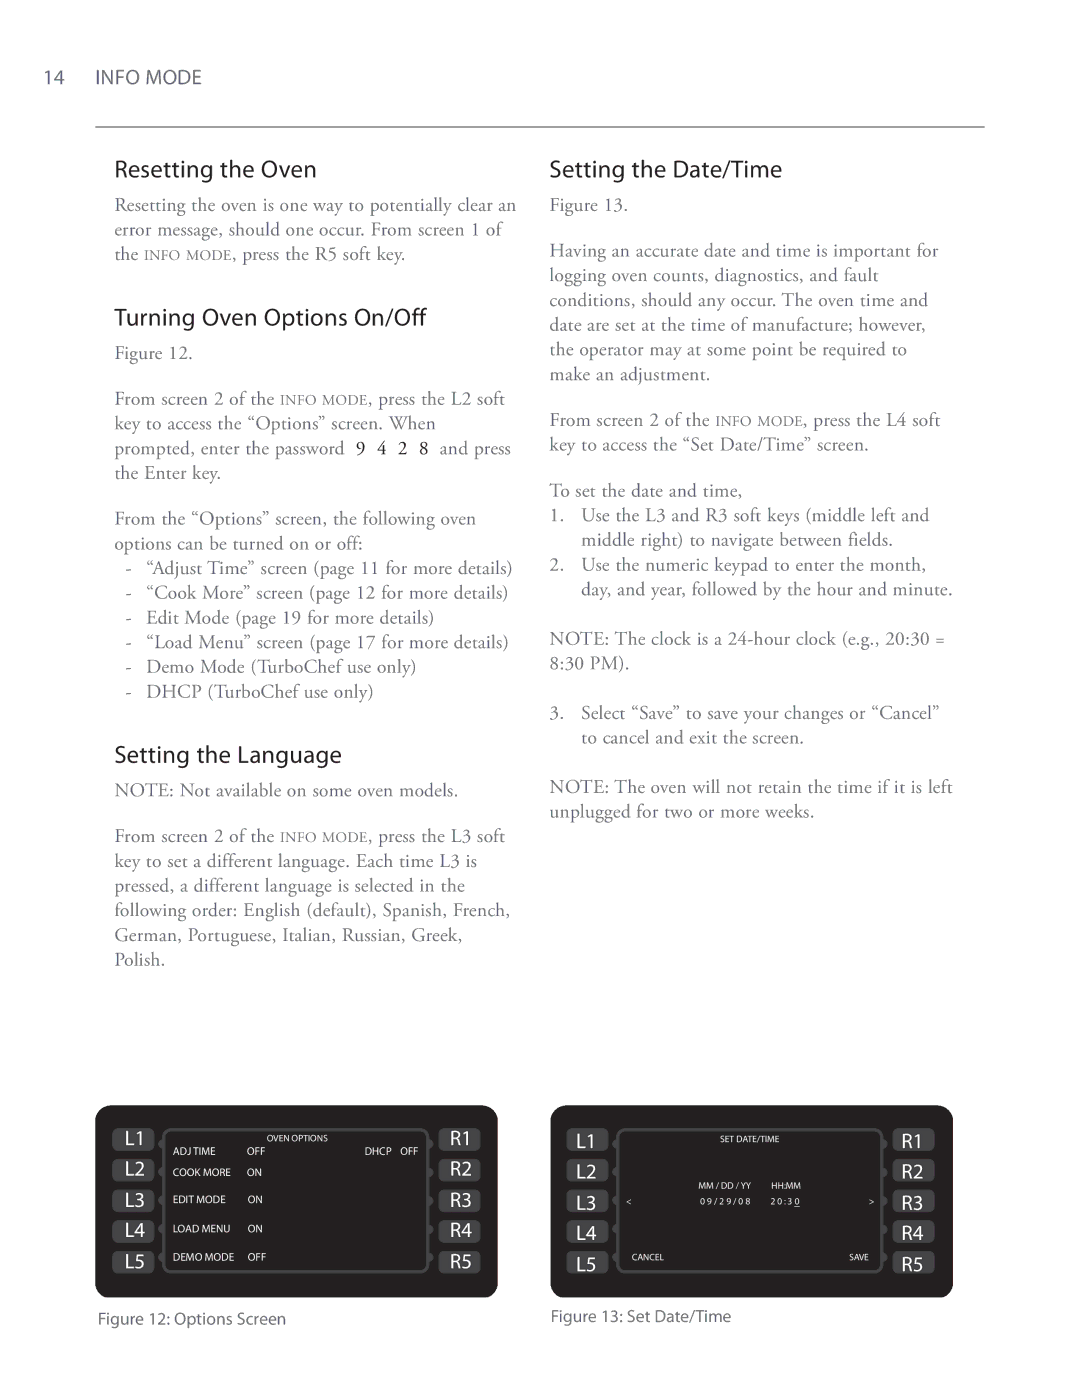
Test Mode - Testing Oven Parts
Test Mode - Status Indicators
Test Mode - Fault Log
Test Mode - Turning On/Off Diagnostic Mode
Microwave Power Test
Test Mode - Self Test
Test Mode - Manufacturing Mode
16 INFO MODE
Changing Temperature Measurement Setting
Erase/Default Oven Settings
Loading a Menu
Serial Number Edit
Updating the Software
18 INFO MODE
Edit Mode
Overview of the Edit Mode
Single vs. Multiple Temperature Mode
EDIT MODE
Changing Food Group/Recipe Name
Changing Set Temperatures
20 EDIT MODE
Changing Recipe Settings
EDIT MODE
22 EDIT MODE
This page intentionally left blank
Oven Systems
Stirrer Motor and Assembly
Convection System
Blower Motor Bottom
Blower Motor Top
Troubleshooting Convection System
Removing/Reinstalling the Oven Door
Adjusting the Oven Door
Oven Door
OVEN SYSTEMS
Tap in this
Interlock Switches
Adjusting the Door Switches
Hinges and Counter-Balance Assembly
Adjusting the Counter-Balance Assembly
Measuring RF Leakage for Microwave Safety
OVEN SYSTEMS
Troubleshooting
28 OVEN SYSTEMS
Testing a Capacitor
Wiring the Filament Transformers
Microwave System
Capacitors
Wiring the High-Voltage Transformers
Testing a Filament or HV Transformer
30 OVEN SYSTEMS
High-Voltage Transformers
Testing a High-Voltage Diode
OVEN SYSTEMS
Testing a Magnetron for an Open/Shorted Filament
32 OVEN SYSTEMS
Magnetrons
Wave Guides
Control System
Control Board
Display
Electrical Compartment Cooling Fans
Power Supply
34 OVEN SYSTEMS
High Limit Thermostat
Magnetron Thermostats
Wire Harness
Relay - K7 Magnetron Cooling Fan
Relay - K8 Stirrer Motor
Smart Card Reader
Filtering System
36 OVEN SYSTEMS
Catalytic Converter
Drain Pan
Troubleshooting
Overview of Troubleshooting
Fault Code Descriptions
TROUBLESHOOTING
For instructions on viewing the fault counter, see page
F7 RTD Open
38 TROUBLESHOOTING
F8 Heat Low
Fault Code Troubleshooting
TROUBLESHOOTING
Is each blower motor
Do resistance measurements
40 TROUBLESHOOTING
Troubleshooting F2 LOW TMP Cook Temperature Low
TROUBLESHOOTING
Troubleshooting F3 MAG CURR Magnetron Current Low
Troubleshooting F4 MONITOR Door Monitor Defective
42 TROUBLESHOOTING
Troubleshooting F5 MAG TEMP Magnetron Over Temperature
Troubleshooting F6 EC TEMP Electrical Compartment Temperature High
TROUBLESHOOTING
Troubleshooting F7 THERMO RTD Open
44 TROUBLESHOOTING
Replace the solid state relay
Non-Fault Code Troubleshooting
TROUBLESHOOTING
Troubleshooting No Keypad Input
Troubleshooting “Cook Door Open” Message when Door is Closed
46 TROUBLESHOOTING
Troubleshooting No Display - Screen is Blank
TROUBLESHOOTING
Does the problem occur for all
Troubleshooting Food Not Cooking Properly
programmed recipes? For example, are all
48 TROUBLESHOOTING
USB Device
TROUBLESHOOTING
Troubleshooting “Write Fail” Message When Loading Menu
Troubleshooting “Defective Media” Message When Oven is
50 TROUBLESHOOTING
Plugged in or Restarted
Oven Schematic
OVEN SCHEMATIC
DELTA
TURBOCHEF TECHNICAL SUPPORT
+214-379-6000 International
This page intentionally left blank
Appendix - Replacing Oven Components
Comprehensive Table of Oven Components
To Replace This
First Remove This
APPENDIX - REPLACING OVEN COMPONENTS
A-2 APPENDIX - REPLACING OVEN COMPONENTS
To Replace This
First Remove This
No Covers
Replacing Items - No Cover Removal Required Figures A-1, A-2
A-3 APPENDIX - REPLACING OVEN COMPONENTS
To Replace This
First Remove This
Figure A-2 Door Assembly Detail
A-4 APPENDIX - REPLACING OVEN COMPONENTS
Figure A-1 No Cover Removal Required
Replacing Items - Opening Top Cover Required Figure A-3
11 12
A-6 APPENDIX - REPLACING OVEN COMPONENTS
NOTE Additional keypad detail on Figure A-6, page A-8
Replacing Items - Removing Top Cover Required Figures A-4, A-5, A-6
APPENDIX - REPLACING OVEN
A-8 APPENDIX - REPLACING OVEN COMPONENTS
Figure A-6 Top Cover Detail
Replacing Items - Removing Left Side Cover Required Figures A-7, A-8
A-9 APPENDIX - REPLACING OVEN COMPONENTS
Figure A-8 Blower Motor Assembly
A-10 APPENDIX - REPLACING OVEN COMPONENTS
Figure A-7 Removing Left Side Cover Required
A-11
Replacing Items - Removing Right Side Cover Required Figure A-9
REPLACING OVEN COMPONENTS
A-12 APPENDIX - REPLACING OVEN COMPONENTS
A-13
OVEN COMPONENTS
REPLACING
Figure A-11 Counter Balance Assembly, Hinge, and Switch Detail
For service or information
Customer Service at 800.90T U R B O or
+1 214-379-6000 or Your Authorized Distributor
W I T H I N N O RT H A M E R I C A C A L L