JVC DLA-QX1G manual Menu Operation Procedure

Page 45

Menu Operations (Cont.)
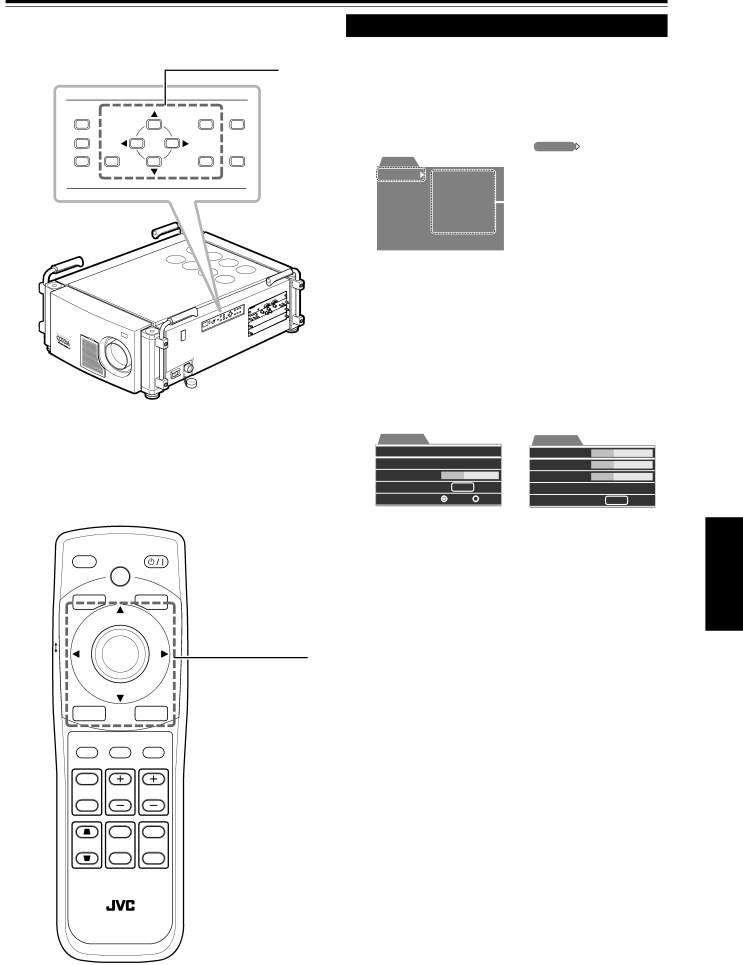
Projector’s buttons

Menu operating buttons

VIC SELECT

MENU

T

1


2


ZOOM

3


EXIT

ENTER

W

Remote control unit


OPERATE


HIDE


BACK


LIGHT

LOCK


Menu operating

UNLOCK

ENTER

control and buttons


EXITMENU

VIC 1 VIC 2 VIC 3

Menu Operation Procedure

1 Press the MENU button.

The main menu appears.

When the video image is projected on the screen, the menu corresponding to the input signal is displayed. When there is no signal, No signal menu is displayed.


is indicated on

Menu


the selected item.

Image adj.

Contrast


Setting

Brightness


VIC menu

Color temp.


The item list of the sub


Options

Gamma


menu appears.

Language

Sub brightness


Information


Ex. “Main : Image adj.”

2 Press /5 to select the item in the main menu.

When “Information” is selected, the information about the input video image appears on the right side of the menu.

3 Press the ENTER button or 3 to go to the sub menu.

The sub menu appears.

VIC menu


VIC menu 1


Tracking

1020


Tint

123


Phase

12

3

Color

123

3

AD sync adj. 123

Sharpness 123

Offset & Gain

ENTER


Phase

123

Clamp

ST

BP

VIC menu 2

ENTER

Ex. “VIC menu” in RGB VIC

Ex. “VIC menu 1” in HD VIC

menu


menu


4 Press /5 to select the item in the sub menu.

When “Language menu” is displayed, select the desired language in this step. Then, go to step 6.

5 Pressitem. 3/2 to adjust the selected

When the item with indication is selected, you can go to the next sub menu by pressing the ENTER

button. Then, adjust the item using 3/2.

6 Press EXIT to go back to the previous screen.

ENGLISH

T

ZOOM SHIFT FOCUS

W

ON T

DIGITAL

KEYSTONE SHUTTER ZOOM

OFF W

RM-MQX1G REMOTE CONTROL UNIT

When using the remote control unit, refer to “Cursor (5//2/3) / ENTER (Menu Operation) Button” on page 16.

Each time you press the button, you can go back to the previous screen.

7 Repeat steps 2 to 6 to adjust the other items.

8 Press the MENU button to clear the menu screen.

43

Image 45
Contents Pour l’utilisateur For Customer UsePage DLA-QX1G About burning-in of the D-ILA device About the plug U.S.A. onlySafety Precautions Important SafeguardsDo not allow any unqualified person to install the unit Do not cut off the main plug from this equipment Information on the power cord plugContents Information on separately sold items AccessoriesProjection lens Video Interface Card VICFront Side / Top Surface / Right Side Controls and FeaturesLeft-hand side / Back Side To remove the handlesIntake area filter Control Panel About status code Connector Panel Remove the slot panel from the slot Install the VICProjector Fasten the VIC to the projectorRemote Control Unit Lock Ô Unlock switch Wired remote control terminalShutter ON/OFF buttons Shift +/- buttonsOpen the back cover Install the batteries Installing BatteriesPrecautions for using batteries Cursor 5/∞/2/3 / Enter Menu Operation ButtonPrecautions for Installation Installing the ProjectorWhen installing the projector, observe the following Allowable minimum space required305 mm Or more Adjusting the Inclination of the Projector Adjusting the vertical angle of the projectorLeveling the projector Projection using stack configuration Installing the Projector against the ScreenLens type Approximate projection distance Projection Distance and Screen SizeOptional Lenses Lens model FunctionFor the lenses with the lens shift function Lens Shift FunctionMaximum amount of shift Relational table for maximum shift amounts aspect ratio 4Effective Range and Distance of the Remote Control Unit Using as a wireless remote control unitUsing as a wired remote control unit Signals that Can Be Input to the Projector Connecting to Various DevicesAnalog HD signals Digital HD signalsExample of a basic system Examples of System ConfigurationDesktop type Connecting to RGB DevicesAnalog HD devices Connecting to Analog HD DevicesConnecting to Digital HD Devices Digital HD devicesDigital HD monitor Connecting to Devices which Control the Projector Insert the supplied power cord Connecting the Power Cord SuppliedInto the power input terminal AC ProjectorTurn on the Main Power switch of the projector Turning On the PowerRemote control unit Basic OperationsTo change the menu language displayed Code displaySelecting the VIC to be projected Adjusting Focus Adjusting the Screen SizeTurning off video image Hide For Operating Other FunctionsPress the Keystone / buttons Image KeystoneSetting the amount of lens shifting Shift Press the Shift + buttonPress the Shift button Menu Operations No signal menu modeMain menu Sub menu RGB VIC menu modeHdtv VIC or HD-SDI VIC menu mode Buttons and Control for Menu Operations To select or adjust the itemTo display the main menu To go to the sub menuMenu Operation Procedure Contents of the Menu VIC menu VIC menu 1/2 For RGB VICFor HDTV/HD-SDI VIC Language menu Options menuColor temp. menu Sub brightness menuUser 1 or 2 menu Offset & Gain menuLens shift menu Menu position menuCleaning and Replacing the Filters Remove the filter coverRemove the filters Reinstall the filters Clean the filtersWhen the lamp’s use hours exceed 900 hours When lamp’s use hours has reached 1000 hoursReplacing the Light-Source Lamp Corrective action TroubleshootingTroubleshooting Message Cause Corrective action Error code Cause Corrective action Appendix GL-MQ1010GUnit ft m GL-MQ1015SG GL-MQ1020ZG GL-MQ1023SZG RGB in RGB input SpecificationsGeneral Pin assignment Specifications for terminals Outside dimensionsCommunication Specifications Command FormatRS-232C external control