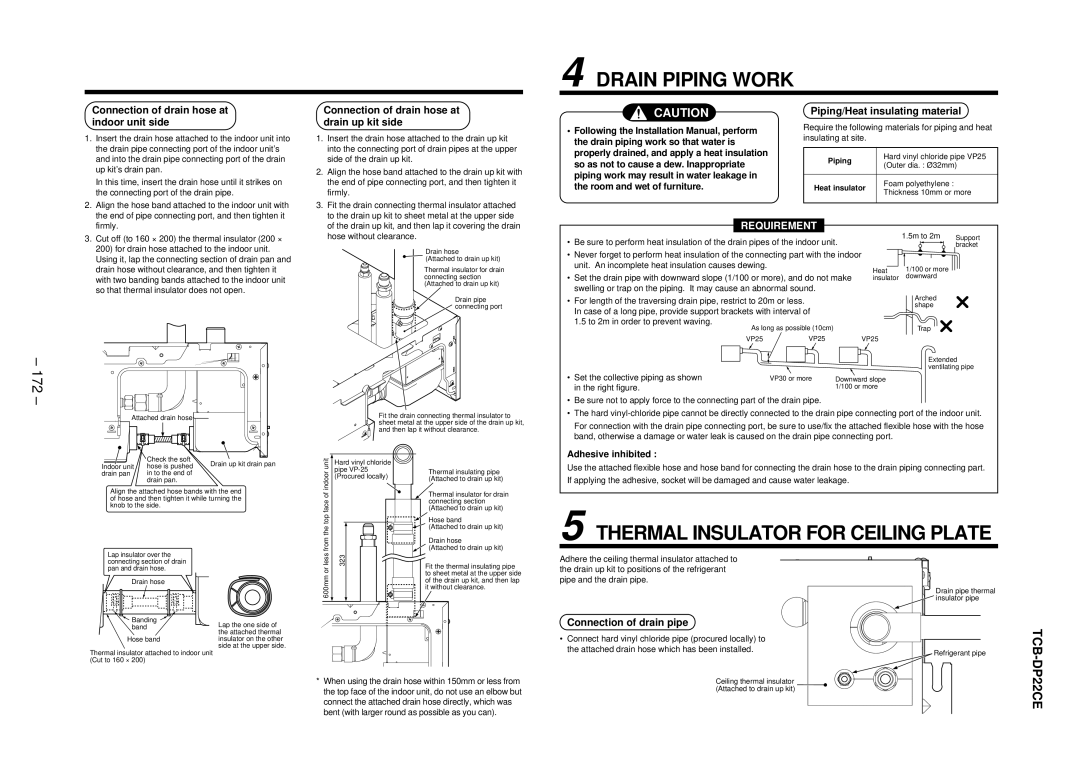
4 DRAIN PIPING WORK
Connection of drain hose at indoor unit side
1. | Insert the drain hose attached to the indoor unit into |
| the drain pipe connecting port of the indoor unit’s |
| and into the drain pipe connecting port of the drain |
| up kit’s drain pan. |
| In this time, insert the drain hose until it strikes on |
| the connecting port of the drain pipe. |
2. | Align the hose band attached to the indoor unit with |
| the end of pipe connecting port, and then tighten it |
Connection of drain hose at drain up kit side
1. | Insert the drain hose attached to the drain up kit |
| into the connecting port of drain pipes at the upper |
| side of the drain up kit. |
2. | Align the hose band attached to the drain up kit with |
| the end of pipe connecting port, and then tighten it |
| firmly. |
3. | Fit the drain connecting thermal insulator attached |
| to the drain up kit to sheet metal at the upper side |
CAUTION
•Following the Installation Manual, perform the drain piping work so that water is properly drained, and apply a heat insulation so as not to cause a dew. Inappropriate piping work may result in water leakage in the room and wet of furniture.
Piping/Heat insulating material
Require the following materials for piping and heat insulating at site.
Piping | Hard vinyl chloride pipe VP25 | |
(Outer dia. : Ø32mm) | ||
| ||
|
| |
Heat insulator | Foam polyethylene : | |
Thickness 10mm or more | ||
| ||
|
|
firmly. |
of the drain up kit, and then lap it covering the drain |
REQUIREMENT
– 172
3. Cut off (to 160 × 200) the thermal insulator (200 × |
200) for drain hose attached to the indoor unit. |
Using it, lap the connecting section of drain pan and |
drain hose without clearance, and then tighten it |
with two banding bands attached to the indoor unit |
so that thermal insulator does not open. |
hose without clearance. |
Drain hose
![]() (Attached to drain up kit)
(Attached to drain up kit)
Thermal insulator for drain connecting section (Attached to drain up kit)
Drain pipe connecting port
•Be sure to perform heat insulation of the drain pipes of the indoor unit.
•Never forget to perform heat insulation of the connecting part with the indoor unit. An incomplete heat insulation causes dewing.
Heat
• Set the drain pipe with downward slope (1/100 or more), and do not make insulator swelling or trap on the piping. It may cause an abnormal sound.
•For length of the traversing drain pipe, restrict to 20m or less. In case of a long pipe, provide support brackets with interval of 1.5 to 2m in order to prevent waving.
As long as possible (10cm) |
| |
VP25 | VP25 | VP25 |
• Set the collective piping as shown | VP30 or more | Downward slope |
in the right figure. |
| 1/100 or more |
1.5m to 2m | Support |
| bracket |
1/100 or more downward
Arched shape
Trap
Extended ventilating pipe
–
Attached drain hose |
Fit the drain connecting thermal insulator to sheet metal at the upper side of the drain up kit, and then lap it without clearance.
•Be sure not to apply force to the connecting part of the drain pipe.
•The hard
For connection with the drain pipe connecting port, be sure to use/fix the attached flexible hose with the hose band, otherwise a damage or water leak is caused on the drain pipe connecting port.
Adhesive inhibited :
| Check the soft | Drain up kit drain pan |
Indoor unit | hose is pushed | |
drain pan | in to the end of |
|
| drain pan. |
|
Align the attached hose bands with the end of hose and then tighten it while turning the knob to the side.
the top face of indoor unit
Hard vinyl chloride pipe
Thermal insulating pipe (Attached to drain up kit)
Thermal insulator for drain connecting section (Attached to drain up kit)
Hose band
![]() (Attached to drain up kit)
(Attached to drain up kit)
Drain hose
Use the attached flexible hose and hose band for connecting the drain hose to the drain piping connecting part.
If applying the adhesive, socket will be damaged and cause water leakage.
5 THERMAL INSULATOR FOR CEILING PLATE
Lap insulator over the connecting section of drain pan and drain hose.
Drain hose |
Banding |
band |
Hose band
Thermal insulator attached to indoor unit (Cut to 160 × 200)
Lap the one side of the attached thermal insulator on the other side at the upper side.
600mm or less from
323
![]()
![]() (Attached to drain up kit)
(Attached to drain up kit)
Fit the thermal insulating pipe to sheet metal at the upper side of the drain up kit, and then lap it without clearance.
Adhere the ceiling thermal insulator attached to the drain up kit to positions of the refrigerant pipe and the drain pipe.
Connection of drain pipe
•Connect hard vinyl chloride pipe (procured locally) to the attached drain hose which has been installed.
![]() Drain pipe thermal
Drain pipe thermal ![]() insulator pipe
insulator pipe
Refrigerant pipe
TCB-
*When using the drain hose within 150mm or less from the top face of the indoor unit, do not use an elbow but connect the attached drain hose directly, which was bent (with larger round as possible as you can).
Ceiling thermal insulator (Attached to drain up kit)
DP22CE