MICROMMAC-22T/24T/42T/44T STACKABLE TOKEN RING INTELLIGENT HUBS
USER’S GUIDE
Copyright March 1996 by Cabletron Systems, Inc
DOC NOTICE
FCC NOTICE
VCCI NOTICE
CABLETRON SYSTEMS, INC. PROGRAM LICENSE AGREEMENT
EXCLUSION OF WARRANTY AND DISCLAIMER OF LIABILITY
CABLETRON SOFTWARE PROGRAM LICENSE
UNITED STATES GOVERNMENT RESTRICTED RIGHTS
CONTENTS
CHAPTER 2 REQUIREMENTS/SPECIFICATIONS
CHAPTER 3 INSTALLATION
CHAPTER 1 INTRODUCTION
CHAPTER 5 TROUBLESHOOTING
CHAPTER 4 LOCAL MANAGEMENT
5.2.4 Saved System Messages 5.3 VIEWING POWER UP DIAGNOSTIC TESTS
CONTENTS
1.1 CONTENTS OVERVIEW
CHAPTER INTRODUCTION
DISPLAY RESET
Figure 1-1. The MicroMMAC-T
1.2 MicroMMAC-T OVERVIEW
INTRODUCTION
Telnet
1.3 MicroMMAC-T FEATURES
Figure 1-2. Typical MicroMMAC-T Configuration Scenario
Cable Signal Polarity
Speed Fault Protection
Active TCU Ports
Local Management
Ring Speed Switch
Cabletron’s Distributed LAN Monitor Mode
Flash EEPROM
LANVIEW LEDs
Reset Button
COM Port Applications
LCD and LCD Display Button
MIB Support
RMON MIB Support
1.4 STACKABLE CAPABILITIES
Table 1-2. RMON MIB RFC 1271/1513 Support Cont
1.5 BRIDGING/ROUTING CAPABILITIES
Figure 1-3. Typical Stackable Configuration
1.6 REMOTE MANAGEMENT CAPABILITIES
1.5.1 SNA/WAN Integration
1.7 TELNET CAPABILITIES
1.8 RECOMMENDED READING
1.9 GETTING HELP
Local Area Networks, Token Ring Access Method, IEEE Standard 802.5
Commercial Building Wiring Standard, EIA/TIA-568
CHAPTER REQUIREMENTS/SPECIFICATIONS
2.1 CABLE SPECIFICATIONS
2.1.1 UTP Cable Specifications
Attenuation and Impedance
Type 3 Media Filters
Maximum Lobe Lengths
Maximum Number of Stations
2.1.2 STP Cable Specifications
Attenuation and Impedance
Maximum Lobe Lengths
Table 2-3. STP Cable Specifications
Maximum Trunk Lengths
Maximum Number of Stations
Table 2-4. STP Maximum Lobe Lengths
Table 2-5. STP Maximum Drive Distance
The maximum allowable fiber
optic cable length is 2 km
2187.2 yards. However, IEEE
802.5 specifications allow for a
2.1.4 Single Mode Fiber Optic Cable Specifications
Table 2-7. Single Mode Fiber Optic Cable Specifications
Fiber Optic Budget
Maximum Trunk Lengths
2.2 CABLE RECOMMENDATIONS/TROUBLESHOOTING
Temperature
Fiber Optic Budget
Crosstalk
2.3 COM PORT SPECIFICATIONS
2.4 TPIM SPECIFICATIONS
Booting/Diagnostics
Local Management
SLIP
TPIM-T2
TPIM-T4
NOTE Transmitter power and receive sensitivity levels, shown in
TPIM-F2
REQUIREMENTS/SPECIFICATIONS
TPIM-F3
TPIM-F2 Specifications
Parameter
When measuring power levels with an Average Power Meter, add 3 dBm
Table 2-9. TPIM-F3 Specifications
2.5.1 Power Supply Requirements
2.5 GENERAL SPECIFICATIONS
2.5.2 Environmental Requirements
2.5.3 Safety
Service
2.5.4 Physical
2.5.5
3.1 UNPACKING THE MicroMMAC-T
CHAPTER INSTALLATION
3.2 ATTACHING THE STRAIN RELIEF BRACKET
3.3.1 Rack-Mounting the MicroMMAC-T
3.3 INSTALLING THE MicroMMAC-T
INSTALLATION
Figure 3-2. Installing of Rack-Mount Brackets
3.3.2 Wall-Mounting the MicroMMAC-T
Figure 3-3. Installing the MicroMMAC-T in a 19-inch Rack
Figure 3-4. Wall-Mounting the MicroMMAC-T
Molly Screw Anchors Molly Screws Bracket Screws Wall Mounting Bracket
3.3.3 Free-Standing Installation
3.4 CONNECTING TO A POWER SOURCE
3.5 RESETTING THE MICROMMAC-T
Figure 3-5. Free-Standing Installation
To reset the MicroMMAC-T
3.6 SETTING THE RING SPEED
To change the ring speed
3.7 SETTING THE NVRAM SWITCH
To restore MicroMMAC-T parameters to the factory defaults
3.8 CONNECTING LOBE PORT CABLING
NOTE Clearing and resetting NVAM does not reset the date and time
INSTALLATION
RJ45 Plug
at TCU
at device port
INSTALLATION
Figure 3-10. UTP Configuration Example
3-10
Lobe Cable
INSTALLATION
To attach a lobe segment to a MicroMMAC-T network port
Figure 3-11. STP Configuration Example
Figure 3-12. MicroMMAC-T Network Ports
3.9 INSTALLING TPIM MODULES
3.9.1 Setting Phantom and RI/RO Switches
Table 3-1. Pinout Cross-Reference for TPIMs Cont
To install a TPIM, perform the following steps
3.9.2 TPIM Installation
CAUTION Observe all static precautions while handling TPIMs
3.9.3 Connecting STP Segments
To connect a TPIM-T1 to a Twisted Pair Segment
3.9.4 Connecting Twisted Pair Segments
To connect a segment to a TPIM-T2/-T4
3.9.5 Connecting Fiber Optic Link Segments
Figure 3-16. The TPIM-T2/-T4
To connect a fiber optic link segment to the TPIM-F2 /-F3
Figure 3-17. The TPIM-F2/-F3
3.10 CHECKING THE INSTALLATION
To check MicroMMAC-T installation
4.1 MANAGEMENT TERMINAL REQUIREMENTS
CHAPTER LOCAL MANAGEMENT
Use Local Management to Do the Following
4.1.1 Attaching the Management Terminal
4.1.2 Management Terminal Setup Parameters
To attach a management terminal to the MicroMMAC-T
4.1.3 Modem Cable Configuration and Setup
Table 4-1. Terminal Settings for LM Terminal
4.2 ACCESSING LOCAL MANAGEMENT
To access Local Management
4.2.1 Accessing Local Management via Telnet
Figure 4-3. MicroMMAC-T Local Management Screen
4.2.2 Accessing Local Management from a Modem
4.3 USING LOCAL MANAGEMENT
SETUP MENU Screen
MAIN MENU Screen
4.3.1 Working with Local Management Screens
Setting or Modifying Local Management Screen Fields
SETUP MENU STATUS MENU DEVICE STATISTICS MIB NAVIGATOR EXIT
SETUP MENU
Exiting a Local Management Screen
Exiting Your Local Management Session
4.3.2 The SYSTEM LEVEL Screen
Setting the System Date
Setting the System Time
Setting the Host IP Address
Modifying the Subnet Mask
To modify the Subnet Mask
Setting the Default Gateway
To set the Default Gateway
Setting Automatic Beacon Recovery Process ABRP Fields
NOTE ARBP is supported only by Cabletron products
To set the Beacon Recovery field
4.3.3 The SNMP COMMUNITY NAMES Screen
Setting COM 1 and COM 2 Applications
To set the Number of Retries field
To set the Retry Interval field
Read-Write The user can view all LM fields and can edit all but the
4.3.4 The SNMP TRAPS Screen
Access Policy
Community Name
Editing the Community Name field
Enable Traps
Setting SNMP Traps
Trap Destination
Trap Community Name
4.3.5 The RING SECURITY Screen
You can select from two modes of ring security Alarm Only
Security Mode
STATION ADDRESS
Stn Edit
NOTE The NMS receives each station added trap once only
Changing the Security Mode
SAVE/EXECUTE
NEXTSCREEN
PREVIOUSSCREEN
Viewing the Revised Allowed List
Adding Stations to the STATION ADDRESS Allowed List
Deleting Stations from the STATION ADDRESS Allowed List
NOTE You cannot delete the Micro-MMAC-T address from the list
4.3.6 The DEVICE STATISTICS Screen
DEVICE STATISTICS
Selecting the Device Statistics Counter Mode
Using the ACCUMULATIVE Counter Mode
Setting the Refresh Field
Frames Received
Errors Received
ISOLATING ERRORS
Line Errors
Burst Errors
AC Errors
Abort Transmit Errors
Internal Errors
RING INFORMATION
Ports Enabled
NON-ISOLATING ERRORS
Lost Frame Errors
Ring Number
4.3.7 The CHASSIS STATUS VIEW Screen
Frame Copied Errors
Rcvr Congestion Errors
Token Errors
Port Status
Mode
Virtual Flexible Network Bus VFNB
Screen Mode Status
ENABLE ALL PORTS ADMINISTRATIVE mode only
NEXT
PREVIOUS
Using the OPERATIONAL Mode Screen
Setting the REFRESH Field
Return key
To display the status of ports
To display the status of RI/RO ports, BRIMs, or the MicroSNAC device
Using the ADMINISTRATIVE Mode Screen
To enable and disable select ports
To enable all ports for all modules
Using the RING OUT ENABLE Mode Screen
To bypass all ports on a module
To reconnect a module to the token ring
4.3.8 The COMPONENT STATUS Screen
To switch to and from STN and RO
4.3.9 The MIB NAVIGATOR Screen
Figure 4-13. COMPONENT STATUS VIEW Screen
To get help on specific commands
To access a list of MIB commands
To escape from the MIB NAVIGATOR screen
bran
Built-In commands
next
tree
whoami
4.3.10 The FLASH DOWNLOAD Screen
ping
snmp branch
snmpget
Download Method field
To chose the RUNTIME method
To choose the BOOTPROM method
2. Toggle from RUNTIME to BOOTPROM using the spacebar
Flash Image Server IP
Flash Image File Name
CHAPTER TROUBLESHOOTING
5.1 USING LANVIEW LEDs
5.2 USING THE LCD DISPLAY
5.2.1 Static System Messages
Table 5-2. Static System Messages
5.2.2 Alarm Messages
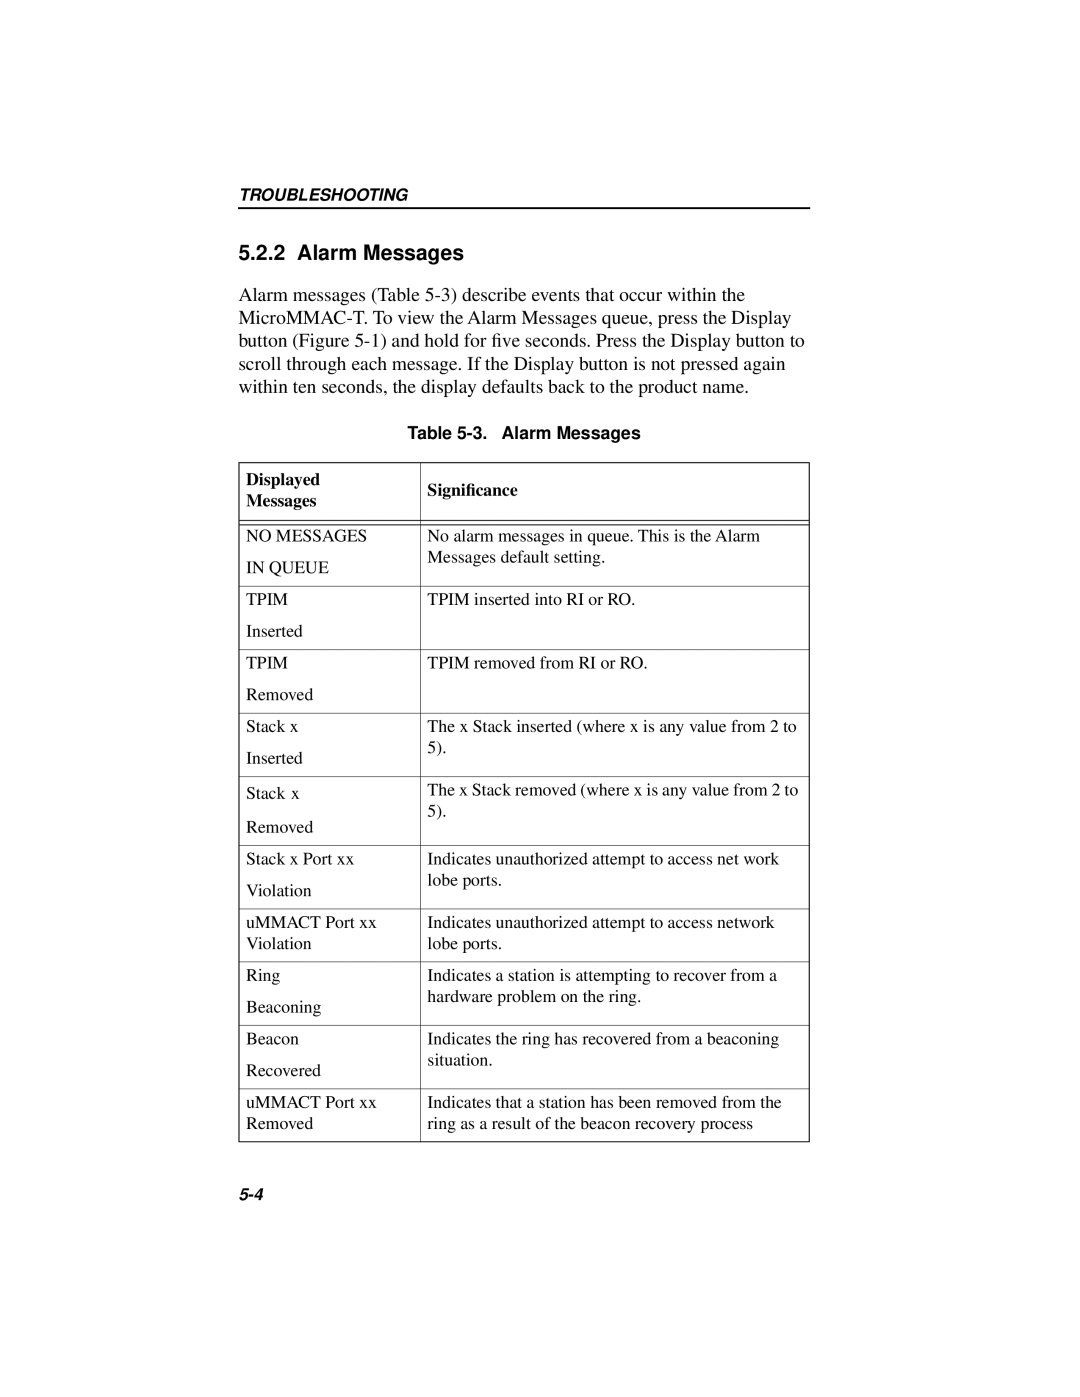
TROUBLESHOOTING
Table 5-3. Alarm Messages
Displayed
Table 5-3. Alarm Messages Cont
5.2.3 Unsaved Initialization Messages
Table 5-4. Unsaved Failure or Error Messages
Table 5-5. Normal Unsaved Initialization Messages
5.2.4 Saved System Messages
Table 5-6. Saved System Messages
NOTE The LCD displays the following message whenever the POWER
5.3 VIEWING POWER UP DIAGNOSTIC TESTS
Responding to Error Messages
To execute a response option
To return to Local Management
POWER SUPPLY CORD
GERMAN
SPANISH
FRENCH