Page
Laser Class 700 Series Facsimile Guide
With Cover Sheet Editor
Manuals for the Machine
Appendix
How This Manual Is Organized
Contents
Sending Documents
Using Speed Dialing
Receiving Documents
Using the Machine as a Copier
Using Confidential Mailboxes
Using a Relay Network
Using Polling
Special Sending/Receiving Features
Summary of Important Settings
Other Special Features
Troubleshooting
Printing Reports and Lists
Appendix
Glossary -7 Index
Documents You Can Scan
Symbols Used in This Manual
How to Use This Manual
Keys Used in This Manual
Press Data Registration
Xii
Illustrations Used in This Manual
Legal Notices
Power Requirements
Users in the U.S.A
Location
Xiv
Connection of the Equipment
CF-PL Facsimile GuideUSEN HT1-2188-000-V.1.0
Xvi
Xvii
Users in Canada
Xviii
Avis
Trademarks
Super G3
Copyright
Xix
Disclaimers
Before You Start Using This Machine
Full Support of ITU-T Subaddresses and Passwords
Main Features
Improved Speed
UHQ Ultra High Quality Image
Automatic Dialing
Variety of Send and Receive Features
ECM Send and Receive
Receiving in Memory If You Run Out of Paper or Toner
Delayed Sending
Dual Access
Better Security with PIN Codes
JBIG, Improved Image Data Compression
Jbig
One-Touch Panels Closed
Operation Panel Parts and Functions
Error Lamp
Speaker Volume Switch
Printer Operation Panel
Counter Check
Monitor
Resolution
Delete File
LCD Display
One-Touch Panels Opened
Delete
Password
Return
Space
Using the Menus
General Guidelines for Registering Information
Press Data Registration
Press or to display the name of the desired menu title
Press Stop to return to the Standby mode
Press or until the name of the menu you want to open
Set to go to the next level
Entering Names for Registration
Press to change the entry mode
Press the appropriate key on the numeric keypad to enter a
Letter or number
Press or to move the cursor to the left or right to
To complete entering the name for registration, press Set
Operation Panel Key Summary Table
Keys for Registering Information
Key Description
Registering Required Sender Information
Things You Must Do Before Using This Machine
What Is Sender Information?
Press Set
Open all three one-touch speed dialing panels
Use 24-hour notation to enter the time e.g., 100 p.m. as
Set Press or until 1.USER Settings appears press
Press or until 3.FAX Settings appears press
Set Press or until 1.TEL Line Settings appears
Open all three one-touch speed dialing panels
Menu
Press or until 1.USER TEL NO. appears press
Checking and Setting the Telephone Line
Press Stop to return to the Standby mode
Set
Press or until 1.USER Settings appears press
Telephone line type is set
Registering a Sender’s Name
Registering Sender’s Names
Before You Start Using This Machine
If you select Other FAX Numbers
If you select User TEL Number
Press or until 1.SENDER Name REG. appears
When you are finished making changes, press Set
Press Set
To change the sender’s name
28Things You Must Do Before Using This Machine
Using the Optional Dual Line
Disabled Feature Description
How the Two Telephone Lines Operate
Registering Telephone Numbers for the Lines
Press or until 2.TEL Line TYPE. appears press
Press or until 3.TX Start Speed appears press Set
Press or to select Touch Tone or Rotary Pulse press Set
Press or until 2. Line 2 appears press Set
Setting the TX Line Priority
34Using the Optional Dual Line
Press or to display the desired setting press Set
Switching Between the Two Lines
When you are finished, press Stop to return to the Standby
Mode
36Using the Optional Dual Line
Using Speed Dialing
Read This Before Entering Telephone Numbers
When you come to a step that asks you to enter a number for
Entering Pauses for Dialing
Dialing, use the numeric keys to enter the number
Adjusting the Length of a Pause
4Read This Before Entering Telephone Numbers
Access Code Dialing
What Is Speed Dialing?
One-Touch Speed Dialing
Coded Speed Dialing
Setting Up One-Touch Speed Dialing
Press or until the one-touch speed dialing key’s
Enter the telephone number up to 120 digits using
Number that you want to register appears press Set
Press or until 1.TEL Number Entry appears
To stop here and register another key
To end the procedure and return to the Standby mode
Press or to select a preset time number 1 to 5 press Set
Key, press Data Registration
100 p.m. as 1300 press Set
If you want to set the transmission type, press or until
TX Type appears press Set
Setting Description
Until 5.TX Speed appears press Set
If you experience transmission errors during long distance
If you want to change the transmission speed, press or
Press or to select the desired transmission speed
Press or until 6.ECM appears press Set
If you want to select a telephone line for outgoing fax
Appears press Set
If you select ‘FIXED’
Press or to select a sender name press Set
Setting Up Coded Speed Dialing
16Setting Up Coded Speed Dialing
Press or until 3.OPTIONAL Setting appears
Enter a name up to 16 characters long using the numeric
If you want to set an access code, press or until
Access Code appears press Set
Press or to select a preset time number 1 to 5 press
Enter an access code from two to five digits using
If you want to set the time for the transmission, press or
100 p.m. as Press Set
Press or to select the desired transmission type press Set
Designates the transaction as a transmission to a
Press or to select the desired transmission speed press Set
If you want to turn ECM Error Correction Mode ‘ON’ or ‘OFF’
Press or to select ‘ON’ or ‘OFF’ press Set
Press or to select Auto or Fixed press Set
Press or to select a sender name press Set
Setting Up Group Dialing
Dialing code that you want to set as the group dial press
When you are finished registering destinations, press Set
Press or until 1.DSTN TEL/ID appears press Set
Register all the destinations for the group
26Setting Up Group Dialing
Or until 2.TX Time Settng appears press Set
Press or to select a preset time number 1 to 5 press
28Setting Up Group Dialing
Setting Up the Access Code Key
Other
Make sure that 2.NO of Characters is displayed press Set
Using CF-PL Facsimile GuideUSEN HT1-2188-000-V.1.0
Using One-Touch Speed Dialing
Using Speed Dialing
Place your documents on the machine
Press the desired one-touch speed dialing key
Using Speed Dialing
Using Coded Speed Dialing
Using Group Dialing
36Using Speed Dialing
Press the access code key that you have set
Using Access Code Dialing
Enter the access code from two to five digits using
Numeric keys
38Using Speed Dialing
Directory 2 Press Directory
Using Directory Dialing
Press a key on the numeric keypad which corresponds to
first letter of the name of the party you are searching for
Press or to scroll through the other names press Set
Sending Documents
Preparing the Document
Setting a Document for Sending
Adjust the document guides to fit the width of your document
Setting the Document on the Machine
Place your document face up in the document feeder tray
Extension Tray
Adjusting the Scan Settings
Machine adjusts the quality of the image
Specify the destination
Selecting a Sender’s Name
Continue the procedure for sending the document
Press or until the desired sender’s name appears on
LCD display press Set
Using Regular Dialing
Dial the telephone number using the numeric keys
Press Start
Cancel Sending on a Single Line
Cancel Sending a Document
Press to cancel the transmission
Press Stop
Press or to select the transaction you want to cancel
Cancel Sending on a Dual Line
Checking/Canceling Fax Jobs
Flow of Checking Operations
Press Monitor Press Set
If you press Stop during scanning
Canceling with the Stop key
If there is only one job being processed
If there are multiple jobs
Canceling a Job from the Monitor Screen
Display the job you want to cancel
Press
Press Hook if you want to use Manual Sending
Dialing Long Distance with Regular Dialing
Press Start hang up your handset
Dial the long distance number using the numeric keys
Memory Sending
Overview of Sending Methods
Transaction Number
Transaction Number
Press Direct TX
Direct Sending
Name, telephone number, and transaction number
Press Hook
Manual Sending
Ask the other party to press the start key on their fax
Machine, then hang up their handset
Press Start on your machine hang up your handset
Redialing When the Line Is Busy
What Is Automatic Redialing?
Messages Displayed When Redialing
Setting Up Redialing
Press or to display the desired Auto Redial setting
Press Stop to return to the Standby mode
Sequential Broadcasting to More Than One Location
To use one-touch speed dialing
To use access code dialing
To use coded speed dialing
To use regular dialing
After you have specified all of the destinations, press Start
Sending Documents at a Preset Time
Enter the time in 24-hour notation e.g., 100 p.m. as
Enter all the numbers, including zeros
Specify the destinations press Start
Press Set
Subaddress/Password Sending with Speed Dialing
Sending a Document with a Subaddress/Password
Press Start to start scanning immediately
Subaddress/Password Sending with the Operation Panel Keys
Specify the destination press Set
Enter the ITU-T password up to 20 digits using the numeric
If you want to enter a password, press Password
36Sending a Document with a Subaddress/Password
Receiving Documents
Receiving Documents Automatically
Setting the Automatic Receive Mode
Optional Dual Line Transactions
Reception Error Messages
Receiving a Document Manually with the Optional Handset
Receiving Documents Manually
Every time you hear the telephone ring, pick up the handset
Press or to select Manual RX press Set
Receiving
If you hear someone on the line, you can speak to them
Make sure the extension telephone is connected properly
Receiving a Document Manually with an Extension Telephone
Changing the Remote Receive ID
Step
Enter a new number for the ID 00 to 99 using the numeric
Cancel Receiving on a Single Line
Cancel Receiving a Document
Press Stop to cancel the reception
Press to cancel receiving the document
Cancel Receiving on a Dual Line
Using the Machine as a Copier
Preparing the Document
Place your documents face up in the document feeder tray
Setting a Document on the Machine
4Setting a Document on the Machine
Adjusting the Scan Settings
Making Copies
Specify the document settings
Press Copy
If you want to select another paper cassette or the MP tray
Enter the number of copies 01 to 99 using the numeric keys
Press Monitor Press or to display 2. Copy press Set
Checking/Canceling Copy Jobs
Checking/Canceling Copy Jobs
Canceling from the Monitor Screen
Using a Relay Network
What Is Relay Broadcasting?
Setting Your Machine as a Relay Unit
Setting Up and Using a Standard Relay Unit
Press or to display the setting you want press Set
Group Dial Name
RX Password
Trigger Subaddress
SENDER’S FAX no
Select Locations
# of RX Copies
TX Report
Transmit
Press or until 2.CHANGE Data appears press
Changing the Relay Broadcast Settings
Press or to display the setting you want to change press Set
Deleting the Relay Group
10Setting Up and Using a Standard Relay Unit
Confirm the following points on your machine
Sending a Document to a Relay Unit for Relay Broadcasting
Sending with the Advanced Communication Key
Sending a Document to a Relay Unit with Speed Dialing
Advanced Communication
14Sending a Document to a Relay Unit for Relay Broadcasting
Using Confidential Mailboxes
Set Press or until 6.FILE Settings appears press
Setting Up and Using the Confidential Mailbox Feature
Creating a Confidential Mailbox
Set Press or until 1.CONFIDNTL Mailbox appears
Press or until 2.PASSWORD appears press Set
If an ITU-T password is also required, press or until
Spaces using the numeric keys press Set
RX Password appears press Set
Enter a password up to seven digits using the numeric keys
Enter a two digit number to specify the number of document
Copies to print using the numeric keys press Set
To change using the numeric keys press Set
Changing Confidential Mailbox Settings
Set or until 1.CONFIDNTL Mailbox appears press Set
Open all three one-touch speed dialing panels press Data
Set
Deleting a Confidential Mailbox
You want to delete using the numeric keys press Set
Press or until 3.DELETE File appears press Set
Enter the two digit number of the confidential mailbox that
Press Stop to return to the Standby mode
Receiving a Confidential Document
Set
Sending a Confidential Document with Speed Dialing
Sending a Confidential Document
Press or to display Confidential press Set
If an ITU-T password is also required, press Password
Press or until 1.CONFIDENTIAL TX appears press
Set Dial the telephone number press Set
Press Start
16Sending a Confidential Document
Using Polling
Before You Use Polling Receiving
What Is Polling?
Polling Other Fax Machines to Receive a Document
Dial the other party’s number
Directory Dialing, on p
If an ITU-T password is required, press Password
Enter the ITU-T subaddress using the numeric keys press Set
3 8 Enter the ITU-T password using the numeric keys press
Polling to Receive at a Preset Time
Press or until 3.PRESET Polling appears press Set
You can also press or to select a preset polling box number
Press or until 3.SELECT Locations appears
Specify the destination to poll press Set
Set the time for your machine to poll other fax machines
To set preset polling for selected days
To set preset polling for everyday
Changing the Preset Polling Settings
Registration or until 3.FAX Settings appears
Keys press Set
Press or to display the setting you want to change press Set
Deleting a Preset Polling Box
Press Stop to return to the Standby mode
Setting Up Polling Sending
Setting Up a Polling Box
Before You Can Be Polled to Send
Setting Up Polling Sending
Or until 2.PASSWORD appears press Set
Press or until 1.FILE Name appears press Set
Enter a file name for the polling box up to 24 characters
Press or until 4.TX Password appears press
Enter an ITU-T subaddress up to 20 digits using the numeric
Press or until 3.SUBADDRESS appears press
Scanning a Document into the Memory for Polling Sending
Press or until 5.ERASE After TX appears press
Set Press or to display on or OFF press Set
Enter the two digit number of the polling box using
Press Advanced Communication press Set twice
Or until you see the sender’s name you want to use
Change using the numeric keys press Set
Changing the Polling Box Settings
Enter the password up to seven digits using the numeric
You can also press or to select the polling box number
To the Standby mode
Press or to display the setting you want to change
Deleting a Polling Box
Set or until 4.POLLING BOX appears press
Enter the two digit number of the polling box you want to
Delete using the numeric keys press Set
Special Sending/Receiving Features
Transferring Documents
Before You Setup Document Transfer
Setting Up the Machine for Document Transfer
Press a one-touch speed dialing key, or Coded Dial
File Name
Start Time
Time Setup
Everyday
Select Days
Seven digits using the numeric keys press Set
Turning the Transfer Mode on and OFF
If you have not previously set a password, proceed to step
Changing the Transfer Settings
On p
Transfer, on p
8Transferring Documents
Setup file using the numeric keys press Set
Canceling the Transfer Settings
Using Memory Lock
Setting a Time and Password for Memory Lock
Press or until 3.FAX Settings appears press Set
MEM Lock Password
Report
Output no
Output YES
If a memory lock password has been set, enter the password
Turning Memory Lock on
Press Memory Reception
If a memory lock password has been set, enter the memory
Lock password using the numeric keys press Set
Turning Memory Lock OFF and Printing Documents
Check the LCD display messages
When the Machine Displays Received in Memory
16When the Machine Displays Received in Memory
Menu is displayed below
Printing a Memory List
Memory, enter the password up to seven digits using
If you have set a password for the document stored
Printing a Document in Memory
Press or to display the transaction number
Printing starts
Sending a Document in Memory to a Different Destination
Press or until 4.RESEND Document appears
Press or to select the document you want to send
You can also use the numeric keys to select a sender’s name
Name appears on the LCD display
Erasing a Document from Memory
Enter the password using the numeric keys press Set
Deleting a Document with the Delete File Key
Press Delete File
Press to delete the selected document
Deleting a Document with the Memory Reference Key
Press or until 5.DELETE Document appears
Document that you want to delete press Set
24Erasing a Document from Memory
What Happens to the Memory After a Power Failure?
About the Backup Battery
How Your Registered Data Is Protected
26What Happens to the Memory After a Power Failure?
10-1
Other Special Features
Using the Telephone
When you hear the dial tone, specify the destination
Pick up the handset, or press Hook
10-3
Tone Dialing on a Pulse Line
Dial the telephone number of the information service using
10-5
Setting a PIN Code
Setting Up and Using PIN Codes
10-7
Dialing with a PIN Code after the Number
Dialing with a PIN Code before the Number
Using the numeric keys
PIN code is not displayed as you enter it
10-9
Enter the telephone number using the numeric keys press
10-11
Setting PIN Code Access for Speed Dialing
Three digit code
Using Speed Dialing with PIN Code Access
Forced PIN Code Access
Enter the PIN code up to 20 digits using the numeric keys
10-13
Dial the telephone number using the numeric keys, press a
Digit code
Speed dialing key, or press Coded Dial followed by a three
Setting Up the Program One-Touch Key
Press or until 6.PROG 1-TOUCH KEY appears press Set
10-15
Print
Delayed TX
Sender Name
Confidential
10-17
Setting Up the Stamp Feature
Setting Up and Using the Optional Stamp Feature
Press or until 4.FAX Default appears press Set
Setting Up the Stamp Action
Press or until 5.TX Stamp appears press Set
10-19
DIRECT&MEMORY
10-21
Turning the Stamp Feature ON/OFF
Feature Menu Item Description of Default
How the Machine Operates with Default Settings
ECM TX
Offhook Alarm
ECM RX
Energy Saver
RX Reduction
Auto Redial
Activity Report
CONFID. RX
10-25
User TEL no
Unit Name
10-26How the Machine Operates with Default Settings
11-1
Summary of Important Settings
Opening the Additional Functions Menu
TX Send Settings
Summary of User Data Settings
RX Receive Settings
11-3
LAN Settings
User Settings
Setting Procedure
11-5
TEL Line Settings
Setting Item Description
Touch Tone
Rotary Pulse
11-7
Other FAX Numbers
Prog 1-TOUCH KEY
Print Report
11-9
SENDER’S Name SET
Memory Reference
Line
Report Settings
Press or until 2.REPORT Settings appears
11-11
Print Error only
Report with TX Image
CONFID. RX Report
Auto Print
11-13
Daily Report Time
Report Print Time
Press or until 3.TX Settings appears press Set
TX Send Settings
Erase Failed TX
11-15
Direct & Memory TX
Stamp Action
Direct TX
NECESS. PIN Code
11-17
RX Receive Settings
Auto RX
Receive Mode
Manual RX
Remote RX ID
Printer Settings
Press or until 5. Printer Settings appears
11-19
# of Copies
11-21
File Settings
11-23
Setup File
Confidntl Mailbox
SET BOX #
Relay TX Group
TEL=
11-25
Preset Polling
Change Data
SET RLY Group TX#
TX Password
Polling BOX
Erase After TX
Transfer
11-27
File
11-29
System Settings
Memory Lock RX
System Settings Password
Phone NO. Check
11-31
Resolution
FAX Default
TX Mode
Standard
11-33
11-34System Settings
12-1
Printing Reports and Lists
Printing the Speed Dialing Lists
One-Touch Speed Dialing List
Coded Speed Dialing List
One-Touch Speed Dialing List Detail
Coded Speed Dialing List Detail
Group Dial List
Regulartx
Access Code List
12-5
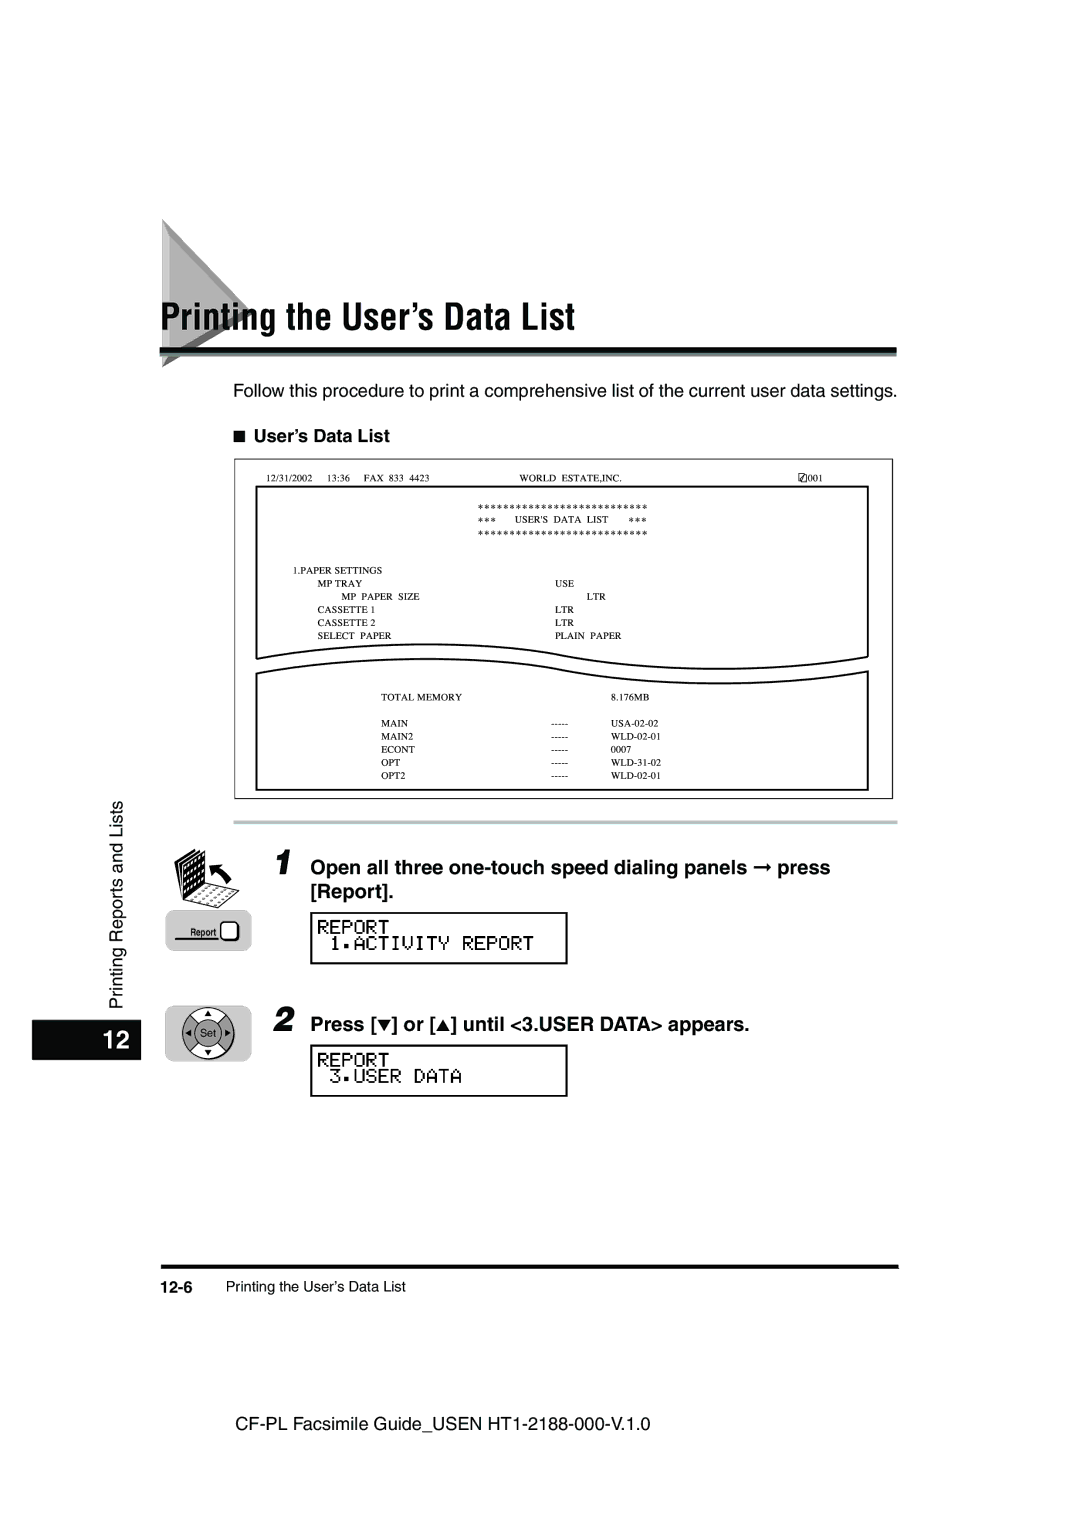
Printing the User’s Data List
Open all three one-touch speed dialing panels press Report
Press or until 3.USER Data appears
12-7
Press Set to start printing
ST. Time
Reports
Time USE
PGS
Printing the Activity Management Report
Activity Management Report
Activity Management Report TX/RX Separate
Department ID Report
Press Report Set
Error Report TX
Activity Reports
Transmission TX Report
Transmission TX Report with First
Error Report RX
Multi-Transaction Report
Reception RX Report
Relay Broadcast Report
Confidential Receive Report
Cancel Report Printing
Press or until 6.CANCEL Report appears press Set
12-15
Confidential Mailbox List
Memory Lists
Memory Clear Report
Document Memory List
Press or until 4.DOC. Memory List appears
12-17
12-18Memory Lists
13-1
Troubleshooting13
Error Code Table Listed by Number
13-3
See Dialing Long Distance with Regular Dialing, on p
13-5
Are using are correct
13-7
# Already in USE
List of LCD Display Messages Alphabetical List
13-9
Check Printer Cover
Memory Full
13-11
Not FOUND, TRY Again
Received in Memory
13-13
TX Limit Reached
Sending Documents
When Trouble Occurs
Maintenance, in the Reference Guide
13-16When Trouble Occurs
Troubleshooting
Receiving Documents
Copying Documents
Other Troubles
Line, on p
13-22When Trouble Occurs
14-1
Appendix
Copier Features
Dial Features
Specifications
Operation
Fax Features
Telephone Features
Transmitting
Receiving
Document Media to Avoid
Documents You Can Scan
Specifications for Paper Documents
Document Thickness
14-5
Document Size
Printing Area
Scanning Area
Ledger
Letter/Legal
Glossary
Coded speed dialing
Confidential mailbox password
Confidential mailbox
Confidential receiving
Delayed transmission
Default
Density control
Destination label
Document
Dual-Line Upgrade Kit
Document density
Document feeder tray
Error lamp
Fine
Group dialing
Jack
Use/Memory lamp
Long distance dialing
Manual receiving
Manual sending
Memory reception password
Memory broadcast
Memory file
Multitransaction
Normal mode
Noise
Numeric keys
Pause time
Preset polling box
PIN code
Polling box
Pulse
Reduction mode
Registering
Regular dialing
Resolution
Restricted reception
RX password
Rotary pulse
Scanning area
Timer sending
Switchboard
Tone/pulse setting
Standard
TX password
Transfer password
Transfer
Transmission time
Urgent document
Ultra Fine
Index
Index
14-23
Confidential RX Display Language Confidential TX, 2-11
Keypad Volume
Setting for speed dialing, 10-11 with speed dialing
Report Settings
TX Settings