Perform the following procedure to assemble the economiz- er hood.

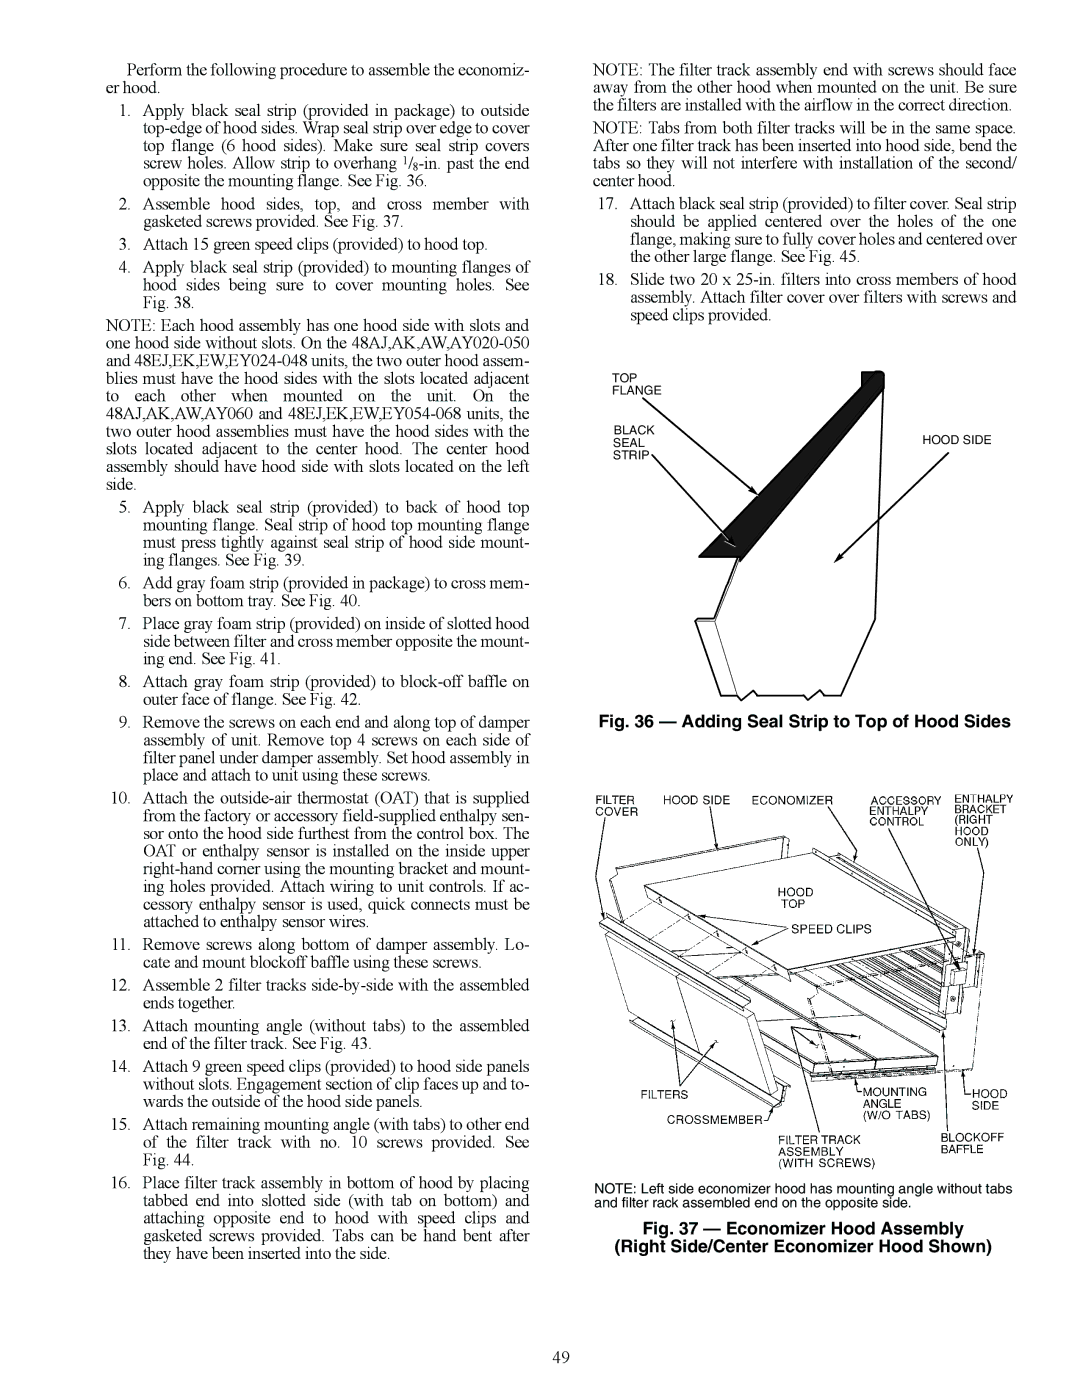
1.Apply black seal strip (provided in package) to outside top-edge of hood sides. Wrap seal strip over edge to cover top flange (6 hood sides). Make sure seal strip covers screw holes. Allow strip to overhang 1/8-in. past the end opposite the mounting flange. See Fig. 36.

2.Assemble hood sides, top, and cross member with gasketed screws provided. See Fig. 37.

3.Attach 15 green speed clips (provided) to hood top.

4.Apply black seal strip (provided) to mounting flanges of hood sides being sure to cover mounting holes. See Fig. 38.

NOTE: Each hood assembly has one hood side with slots and one hood side without slots. On the 48AJ,AK,AW,AY020-050 and 48EJ,EK,EW,EY024-048 units, the two outer hood assem- blies must have the hood sides with the slots located adjacent to each other when mounted on the unit. On the 48AJ,AK,AW,AY060 and 48EJ,EK,EW,EY054-068 units, the two outer hood assemblies must have the hood sides with the slots located adjacent to the center hood. The center hood assembly should have hood side with slots located on the left side.

5.Apply black seal strip (provided) to back of hood top mounting flange. Seal strip of hood top mounting flange must press tightly against seal strip of hood side mount- ing flanges. See Fig. 39.

6.Add gray foam strip (provided in package) to cross mem- bers on bottom tray. See Fig. 40.

7.Place gray foam strip (provided) on inside of slotted hood side between filter and cross member opposite the mount- ing end. See Fig. 41.

8.Attach gray foam strip (provided) to block-off baffle on outer face of flange. See Fig. 42.

9.Remove the screws on each end and along top of damper assembly of unit. Remove top 4 screws on each side of filter panel under damper assembly. Set hood assembly in place and attach to unit using these screws.

10.Attach the outside-air thermostat (OAT) that is supplied from the factory or accessory field-supplied enthalpy sen- sor onto the hood side furthest from the control box. The OAT or enthalpy sensor is installed on the inside upper right-hand corner using the mounting bracket and mount- ing holes provided. Attach wiring to unit controls. If ac- cessory enthalpy sensor is used, quick connects must be attached to enthalpy sensor wires.

11.Remove screws along bottom of damper assembly. Lo- cate and mount blockoff baffle using these screws.

12.Assemble 2 filter tracks side-by-side with the assembled ends together.

13.Attach mounting angle (without tabs) to the assembled end of the filter track. See Fig. 43.

14.Attach 9 green speed clips (provided) to hood side panels without slots. Engagement section of clip faces up and to- wards the outside of the hood side panels.

15.Attach remaining mounting angle (with tabs) to other end of the filter track with no. 10 screws provided. See Fig. 44.

16.Place filter track assembly in bottom of hood by placing tabbed end into slotted side (with tab on bottom) and attaching opposite end to hood with speed clips and gasketed screws provided. Tabs can be hand bent after they have been inserted into the side.

NOTE: The filter track assembly end with screws should face away from the other hood when mounted on the unit. Be sure the filters are installed with the airflow in the correct direction.

NOTE: Tabs from both filter tracks will be in the same space. After one filter track has been inserted into hood side, bend the tabs so they will not interfere with installation of the second/ center hood.

17.Attach black seal strip (provided) to filter cover. Seal strip should be applied centered over the holes of the one flange, making sure to fully cover holes and centered over the other large flange. See Fig. 45.

18.Slide two 20 x 25-in. filters into cross members of hood assembly. Attach filter cover over filters with screws and speed clips provided.

TOP

FLANGE

BLACK

SEALHOOD SIDE STRIP

Fig. 36 — Adding Seal Strip to Top of Hood Sides

NOTE: Left side economizer hood has mounting angle without tabs and filter rack assembled end on the opposite side.

Fig. 37 — Economizer Hood Assembly

(Right Side/Center Economizer Hood Shown)

49

Page 49
Image 49
Carrier 48EY024-068, 48EW, 48AW, 48AY020-060, 48EK, 48AK, 48AJ, 48EJ specifications Adding Seal Strip to Top of Hood Sides

48EJ, 48AJ, 48AK, 48EK, 48AY020-060 specifications

The Carrier 48EJ, 48AW, 48EK, 48AJ, and 48EY024-068 are cutting-edge rooftop air conditioning units designed for commercial applications. These models are renowned for their reliability, energy efficiency, and innovative technologies aimed at providing optimal indoor comfort.

One of the standout features of these units is their advanced cooling and heating capabilities. They employ a multi-stage compressor system that allows for precise temperature control, accommodating various load requirements. This flexibility is particularly beneficial in commercial settings where the cooling load can fluctuate throughout the day.

Energy efficiency is paramount in today’s environmental landscape, and Carrier has ensured that these models meet stringent efficiency standards. They incorporate high-efficiency scroll compressors, which significantly reduce energy consumption while delivering powerful performance. The units are also equipped with variable speed fans that adjust airflow based on demand, further optimizing energy use.

In terms of construction, these rooftop units feature a robust design that enhances durability and longevity. The cabinet is constructed to withstand harsh weather conditions, ensuring reliable performance year-round. Additionally, the units are equipped with corrosion-resistant coatings, particularly useful in coastal environments where salt exposure can be a concern.

The Carrier 48EJ, 48AW, 48EK, 48AJ, and 48EY models utilize advanced controls and connectivity features, allowing for easy integration into building management systems. This connectivity enables remote monitoring and control, facilitating quick response to changing conditions and simplifying maintenance tasks.

Noise reduction is another key characteristic of these models. They are designed with sound-absorbing insulation and low-noise fan blades to ensure quiet operation, making them suitable for noise-sensitive environments such as schools and hospitals.

These units are also available with various options for air filtration and dehumidification. The use of high-efficiency air filters enhances indoor air quality by trapping dust, pollen, and other airborne particles. Enhanced dehumidification capabilities ensure that spaces remain comfortable even in humid conditions.

In conclusion, the Carrier 48EJ, 48AW, 48EK, 48AJ, and 48EY024-068 rooftop units are engineered to offer exceptional performance, energy efficiency, and durability. With their advanced technologies and user-friendly features, they stand out as reliable solutions for meeting diverse commercial cooling and heating needs, making them a popular choice for many businesses.