Portable LCD Projector
Model 8806 USER’S MANUAL
2 The contents of this guide are subject to change without notice
Precautions
Safety Cautions
Important Information
DOC Compliance Notice for Canada only
Important Information Disposing of your used product
Installation
Important Safeguards
Important Information RF Interference for USA only
Place the projector in a horizontal position
Important Information Fire and Shock Precautions
Lamp Replacement
Remote Control Precautions
A Lamp Characteristic
Important Information
3. Projecting an Image Basic Operation
Table of Contents
2. Installation and Connections
Table of Contents
1-34
viii
Table of Contents
Picture
Whats in the Box?
1. Introduction
Remote control
Power cable
Introduction to the Projector
Features you’ll enjoy
1. Introduction
Congratulations on Your Purchase of the Projector
Free downloadable Software Geometric Correction Tool
About this users manual
1. Introduction
Front/Top
Part Names of the Projector
Rear
Adjustable Tilt Foot Lever
Carrying the Projector
Bottom
1. Introduction
Always carry your projector by the handle
2. Pull up the carrying handle with the catch pressed down
1. Introduction To lock the carrying handle
1. Carefully place the projector on its end
1. POWER Button ON / STAND BY → page 24
1. Introduction Top Features
2. POWER Indicator → page 24, 35 3. STATUS Indicator → page
4. LAMP Indicator → page 110 5. PC CARD Access Indicator → page 21
1. COMPUTER 1 IN/Component Connector Mini D- Sub 15 Pin →page 13
1. Introduction Terminal Panel Features
3. COMPUTER 3 IN Connector DVI-D 24 Pin HDCP compatible →page
4. COMPONENT IN Y, Cb/Pb, Cr/Pr Connectors RCA →page
5. POWER ON Button → page
Part Names of the Remote Control
6. POWER OFF Button → page
24. VOLUME +/- Buttons → page 25. PICTURE Button → page 72
Operating Range for Wireless Remote Control
Battery Installation
Remote Control Precautions
Remote control
REMOTE
1. Introduction Using the Remote Control in Wired Operation
Selecting a Location
For optional lenses, see page
Connecting Your PC or Macintosh Computer
2. Installation and Connections
Making Connections
Enabling the computer’s external display
What is HDCP/HDCP technology?
When Viewing a DVI Digital Signal
2. Installation and Connections
COMPUTER 3 IN
NOTE Audio signal is not available for this connection
2. Installation and Connections To connect SCART output RGB
2. Installation and Connections Connecting an External Monitor
2. Installation and Connections
Connecting Your DVD Player with Component Output
Component video RCA×3 cable not supplied Audio Equipment DVD player
Audio cable not supplied
2. Installation and Connections
Connecting Your VCR or Laser Disc Player
S-VIDEO IN AUDIO IN VIDEO IN
S-Video cable not supplied
Projector control feature
2. Installation and Connections Connecting to a Network
Picture transmission feature
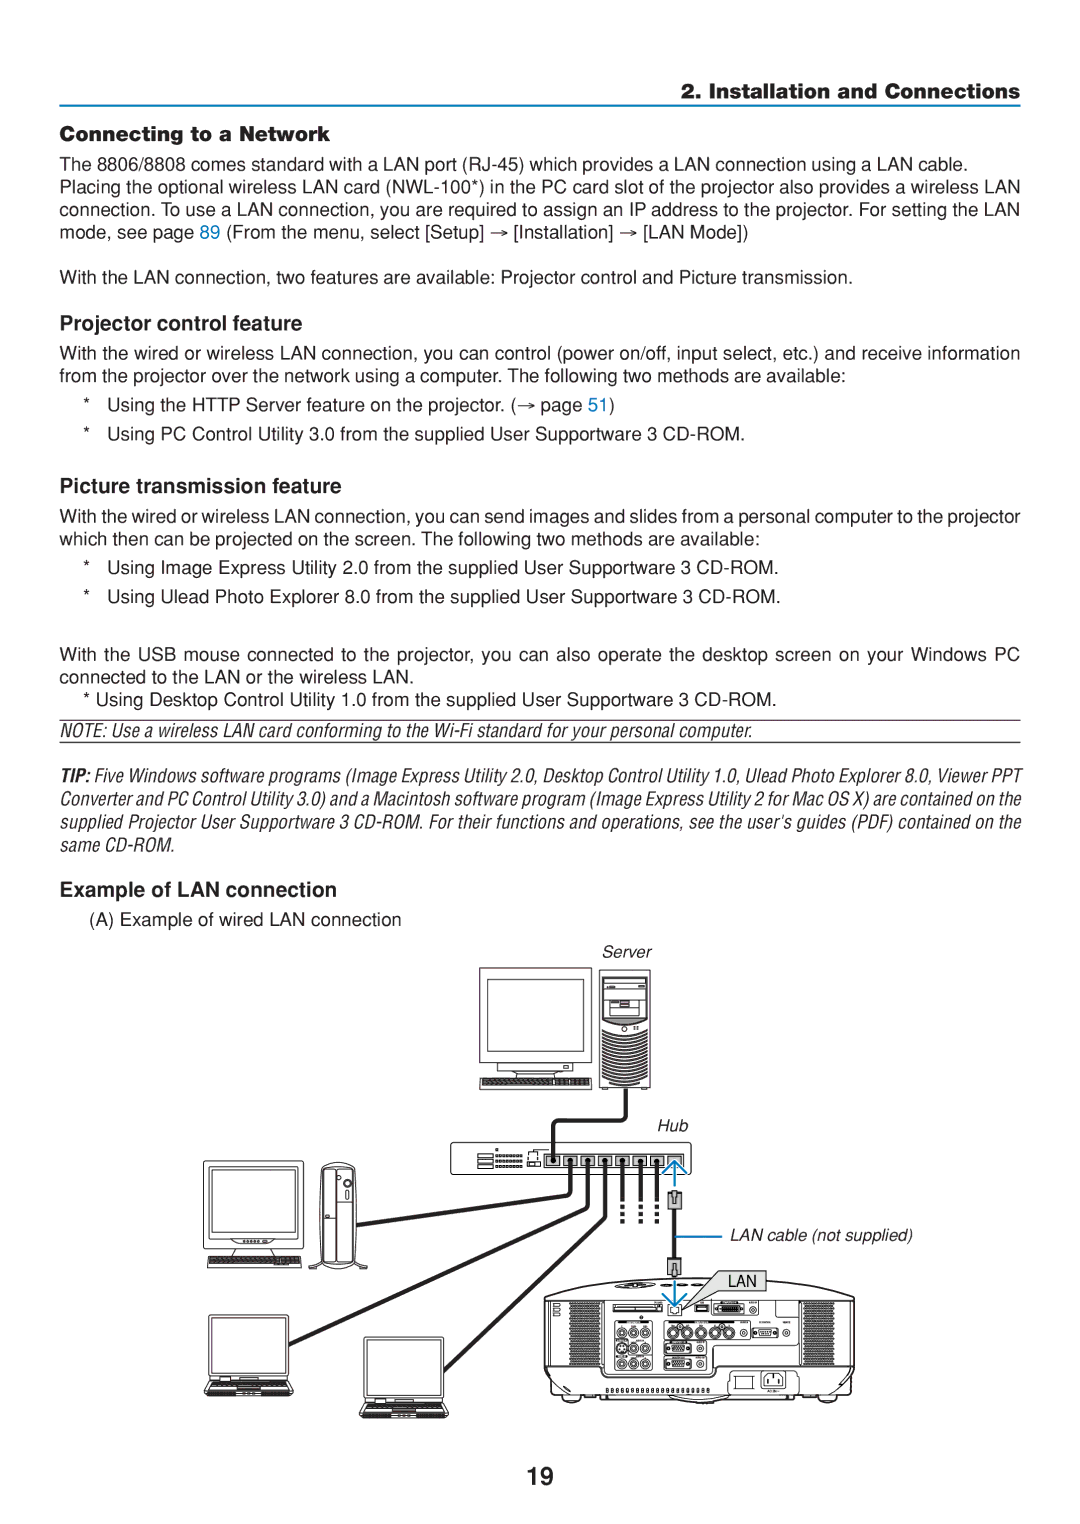
Example of LAN connection
C Example of wireless LAN connection Network Type → Mode 802.11 Ad Hoc
2. Installation and Connections
Inserting the PC Card
2. Installation and Connections Inserting and Removing a PC Card
PC Card Lock
Removing the PC Card
PC Card Type
2. Installation and Connections
About Direct Power Off
2. Installation and Connections Connecting the Supplied Power Cable
Turning on the Projector
3. Projecting an Image Basic Operation
To select a menu language, follow these steps
3. Projecting an Image Basic Operation
Note on Startup screen Menu Language Select screen
Using the Remote Control
Detecting the Signal Automatically
Selecting a Source
Selecting the computer or video source
3. Projecting an Image Basic Operation
Adjusting the Picture Size and Position
3. Projecting an Image Basic Operation
Adjusting the position of a projected image
Desktop front projection 0.5V Vertical shift Max 1V
Height of projected image
Finely adjusting the size of an image Zoom lever
3. Projecting an Image Basic Operation Adjusting the focus Focus ring
Focus ring
Zoom lever
3. Projecting an Image Basic Operation
Adjusting the Tilt Foot
1. Lift the front edge of the projector
3. Lower the front of the projector to the desired height
3. Projecting an Image Basic Operation
Correcting Keystone Distortion
When the projector is placed diagonally to the screen
5. Repeat steps 2 and 4 to correct keystone distortion
3. Projecting an Image Basic Operation
Adjusting the Image Using Auto Adjust
Adjusting Volume Up & Down
Optimizing an RGB Image Automatically
Increase volume Decrease volume
Setting the function switch
Using the Laser Pointer
3. Projecting an Image Basic Operation
Do not look into the laser pointer while it is on
After Use
Turning off the Projector
To turn off the projector
About Direct Power Off
Changing Lamp Mode
4. Convenient Features
Turning Off the Image and Sound
Freezing a Picture
Getting Integrated Help
4. Convenient Features
POWER
Display Help
4. Convenient Features
Using a USB Mouse
Operate the Menus using the USB mouse
Connecting the remote mouse receiver to your computer
Using the Optional Remote Mouse Receiver
When operating a computer via the remote mouse receiver
When connecting using the USB port
4. Convenient Features
Operating your computer’s mouse from the remote control
About Drag Mode
4. Convenient Features
Correcting Horizontal and Vertical Keystone Distortion Cor- nerstone
Cornerstone
7. Use the SELECT
4. Convenient Features
button to move the projected image frame as shown on the example
8. Press the ENTER button
The adjustable ranges for 3D Reform are as follows
4. Convenient Features
Making Freehand Drawings on a Projected Image ChalkBoard
Drag
Left-click and drag to draw lines freehand. Left-click
4. Convenient Features
Preventing Unauthorized Use of the Projector
Assigning a Keyword for the first time
5. Press the ENTER button to display the Security screen
4. Convenient Features
4. Press the SELECT button four times to highlight Security
8. Press the SELECT
4. Convenient Features
4. Convenient Features Checking If Security is enabled
4. Convenient Features Disabling the Security
Overview
Operation Using an HTTP Browser
Preparation Before Use
Handling of the Address for Operation via a Browser
OSD On
4. Convenient Features Structure of the HTTP Server
Displays the status of errors occurring within the projector
4. Convenient Features
Lamp Life Remaining
Lamp Hours Used
Meeting room Office
Disclaimer
4. Convenient Features
4. Convenient Features Operations on the Computer
1. Make the LAN settings on the projector
Operations on the projector - Connecting to the computer
4. Convenient Features
10. Input the password and click OK
Operations on the projector -Operating the desktop
4. Convenient Features
Operations on the projector - Exiting the desktop operation
Operations on the projector - Disconnecting communication
4. Convenient Features
1. Press the MENU button while the desktop is displayed
Features
5. Using the Viewer
Making the Most out of the Viewer Function
Easy to use
Using Ulead Photo Explorer
5. Using the Viewer
Using Windows Explorer to save files
Saving data to a PC card or USB memory device
Projecting slides Viewer
Operating the Viewer Function from the Projector playback
Operating Viewer Menu
5. Using the Viewer
Indicates the selected folder or drive
Viewer Window Elements
5. Using the Viewer
5. Using the Viewer Setting Option for Viewer
Viewing Digital Images
5. Using the Viewer Exiting Viewer
5. Using the Viewer
Changing Background Logo
Using the Menus
6. Using On-Screen Menu
Menu tree
6. Using On-Screen Menu
Adjust
Preset
Setup
6. Using On-Screen Menu
Installation
LAN Mode
Menu windows or dialog boxes typically have the following elements
Menu Elements
6. Using On-Screen Menu
Computer 1 and
Menu Descriptions & Functions Source
Computer 3 RGB Digital
Component
Using the Entry List
6. Using On-Screen Menu Entry List
Entering the Currently Projected Signal into the Entry List
6. Using On-Screen Menu
Entry Edit Command
Source Name
Input Terminal
Preset
Menu Descriptions & Functions Adjust
Picture
Mode
6. Using On-Screen Menu
Detail Settings
Brightness
Reset
Contrast
Sharpness
Adjusting Clock and Phase Clock/Phase
6. Using On-Screen Menu Image Options
Masking Unwanted Area Blanking
Adjusting Horizontal/Vertical Position Horizontal/Vertical Position
Selecting Overscan Percentage Overscan
6. Using On-Screen Menu
Selecting Aspect Ratio Aspect Ratio
Screen Type
Standard 43 aspect
Turning On/Off 3 Dimension Separation 3D Y/C Separation
6. Using On-Screen Menu Video
Setting Vertical Edges Vertical Enhancer
Selecting Interlace or Deinterlace Deinterlace
Setting Contrast Enhancement Contrast Enhancement
Setting Telecine Mode Telecine
Controlling Sound Volume/Bass/Treble/Balance
Sound
Selecting Keystone Mode Keystone
Menu Descriptions & Functions Setup
Selecting Cornerstone Mode Cornerstone
Basic
Setting Lamp Mode to Normal or Eco Lamp Mode
Using the Wall Color Correction Wall Color
Selecting Menu Mode Menu Mode
Selecting Menu Language Language
Selecting Menu Color Color Select
6. Using On-Screen Menu Menu
Turning On / Off Source Display, Message and Time Display Select
Selecting Menu Display Time Display Time
6. Using On-Screen Menu
Setting a Password Menu Lock / Logo Lock
Entry
Delete
6. Using On-Screen Menu
Security
6. Using On-Screen Menu
To register a PC card or USB memory device as a protect key
To delete PC card data you registered
Using PJLink
If youve lost your registered PC card, proceed as follows
6. Using On-Screen Menu
Installation
Selecting Projector Orientation Orientation
6. Using On-Screen Menu
Position
Selecting Aspect Ratio and Position for Screen Screen
6. Using On-Screen Menu
LAN Mode
Setting LAN Mode
Hints on How to Set Up LAN Connection
Built-in
6. Using On-Screen Menu
PC Card
6. Using On-Screen Menu
Advanced menu Network Type required for wireless only
6. Using On-Screen Menu
WEP required for wireless only
6. Using On-Screen Menu
Domain
6. Using On-Screen Menu
Using Software Keyboard to enter an encryption key
Mail
6. Using On-Screen Menu
Projector Name
Setting the Current Date and Time Date, Time Preset
Selecting Communication Speed Communication Speed
Turning On or Off Remote Sensor Remote Sensor
Setting Auto Adjust Auto Adjust
6. Using On-Screen Menu Options
Enabling Power Management Power Management
Enabling High Speed Fan Mode Fan Mode
Selecting S-Video Mode S-Video Mode Select
Selecting Signal Format Signal Select
Setting MONITOR OUT Connector OUT Terminal
Selecting Color System
Using Off Timer Off Timer
6. Using On-Screen Menu Tools
Using Program Timer Program Timer
Selecting the ChalkBoard ChalkBoard
Setting the Program Timer
6. Using On-Screen Menu
The Edit screen will be displayed 2. Set the turn-on time
3. Set the turn-off time
6. Complete the settings
6. Using On-Screen Menu
Activating the Program Timer
Changing the programmed settings
Delete the programmed settings
Setting Mouse Pointer, Button and Sensitivity Mouse
6. Using On-Screen Menu
Usage Time
Menu Descriptions & Functions Information
6. Using On-Screen Menu
The information included are as follows
Source Page2
6. Using On-Screen Menu Source Page1
Signal Type
Input Terminal
LAN PC Card
6. Using On-Screen Menu LAN Built-in
Version
6. Using On-Screen Menu LAN Wireless
Returning to Factory Default
Menu Descriptions & Functions Reset
Current Signal
Resetting the Filter Usage Hours Clear Filter Hours
Cleaning or Replacing the Filter
7. Maintenance
To clean the air-filter
To replace the filter sponge
7. Maintenance
Cleaning the Cabinet and the Lens
To replace the lamp
Replacing the Lamp
7. Maintenance
Remove the lamp housing by holding it
7. Maintenance
4. Reattach the lamp cover
7. Maintenance
Example Distance from a 100 screen with the lens NP03ZL
8. Using Optional Lenses
Table of Throw Distances and Screen Sizes for Optional Lenses
8. Using Optional Lenses
Lens Shift Adjustable Range
Replacing with Optional Lens
Install the new lens
Remove the existing lens from the projector
8. Using Optional Lenses
Using the anti-theft screw to prevent theft of the lens
8. Using Optional Lenses
Tighten the supplied anti-theft screw on the front bottom
Hole of anti-theft screw for lens unit
Indicator Messages
Troubleshooting
9. Appendix
Power Indicator
Common Problems & Solutions → Power/Status/Lamp Indicator on page
9. Appendix
Ensure that the lamp cover is installed correctly. → page
After replacing the lamp, reset the lamp hours used. → page
9. Appendix
If there is no picture, or the picture is not displayed correctly
8806 /8808
Specifications
Optical
Electrical
9. Appendix
Mechanical
SOURCE ADJUST AUTO REFORM 3D
Cabinet Dimensions
POWER
9. Appendix
9. Appendix
Using the Chart
Screen Size and Projection Distance
Height
9. Appendix
List of Screen Sizes
Screen size
Mini D-Sub 15 Pin Connector
Pin Assignments of D-Sub COMPUTER 1 Input Connector
RGB Signal Analog
YCbCr Signal
9. Appendix
Compatible Input Signal List
D Images above flagged with D are supported by digital signal
PC Control Codes
PC Control Codes and Cable Connection
Cable Connection
9. Appendix
MODE
Using Software Keyboard
9. Appendix PC Control Connector D-SUB 9P
Power
Troubleshooting Check List
Power cables plug is fully inserted into the wall outlet
Main power switch is pressed to the ON position
Installation environment
In the space below please describe your problem in detail
Signal cable
9. Appendix
DukaneProjector Model
Wired and Wireless Network Setup Guide
T380/LT280
Each program runs on Windows XP and Windows
Introduction
Cautions on Usage
Cautions on Usage
Setting the LAN Setting of Personal Computer
Contents
Connecting LAN Cable
Attaching Wireless LAN Card
1. What You Can Do with User Supportware
”Easy Connection” function for connecting wireless LAN
1-1. Image Express Utility
What You Can Do with User Supportware
Projected images can be transferred and saved to personal computers
1-click switching of presenter
Central management of the projecting personal computer
1. What You Can Do with User Supportware
1-2. Desktop Control Utility
What You Can Do with User Supportware
PowerPoint file conversion
1-3. Ulead Photo Explorer 8.0 SE Basic
1. What You Can Do with User Supportware
Image transmission
1-5. PC Control Utility
1-4. Viewer PPT Converter
What You Can Do with User Supportware
1. What You Can Do with User Supportware
2. Operating Environment
2-1. Supported Projector
2. Operating Environment
2-2. Operating Environment
Operating Environment
3. Connecting LAN Cable
LAN Card
4. Attaching Wireless LAN Card
Setting card in PC card slot
2 Slowly press the PC card eject button
Removing card from PC card slot
3 Slowly press the PC card eject button once again
4 Slowly pull out the card
5-1. Displaying On-Screen Menu LAN Mode
5. Setting the LAN Setting of Projector
Setting the LAN Setting of Projector
5. Setting the LAN Setting of Projector
5 Press the SELECT
4 Press the button three times to highlight the “Installation” tab
button
5. Setting the LAN Setting of Projector
Flow of Setting
5-2. Wireless LAN
Setting the
LAN Setting of Projector
1 Display the “PC Card” page of “LAN Mode”
Setting Wireless LAN
2 Select “Profiles”
5. Setting the LAN Setting of Projector
4 Input “IP Address”
3 Set “DHCP”
Setting the LAN Setting of Projector
5. Setting the LAN Setting of Projector
5 Input “Subnet Mask”
7 Input “DNS Configuration”
6 Input “Gateway”
8 Select “Advanced”
10 Input or edit “SSID” if necessary
9 Select SSID from “Site Survey” if necessary
Setting the LAN Setting of Projector
5. Setting the LAN Setting of Projector
12 Select “Channel” if necessary
11 Select “Mode” if necessary
5. Setting the LAN Setting of Projector
Example of setting
13 Select “WEP” page if necessary
15 Select “Key Select” only when WEP is selected
14 Select “WEP”
Setting the LAN Setting of Projector
Selects alphanumeric character input or hexadecimal number input
16 Input “Key 1” to “Key 4”
5. Setting the LAN Setting of Projector
17 Finalize “Advanced”
19 Finalize the setting
18 Reconnect the network
Setting the LAN Setting of Projector
5. Setting the LAN Setting of Projector
5-3. Wired LAN
Flow of setting
5 Input “DNS Configuration”
Setting Wired LAN
7 Finalize the setting
1 Display the “Built-in” page of “LAN Mode”
6. Setting the LAN Setting of Personal Computer
1 Click Windows Start → Control Panel
2 Double-click the “Network Connections”
Setting the LAN Setting of Personal Computer
3 Right-click the Wireless Network Connection icon and click Property
6. Setting the LAN Setting of Personal Computer
A property window for wireless network connections will be displayed
6. Setting the LAN Setting of Personal Computer
7 Click the Wireless Networks tab
6 Click OK
6. Setting the LAN Setting of Personal Computer
Setting the LAN Setting of Personal Computer
6. Setting the LAN Setting of Personal Computer
11 Input WEP key to set up an encryption key and click Connect
7-1. Displaying “User’s Guide” PDF
7. Refer to “User’s Guide” and Help
Refer to “User’s Guide” and Help
7. Refer to “User’s Guide” and Help
Reference If the above menu is not displayed, follow these steps
7. Refer to “User’s Guide” and Help
1. Click Start of Windows 2. Click Run
4. Click OK The menu will be displayed
Displaying Helps other than Ulead Photo Explorer
7-2. Using Help
Click in the following order
Refer to “User’s Guide” and Help
Help Screen Layout
Displaying Ulead Photo Explorer 8.0 Help
→ Ulead Photo Explore 8.0 SE Basic, in that order
Explorer Help or Projector User Supportware Help
Page
Audio Visual Products
T380/LT280 Wired and Wireless Network Setup Guide
2900 Dukane Drive
Toll-free