Hardware Guide
M10i Internet Router Hardware Guide
Iii
End User License Agreement
Page
Table of Contents
Part Initial Installation
Chapter Junos Internet Software Overview
Procedures
Part
Chapter Replacing Hardware Components
135
Part Appendixes
173
175
183
189
199
Part Index
M10i Internet Router Hardware Guide Xii Table of Contents
List of Figures
Xiii
132
List of Tables
M10i Internet Router Hardware Guide Xvi List of Tables
About This Guide
Objectives
Audience
Hardware Guide
Domain-name
Documentation Conventions
Text and Syntax Conventions
List of Technical Publications
Convention Description Sans serif typeface
Technical Documentation for Supported Routing Platforms
Junos Internet Software for Supported Routing Platforms
Junos References
Hardware Documentation
Documentation Feedback
Junos Internet Software Network Operations Guides
Requesting Support
Product Overview
M10i Internet Router Hardware Guide Product Overview
System Description
System Overview
Field-Replaceable Units FRUs
AC System Redundancy
System Redundancy
Field-Replaceable Units
Safety Requirements, Warnings, and Guidelines
DC System Redundancy
Page
Hardware Component Overview
Router Chassis
Front of Chassis
Chassis Physical Specifications
Midplane
Flexible PIC Concentrators FPCs
Physical Interface Cards PICs
PIC Components
Compact Forwarding Engine Board Cfeb
Cfeb Components
Cfeb States for Cfeb LEDs
Routing Engine
Routing Engine Components
Hardware Component Overview
Routing Engine Interface Ports
Routing Engine States for Routing Engine LEDs
High-Availability Chassis Manager HCM
HCM Components
Alarm LEDs
High-Availability Chassis Manager States for HCM LEDs
Alarm LEDs
Power Supplies
PIC Offline Buttons
AC Power Supply
DC Power Supply
Description Specification
Power Supply LED
States for Power Supply LED
Fan Tray
Cable Management System
Cable Management System
Junos Internet Software Overview
Routing Engine Software Components
Routing Protocol Process
IPv4 Routing Protocols
Junos Internet Software Overview
IPv6 Routing Protocols
Routing and Forwarding Tables
Routing Policy
VPNs
Interface Process
Chassis Process
Snmp and MIB II Processes
Management Process
Software Upgrades
Tools for Accessing and Configuring the Software
Tools for Monitoring the Software
System Architecture Overview
Packet Forwarding Engine Architecture
Data Flow Through the Packet Forwarding Engine
Routing Engine Architecture
Packet Forwarding Engine Components and Data Flow
Routing Engine Functions
System Architecture Overview
Page
Initial Installation
M10i Internet Router Hardware Guide Initial Installation
Site Preparation Checklist
Preparing for Router Installation
Site Preparation Checklist
Rack Requirements
Rack Size and Strength
Typical Open-Frame Rack
Spacing of Mounting Holes
Clearance Requirements for Airflow and Hardware Maintenance
Connection to Building Structure
Chassis Dimensions and Clearance Requirements
Page
Tools and Parts Required
Unpacking the Router
Unpacking the Router
Unpacking the Router Generic Inventory of Router Components
Generic Inventory of Router Components
M10i Internet Router Hardware Guide Unpacking the Router
Installing the Mounting Hardware
Moving the Mounting Brackets
Installing the Cable Management System
Moving the Mounting Brackets on the Chassis
Installing the Cable Management System
Page
Installing the Router
Installing the Chassis in the Rack
Installing the Chassis in the Rack
Installing the Chassis into a Open-Frame Rack
Installing the Chassis into a Four-Post Rack
Connecting the Router
Connecting the Router to Management Devices
Connecting to a Network for Out-of-Band Management
Connecting to a Management Console or Auxiliary Device
Connecting PIC Cables
Providing Power to the Router
Connecting Power to an AC-Powered Router
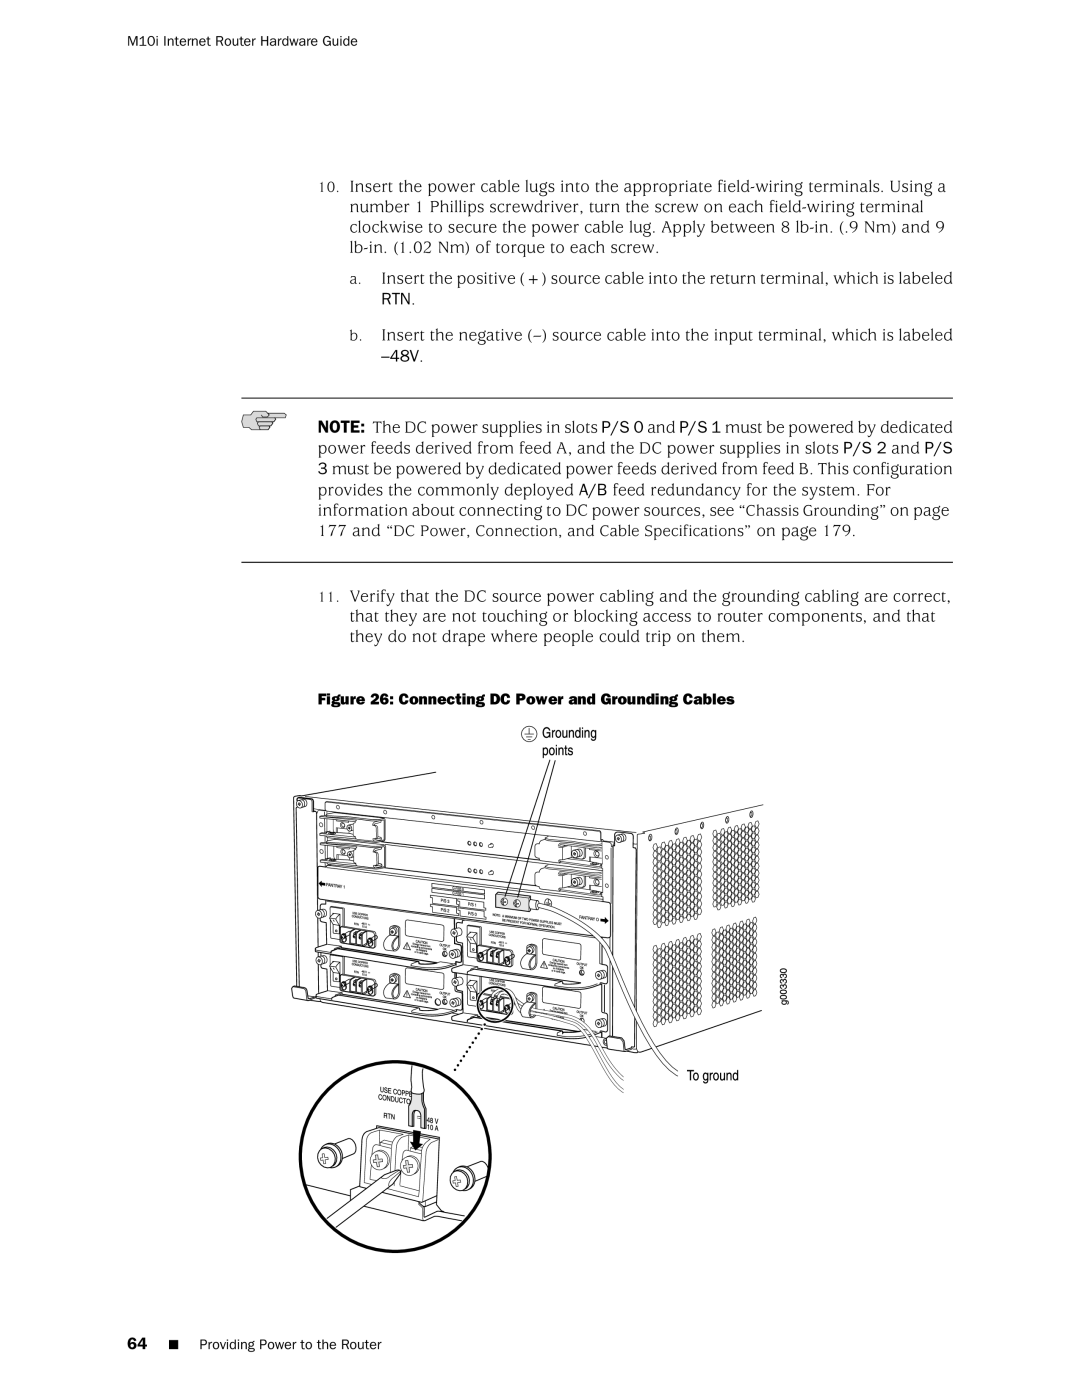
Connecting Power to a DC-Powered Router
RTN
Powering On the Router
M10i Internet Router Hardware Guide
Performing the Initial Configuration
Configuring the Junos Internet Software
Retype new password password or
Root@# set system root-authenticationssh-dsapublic-key or
Authentication-method password public-key
Address address/prefix-length
Page
Part
Page
Maintaining Hardware Components
Routine Maintenance Procedures
Maintaining the Cfeb
Maintaining the Fan Tray
Maintaining PICs and PIC Cables
Maintaining PICs and PIC Cables
Maintaining the Power Supplies
Basics and Services Command Reference
Maintaining the Routing Engine
User@host show chassis routing-engine
Page
Overview of Troubleshooting Resources
Troubleshooting Hardware Components
Command-Line Interface
Hardware and Interface Alarm Messages
LEDs
LEDs on the HCM
LEDs on Hardware Components
Chassis Alarm Messages
Media
SONET/SDH Interface Alarm Messages
Troubleshooting the Cfeb
Juniper Networks Technical Assistance Center
Troubleshooting the Fan Tray
Troubleshooting PICs
LED on All Supplies Are Blinking or Off
Troubleshooting the Power System
LED on One Supply Is Off
User@host show chassis alarms
Replacing Hardware Components
Tools and Parts Required
Replacing a Fan Tray
Removing a Fan Tray
Installing a Fan Tray
Removing a Fan Tray
Replacing a Cfeb
Removing a Cfeb
Installing a Cfeb
Removing a Cfeb
Replacing an HCM
Removing an HCM
User@host request chassis routing-engine master switch
Services Command Reference
Installing an HCM
Removing a Routing Engine
Installing the HCM
Replacing a PIC
Removing a PIC
M10i Internet Router Hardware Guide
Installing a PIC
Removing a PIC
M10i Internet Router Hardware Guide
Replacing PIC Cables
Removing a PIC Cable
Installing a PIC Cable
Replacing Hardware Components
Connecting Fiber-Optic Cable to a PIC
Replacing an SFP
Removing an SFP
Small Form-Factor Pluggable SFP
Installing an SFP
Replacing Power System Components
Replacing an AC Power Supply
Removing an AC Power Supply
Installing an AC Power Supply
Removing an AC Power Supply
Disconnecting and Connecting AC Power
Installing an AC Power Supply
Disconnecting AC Power from the Router
Connecting AC Power to the Router
Replacing a DC Power Supply
Removing a DC Power Supply
Installing a DC Power Supply
Removing a DC Power Supply
RTN
Disconnecting and Connecting DC Power
Installing a DC Power Supply
Disconnecting DC Power from the Router
Connecting DC Power to the Router
48V
Replacing Routing Engine Components
Replacing the Routing Engine
Removing a Routing Engine
Services Command Reference
Installing a Routing Engine
Removing and Inserting the PC Card
Removing the PC Card
Inserting the PC Card
Removing the PC Card
Removing and Inserting the Internal Flash Drive
Inserting the PC Card
Inserting the Internal Compact Flash Disk
Removing the Internal Flash Drive
Configuring the Internal Compact Flash Disk
Inserting the Internal Flash Drive
Removing a Sdram Module
Removing and Inserting Sdram Modules
Inserting a Sdram Module
Replacing Connectors to Routing Engine Interface Ports
Installing the Sdram Module
Replacing the Management Ethernet Cable
Replacing the Console or Auxiliary Cable
Console and Auxiliary Serial Port Connector
Appendixes
M10i Internet Router Hardware Guide Appendixes
Safety and Regulatory Compliance Information
Definition of Safety Warning Levels
Safety Guidelines and Warnings
General Safety Guidelines and Warnings
Restricted Access Area Warning
Qualified Personnel Warning
Appendix a Safety and Regulatory Compliance Information
Preventing Electrostatic Discharge Damage
Fire Suppression
Fire Safety Requirements
Fire Suppression Equipment
General Electrical Safety Guidelines and Warnings
Electrical Safety Guidelines and Warnings
Case of Electrical Accident
Grounded Equipment Warning
M10i Internet Router Hardware Guide
Power Disconnection Warning
TN Power Warning
Copper Conductors Warning
AC Power Electrical Safety Guidelines
DC Power Electrical Safety Guidelines
DC Power Disconnection Warning
DC Power Grounding Requirements and Warning
DC Power Wiring Sequence Warning
DC Power Wiring Terminations Warning
Installation Safety Guidelines and Warnings
Installation Instructions Warning
Chassis Lifting Guidelines
Rack-Mounting Requirements and Warnings
M10i Internet Router Hardware Guide
Appendix a Safety and Regulatory Compliance Information
Ramp Warning
General Laser Safety Guidelines
Laser and LED Safety Guidelines and Warnings
Class 1 Laser Product Warning
Class 1 LED Product Warning
Laser Beam Warning
Radiation From Open Port Apertures Warning
Maintenance and Operational Safety Guidelines and Warnings
Battery Handling Warning
Jewelry Removal Warning
Lightning Activity Warning
Operating Temperature Warning
Product Disposal Warning
Agency Approvals
EMC
Canada
Compliance Statements for EMC Requirements
European Community
United States
Japan
Declaration of Conformity
Compliance Statements for Environmental Requirements
Lithium Battery
Compliance Statements for Acoustic Noise
Page
Router Environmental Specifications
Environmental Specifications
Router Environmental Specifications
Page
Power Requirements, Guidelines, and Specifications
Power Guidelines, Requirements, and Specifications
Site Electrical Wiring Guidelines
Distance Limitations for Signaling
Router Power Requirements
Component Power Requirements
Radio Frequency Interference
Electromagnetic Compatibility
Chassis Grounding
AC Power, Connection, and Power Cord Specifications
DC Power, Connection, and Cable Specifications
AC Power Cord Specifications
DC Power and Grounding Cable Specifications
Cable Type Quantity and Specification Length
DC Power and Grounding Cable Connections
Page
Cable Specifications
Network Cable Specifications and Guidelines
Fiber Optic and Network Cable Specifications
Signal Loss in Multimode and Single-Mode Fiber-Optic Cable
Attenuation and Dispersion in Fiber-Optic Cable
Attenuation in SONET/SDH PICs
Calculating Power Budget for Fiber-Optic Cable
Calculating Power Margin for Fiber-Optic Cable
Estimated Values for Factors Causing Link Loss
Link-Loss Factor Estimated Link-Loss Value
Interface For 100BaseT RJ-45/RJ-45 Operation Connectors
Page
Contacting Customer Support and Returning Hardware
Locating Component Serial Numbers
Cfeb Serial Number ID Label
Serial Number ID Label
HCM Serial Number ID Label
PIC Serial Number ID Label
Power Supply Serial Number ID Label
AC Power Supply Serial Number ID Label
Routing Engine Serial Number ID Label
Contacting Customer Support
Return Procedure
Information You Might Need to Supply to Jtac
Packing the Router for Shipment
Packing Components for Shipment
Packing Components for Shipment
Page
RJ-45 Connector Pinouts for the Routing Engine Mgmt Port
Cable Connector Pinouts
RJ-45 Connector Pinout
RJ-48 Connector to RJ-48 Connector Straight Pinout
DB-9 Connector Pinout
RJ-48 Cable Pinouts for E1 and T1 PICs
RJ-48 Connector to RJ-48 Connector Crossover Pinout
RJ-48 Connector to DB-15 Connector Straight Pinout
RJ-48 Connector to DB-15 Connector Crossover Pinout
V.35 Cable Pinouts for EIA-530 PIC
EIA-530 PIC DB-25 Connector to V.35 Connector Pinout
DB-25 Connector to DB-15 X.21 Connector Pinout
RJ-21 Cable Pinouts for Fast Ethernet 12-Port PIC
Vhdci to RJ-21 Cable
RJ-21 Pin Assignments
Index
M10i Internet Router Hardware Guide Index
Symbols
PIC
EMC EMI
SFP
PIC Cfeb
Port
See also warnings
Snmp
General