Machine a Coudre
R -- To reduce the risk of electric shock
IlVIPORTANT Safety iNSTRUCTIONS
Instrucciones DE Segurjdad Iimportantes
Conservez Cies Consugnes
Sears Canada 1NCo, Toronto ONTo17t5t32B8
Full 25 Year Warranty on Defect in Material or Workmanship
Especificaciones
Specification
De la mquina
Caractristiques de la machine
Table of Contents
76~78
INDiCE
VIii
Para cambtar
Decorativa
Preparatifs avant
MATliRES
Partie IV. Points Dicoratifs
Cabinet and Tote bags
Names of Parts
Full line of sewing machine cabinets and Tote bags are
Gufahilos superior
Gabinete y bolsa de mane
Moubles et sac de transport
Identification des pices
Standard Accessories Names of Parts
Accesorios Esr ndar
Accessorios fournis avec la machine
Nombre de las parte
Identification des pices
31 *32 *33
Available Accessories and Attachments
La pae Descrlpcldn
Accesorios y refacciones disponibles
Free arm sewing
Extension table
Detaching extension table
Attaching extension table
Para coser con el braze libre
Superficie de Extensi6n
IVlanera de instalar la superficie de extensi6n
Pour retirer la rallonge
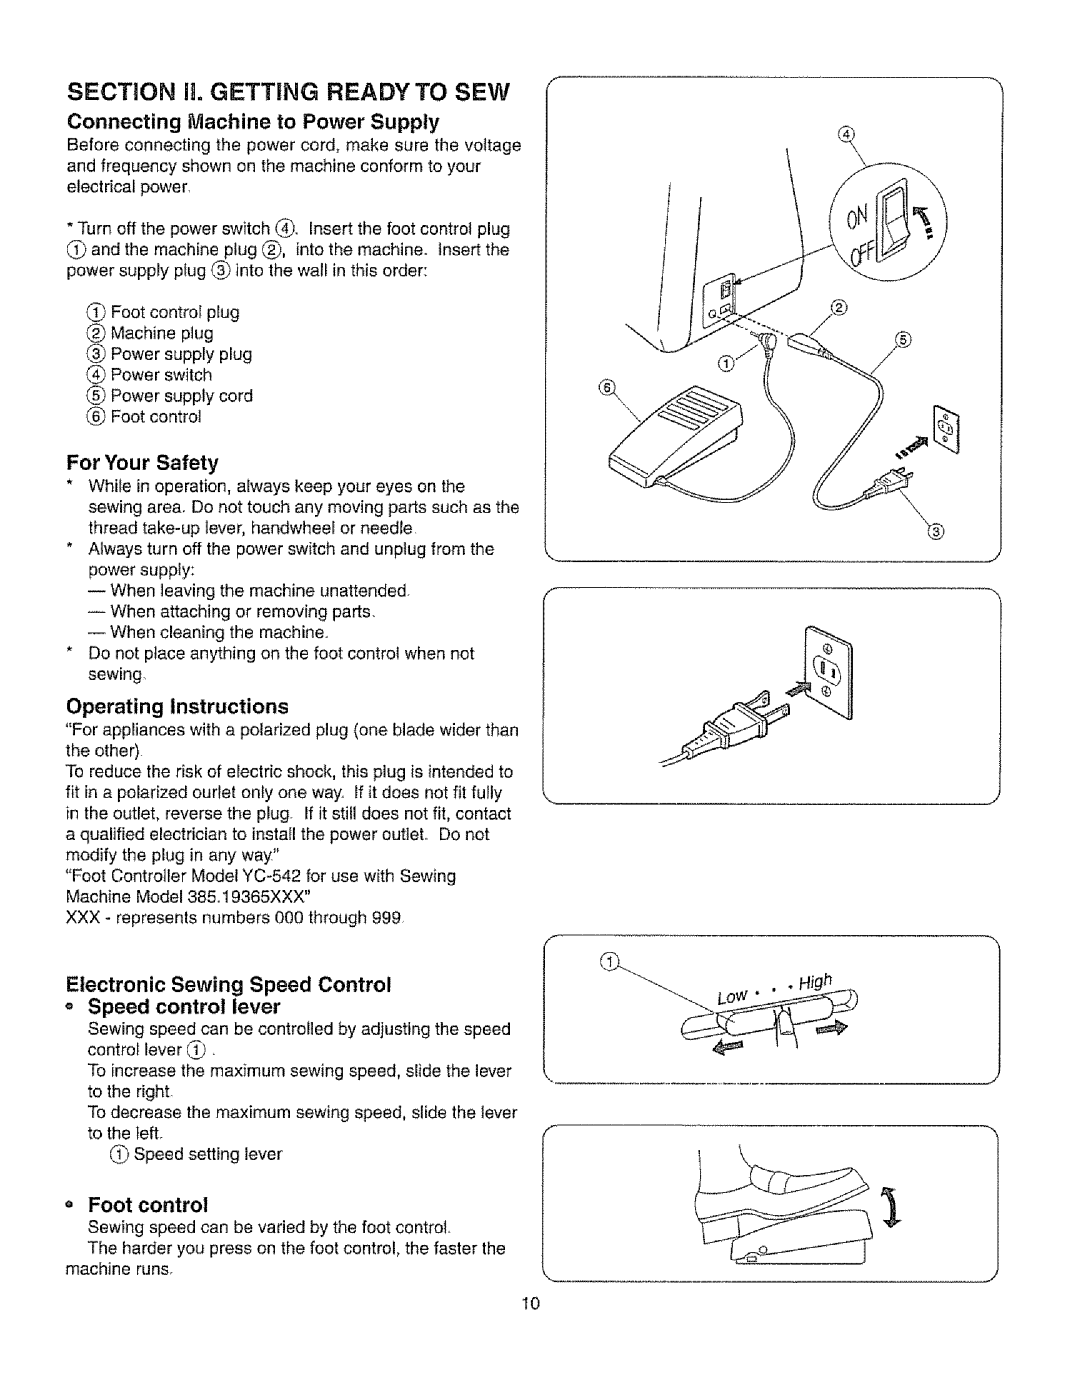
For Your Safety
Connecting Machine to Power Supply
Operating Instructions
Electronic Sewing Speed Control o Speed control lever
Partie ii PRiPAREZ-VOUS a Coudre
Main Function of Buttons Up/Down needle position button
Screen sharpness adjusting dial
Reverse button
Language selection dial
Bot6n de aguja arriba/abajo
Stitch length selection
Stitch width selection
Mirror image key
@Editing
Slection de
Selecci6n de modalidad
De la Iongitud de La puntada S61ection de la
Correcciones
@Twin needle
@ Message key
@ Memory key
5RUTO F 3.52.5J
Tecla de memoria
Touche de mmoire
Touche deffacement
@ Stock/Call key
Blue mode 01 96, the patterns 0t to 10 can
Direct pattern selection and number keys
You can select the patterns 01 to 10, and buttonhole
Selecci6n directa de patrones y teclas con
@ Tecia de almacenamiento/acceso
Selecci6n directa de patrones
Teclas con nSmeros
Pattern Selection and Screen Indication
Number Key Selection
01~96
Ol9.2,2/ / 4-6 Ruto F 2.08,4
Sdlection des motifs et affichage sur rdcran
Selecci6n de patr6n e indicaci6n en la pantalla
Selecci6n de tecla numdrica
Sdlection par touche numdrotde
Buzzer
Normal / Resumption Mode
Sonnerie
Mode Normal / Reprise
Modalidad Normal / Reanudacion
Se6al sonora
Pressure Adjusting Lever
To Raise or Drop the Feed Dogs
Presser Foot Lifter
Comment monter et descendre les griffes
C6mo subir / bajar los dientes dei tranporte
Changing Needle
To Remove and Attach the Foot Holder
To Remove and Attach the Presser Foot
Changer Iaiguille
C6mo y cudndo cambiar la aguja
Selecting Needle and Fabric
Green
Topstitching
Muy Ligero Gasa, Encaje Fino, Organd, Redecilla y
Selecci6n de Aguja y Tela
Tul
1175 1280
Poids Tissu Type daiguille
Choix de Iaiguiile et Tissu
Daiguille
Diamtre
Blankpage p.ginablanca pageblanche
Winding the Bobbin Removing the bobbin
Setting up the bobbin winding
Use Additional Spool pin
Winder spindle
Bobinado de la Canilla
C6mo sacar la canilla
Remplir la canette Retrait de la canette
Para utilizar el portacarretes adicional
Setting up the spool
OWinding the bobbin
Push the bobbin to the righL
Colocaci6n del carrete pequeo
Installation de la petite bobine
Remplissage de la canette
Petites ou dtroites
Inserting the bobbin
15 cm 6 de hilo,, Ranura
Threading the machine
Threading the Machine
Enfilage de la machine
Enhebrado del hilo superior
Tire hacia abajo y pselo per detrds del gufahilos inferior
Gufahiles inferior
Needle Threader
Gufa
Ensartadorautomdtico Enfile-aigutlte
PasserfacilementA
Drawing up the Bobbin thread
Comment faire monter le fil de la canette
Extracci6n del hilo de la canilla
Balanced thread tension
Manual thread tension adjustment
Auto-thread tension
= Balanced thread tension
Tensien de hilo automdtica
Tensien de hilo balanceada
Ajuste manual de la tensien de hilo
Rdglage manuel de la tension
Starting to sew
Straight Stitch Sewing
Changing Sewing Direction
Finishing sewing
Para terminar ia costura
Partie IllCOUTURE DE Base Couture avec le point droit
Using the Quilting Guide
Using the Seam Guides on the Needle Plate
Sewing on Heavy Fabrics
Turning Square Corners
Tourner angle droit
Girando esquinas cuadradas
Vis
Manera de coser telas pesadas
Manual Stitch Length
These settings apply only to straight stitch patterns #1
Variable Needle Position
UTOS.5
Ajuste manual de la iongitud de puntada
C6mo cambiar la posici6n de la aguja
Rdglage manuel de la Iongueur du point
Les diffrentes positions de Iaiguille
Attaching the Embroidery Foot
Various Utility Stitches
Basting
Stitch pattern Thread tension dial Embroidery foot
Hilvdn
Triple Stretch Stitch
Automatic Reverse Stitch
Stretch Stitch
Stitch pattern @ Thread tension dialAUTO
Point Arribre automatique
Puntada invertida automdtica
Puntada Eldstica Triple
Point Extensible Triple
Auto-Lock Stitch
Saddle Stitch
Zigzag Stitches
To change the Width and Length
Point darrt automatique
Puntada de fijaci6n Automdtica
Puntada vistosa
Point Sellier
Tricot Stitch
Variation of Zigzag Stitches Overcasting stitch
Stitch pattern
Thread tension dialAUTO
VariatiOn de la puntada de zig-zag
Variantes Du point zigzag Points zigzag
Point pour jersey
Knit Stitch
Overedge sewing
Stitch pattern Thread tension dialAUTO Overedge Foot
Point pour
Puntada de punto
Otras costuras de sobreborde
Autre point de surfilage
Overedge Sewing Ill
Overedge sewing
Bordure Zigzag double
Borde de zig-zag doble !i
Bordure Zigzag double !1
Borde de zig-zag doble Patr6n de puntada
Sewing Button
02,0
Coudre un bouton
Costura De botones
Sewing preparation
Automatic Buttonhole BH1
Prdparatifs avant la couture
Preparaci6n para coser
Ojales automdticos BH1 Patr6n de puntada
Boutonniere automatique BH1
Sewing preparation
After attaching the sensor buttonhole foot, raise the foot
Point Slider No gap @ Spring holder @ Uneven stitch results
Prparatifs avant ia couture suite
Preparaci6n para coser continuaci6n
Empezando a coser
Commencer coudre
To Change the Stitch Density
Starting to sew
Commencer b coudre suite
= Empezando a coser continuaci6n
= Para cambiar ia anchura de las puntadas
Ajustes de la densidad y la anchura de los ojales
Adjusting the Stitch Width and Density
Automatic Buttonhole
To change the stitch density
Ojales automdticos BH2 / BH3
Ojal
Boutonniere
Corded Buttonhole
Stitch pattern Thread tension dial
To tighten it
Boutonnieres Rebroddes
Ojales con cord6n
Fabric Preparation
Zipper Sewing
Attaching Zipper Foot
= Starting to sew
Prdparatifs avant la couture
Para coser
Costura de cremallera yea la hoja adjunta
Glissibre
Zipper Sewing
Costura de cremalieras continuaci6n
Couture des fermetures b glissibre suite
Darning Stitch
To adjust the shape of Darning stitch
To memorize Darning stitch
IIIllllttlllllll
Pour repriser moins que 2 cm 3/4
Para coser
Zurcido
Para zurcir menos de 2 cm 3/4
Bartacking
Adjusting the evenness of bartacking
Memorizing bartacking
Make a test on an extra piece of fabric to check your
Memorizando el hilvdn de barra
Hilvdn De barra
Mdmoriser les points de fixation
Ajuste de la uniformidad de las puntadas de Hilvdn de barra
Blind Hem foot
Blind Hem
Ourlet
Para coser
Roulott
Pour coudre
Quilting
Pintucking
@ Stitch pattern
L9,UTO a 7
Aiforzas Plis religieuse
Acolchado
Matelasser
Applique
Shell Tack
Stitch pattern @Thread Tension dial Satin Stitch foot
Hilvn de Concha
Appliques
Point De coquille
Aplique
Fagoting
Smocking
Les Smocks
Puntada con frunces
Deshilachado
Couture ajoure
Starting to sew
Scallop StitchA
Scallop StitchB
Stitch Pattern Thread tension dial
Manera de coser
IVlanera de coser
La couture
Patchwork
Satin Stitch
DStitch Pattern Thread tension dialAUTO
Patchwork
Costura para trabajo tipo mosaico
Costura de puntada De satfn
Point
Cross Stitch
Decorative Stitch
Point De croix
Puntada en cruz
Puntada decorativa
Point Ddcoratif
92 qUT0
Twin Needle Stitch
Manera de coser
Puntada De aguja Doble
Couture iaiguille
Double
Adjusting Pattern Balance
Adjusting Distorted Stretch Stitch Patterns
Adjusting Distorted Letters or Numbers Red or Green Mode
Iquilibrer un motif
Ajuste de balance del patr6n
Ajuste de patrones de puntada eldstica Distorsionados
R6glage dun motif extensible d6form6
Select stitch pattern
Select the Blue pattern modem
O01-,67
102
Programacidn de patrones de costura decorativa
La programmation des motifs ddcoratifs
103
Restarting Programmed Patterns
Cycle Stitching with Mirror Image Patterns
Costura de ciclo con patrones de imagen Revertida
Cycles de couture avec des motifs en miroir
105
01~96 0t67 106
Elongation
Aliongement
Alargamiento
One Point Stitch
Costura de puntada Dnica
Couture dun point
Motif 71,72 Maiette de rgtage de 1atension du ffi
Sewing Letters in Block Style Example Sunday
Select Red mode Select stitch pattern Press
Key Select stitch pattern Press
110
Costura de letras en estilo de bloque Ejemplo Sunday
Par exemple Sunday
Couture des lettres en criture dimprimerie
111
Example A, B, C
Sewing Letters in Script Style
I12
Combinando letras en estilo caligrdfico A, B, C
Deleting a Stitch Pattern, Letter or Number by Editing
Editing Function
Effacer un motif, une lettre ou un chiffre en
Funci6n de correccibn
#ditant
115
116
Adding Letters or Space between
Funci6n de correcci6n
Agregando letras o espacios entre letras
Ajouter des lettres ou un espace entre les lettres
Fonction dEdition
Assemble Hook Race
Section V Care of Your Machine
Limpieza del garfio y de los dientes de transporte
Partie V ENTRETiEN DE Votre Machine
Ensamble el garfio
Remontage de la piste du crochet
Attaching the Light Bulb
Removing the Light Bulb
Cbmo quitar ta bombilla
Remplacement de rampoule
Instalaci6n de la bombilla
Comment changer Iampoule dclairage
Patterns are distorted Cause
Seam puckering Cloth is not
Reference
Automatic buttonhole stitches are not working
Normal
Reference
Condition
123
La mquina no
Frunce las costuras La tela no se
Probable Referencia
Es insuficiente
Salen El patr6n No est4 equilibrado Distorsionados
Condicion Causa probable Los patrones
Las puntadas
P4g Pgo119 Normal 125
De rfrence
Uaiguille est real installe
Fronceo
Le tissu navance pas rgulirement La machine ne marche pas
Page
Call anytime, day or night U.SoA only
Calt anytime, day or night U.S.Ao and Canada