DIAGNOSIS & TROUBLESHOOTING
DIAGNOSIS
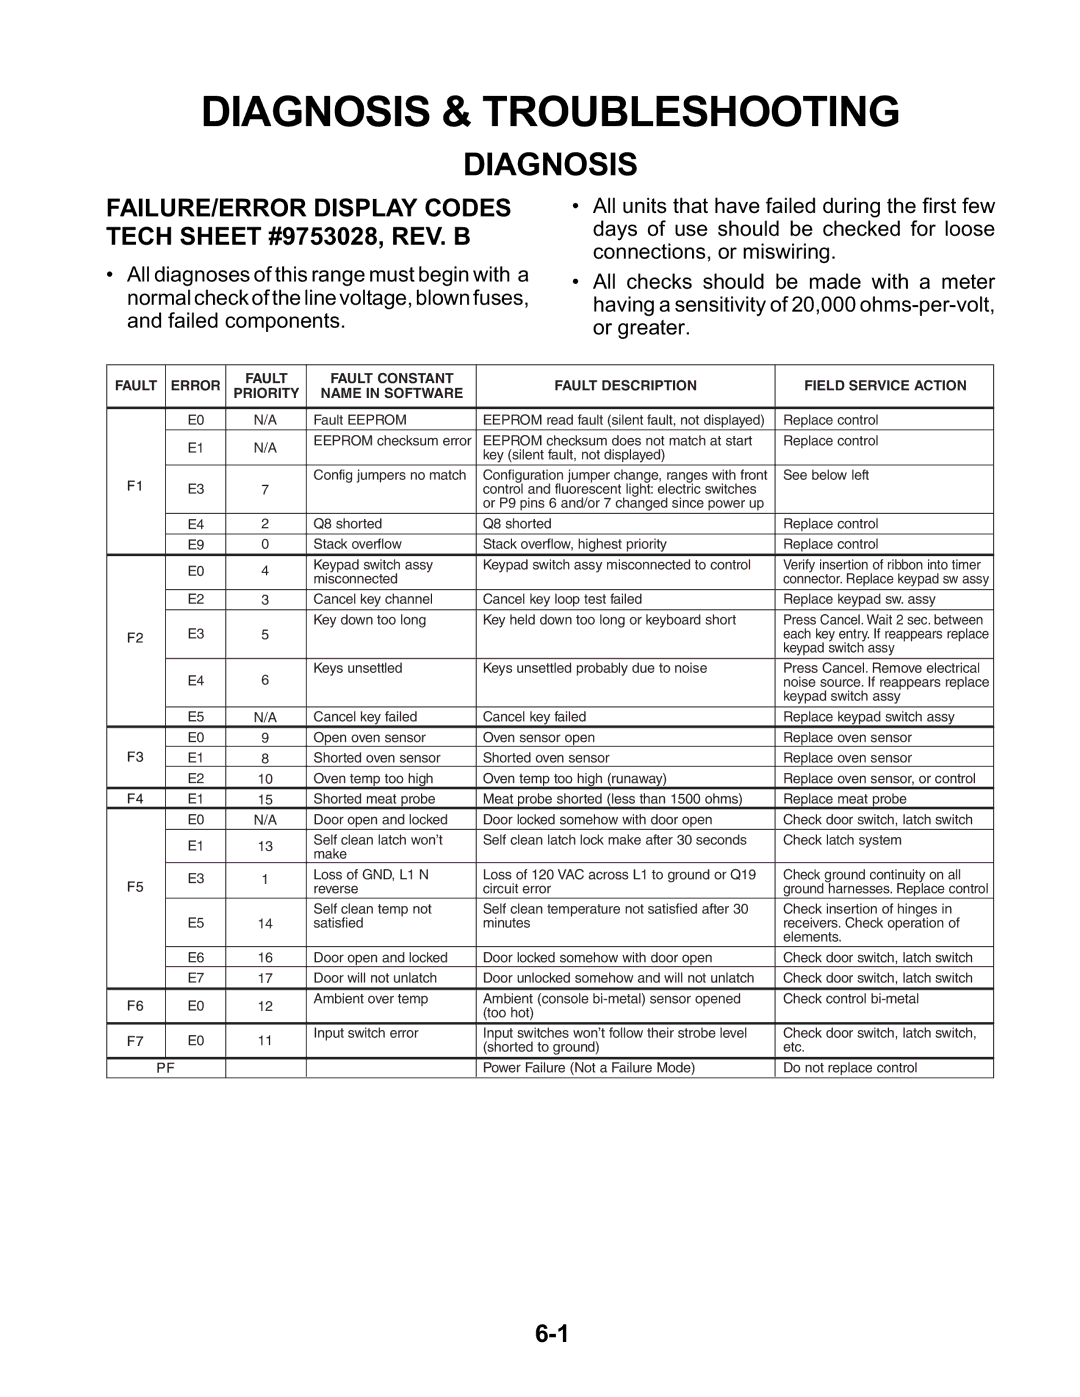
FAILURE/ERROR DISPLAY CODES TECH SHEET #9753028, REV. B
•All diagnoses of this range must begin with a normal check of the line voltage, blown fuses, and failed components.
•All units that have failed during the first few days of use should be checked for loose connections, or miswiring.
•All checks should be made with a meter having a sensitivity of 20,000
FAULT | ERROR | FAULT | FAULT CONSTANT | FAULT DESCRIPTION | FIELD SERVICE ACTION | |
PRIORITY | NAME IN SOFTWARE | |||||
|
|
|
|
|
| |
F1 | E0 | N/A | Fault EEPROM | EEPROM read fault (silent fault, not displayed) | Replace control | |
| E1 | N/A | EEPROM checksum error | EEPROM checksum does not match at start | Replace control | |
|
| key (silent fault, not displayed) |
| |||
|
|
|
|
| ||
| E3 |
| Config jumpers no match | Configuration jumper change, ranges with front | See below left | |
| 7 |
| control and fluorescent light: electric switches |
| ||
|
|
|
| or P9 pins 6 and/or 7 changed since power up |
| |
| E4 | 2 | Q8 shorted | Q8 shorted | Replace control | |
| E9 | 0 | Stack overflow | Stack overflow, highest priority | Replace control | |
F2 | E0 | 4 | Keypad switch assy | Keypad switch assy misconnected to control | Verify insertion of ribbon into timer | |
misconnected |
| connector. Replace keypad sw assy | ||||
|
|
| ||||
E2 | 3 | Cancel key channel | Cancel key loop test failed | Replace keypad sw. assy | ||
|
| Key down too long | Key held down too long or keyboard short | Press Cancel. Wait 2 sec. between | ||
E3 | 5 |
|
| each key entry. If reappears replace | ||
3 |
|
|
|
| keypad switch assy | |
|
|
|
|
| ||
E4 | 6 | Keys unsettled | Keys unsettled probably due to noise | Press Cancel. Remove electrical | ||
|
| noise source. If reappears replace | ||||
|
|
|
| keypad switch assy | ||
E5 | N/A | Cancel key failed | Cancel key failed | Replace keypad switch assy | ||
F4 | E0 | 9 | Open oven sensor | Oven sensor open | Replace oven sensor | |
E1 | 8 | Shorted oven sensor | Shorted oven sensor | Replace oven sensor | ||
E2 | 10 | Oven temp too high | Oven temp too high (runaway) | Replace oven sensor, or control | ||
| E1 | 15 | Shorted meat probe | Meat probe shorted (less than 1500 ohms) | Replace meat probe | |
F5 | E0 | N/A | Door open and locked | Door locked somehow with door open | Check door switch, latch switch | |
E1 | 13 | Self clean latch won’t | Self clean latch lock make after 30 seconds | Check latch system | ||
make |
|
| ||||
|
|
|
| |||
E3 | 1 | Loss of GND, L1 N | Loss of 120 VAC across L1 to ground or Q19 | Check ground continuity on all | ||
reverse | circuit error | ground harnesses. Replace control | ||||
|
| |||||
6 |
|
|
|
|
| |
E5 |
| Self clean temp not | Self clean temperature not satisfied after 30 | Check insertion of hinges in | ||
14 | satisfied | minutes | receivers. Check operation of | |||
|
|
|
| elements. | ||
E6 | 16 | Door open and locked | Door locked somehow with door open | Check door switch, latch switch | ||
E7 | 17 | Door will not unlatch | Door unlocked somehow and will not unlatch | Check door switch, latch switch | ||
F7 | E0 | 12 | Ambient over temp | Ambient (console | Check control | |
|
|
| (too hot) |
| ||
PFE0 | 11 | Input switch error | Input switches won’t follow their strobe level | Check door switch, latch switch, | ||
|
|
|
| (shorted to ground) | etc. | |
|
|
|
| Power Failure (Not a Failure Mode) | Do not replace control | |