LG Room Air Conditioner
Table of Contents
2002
LG Model Name
Code Type Code of Model Meaning
2003~2005
Meaning
Safety Precautions
Installation
There is risk of fire, electric shock, explosion, or injury
Operation
Thinner
Keep level even when installing the product
Be cautious that water could not enter the product
Operation
Dimensions
Symbols Used in this Manual
Indoor Unit
9k, 12k Btu Series
Outdoor Unit
Product Specifications
AS-W096U0 AS-W126U0 AS-W096U1 AS-W126U1
Installation
Select the best Location
Indoor unit
Outdoor unit
Oil trap should be installed every 5~7 meters
Fixing Installation Plate
Piping Length and Elevation
Drill a Hole in the Wall
Flaring Work
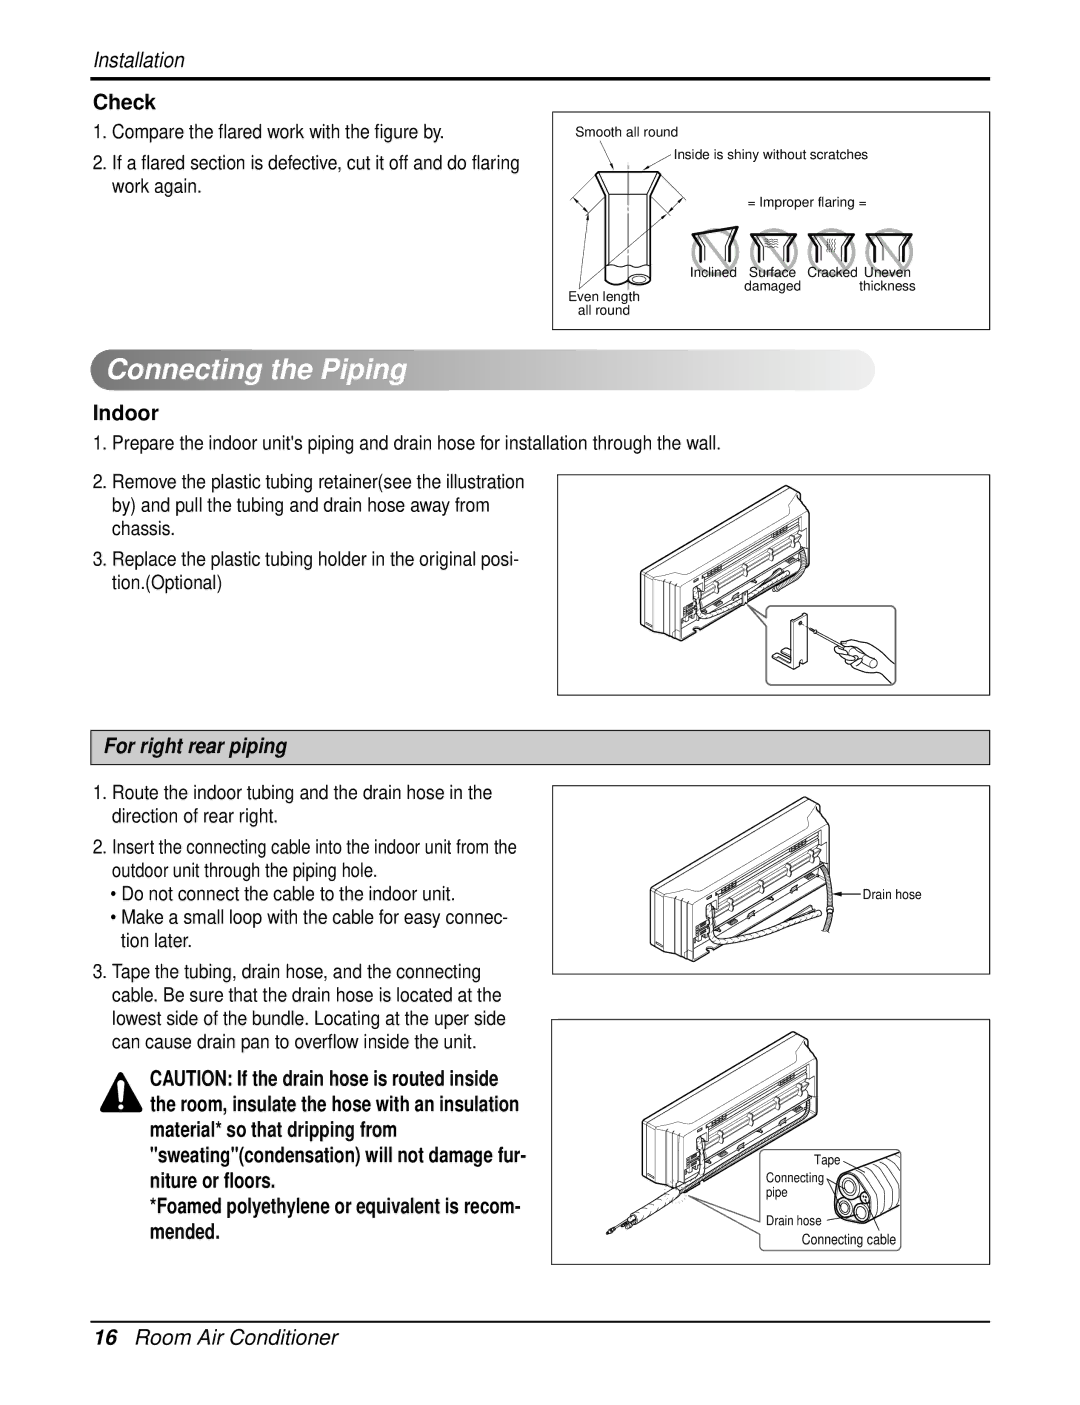
Connecting the Piping
Check
Indoor
Foamed polyethylene or equivalent is recom- mended
Wrap the insulation material around the connecting portion
For left rear piping
Indoor unit installation
For left piping. Follow the instruction below Good case
Bad case
Outdoor
Outdoor unit
Connecting the Cables
Circuit Grade Breaker
To check the drainage
Checking the Drainage
Drain piping
Forming the Piping
Air purging
Air Purging
Air purging with vacuum pump
Evacuation
Soap water method
Finishing the job
Prepare remote controller
Test Running
Settlement of outdoor unit
Evaluation of the performance
Pump Down Procedure
Pump Down
Functions
Power relay control
Active power filter controlPSC
Overheatng. ProtectionPower module
Stand by control at low temp
Cancel Sleep Mode, Timer on or Timer OFF
3, 4, 5, 6 Off Timer
High39C Low11C
Cooling Down to 18C Heating Down to 16C Up to 30C
LED display of indoor unit
Operation
LG Brand/OEM Brand
Protection of the evaporator pipe from frosting
Control method
Cooling mode operation
Model Comp. Operating frequency
Healthy Dehumidification mode operation
Intake air Temp Setting Temp
Operating freq. step of comp
Heating mode operation
Temp. differences Comp. Operating frequency
Fuzzy mode operationOptionals
Intake air temp Setting temp Fan speed
Fuzzy operation for cooling
At beginning
Fuzzy operation for Heating
Fuzzy operation for dehumidification
Jet cool mode operation
Jet heat mode operation
Swing mode
Chaos swing mode
Sleep timer operation for cooling cycle
Sleep timer operation
Sleep timer operation for heating cycle
Indoor temp Operating Mode Setting temp
Auto restarting operation
Forced operation
Trial Operation
Protection from total current control
Protection from DC Peak Current
Portection from overheating of power module
Portection from overheating of compressor
AS-W096/126U0 Series
Defrosting control
AS-W096/126U1 Series
Auto ChangeoverOptional
Auto Cleaning
Low Ambient
Disassembly
To remove the Grille from the Chassis
To remove the Discharge Grille
To remove the Control Box
To remove the Evaporator
To remove the Motor Cover
To remove the Cross-Flow Fan
Electric Control Device
Schematic Diagram
IndoorAS-W096U 0, AS-W126U 0 Series
OutdoorAS-W096Series, AS-W126Series
Wiring Diagram
Indoor Unit AS-W096/126U0,1 Series
Outdoor Unit AS-W096U0 Series
AS-W126U0 Series
Indoor Main P.W.B Assembly DC Part
Components Location
Display ASSEMBLYAS-W096/126U0,1 Series
Outdoor Main P.W.B Assembly AS-W096/126U0 Series
Troubleshooting Guide
Refrigeration Cycle Diagram
Model Capillary Tube
Model Adopted Electrion Expansion Valve
Pipe Length and the Elevation
Oil trap should be installed per 5~7 meters
Outdoor unit Indoor unit
Way, 3-way Valve
Way Valve Liquid Side
Procedure
Air purging
Check for gas leakage
Purge the air from the system
Air purging of the charge hose
Pumping Down
Set the 2-way valve to the closed position
Re-installation
Mount the valve stem nuts and the service port nut
Re-air Purging
Air purging
Balance Refrigerant of the 3-way Valve
Gas leakage
Evacuation
All amount of refrigerant leaked
Gas Charging
After Evacuation
Connect the charge hose to the charging cylinder
Purge the air from the charge hose
Cycle Parts
Trouble analysis
Self-diagnosis function
Precaution in Service or Check
Diagnosis Procedure
Procedure Specification Remedy
Electronic Parts
Product doesnt operate with the remote controller
Compressor/Outdoor Fan are unable to drive
Check Point Comp. on Comp. OFF
When indoor Fan does not operate
Trouble 5 When the horizontal louver does not operate
Heater does not operate at all
Outdoor Unit does not operate at all
Indoor Outdoor
Trouble 8-1When compressor does not operate normally
DC Peak ErrorError Code ➅
Trouble 8-2When compressor does not oprate normally
Communication error between Indoor and Outdoor Error Code ➄
Trouble 8-3When compressor does not oprate normally
CT Error Error Code ➆
Problem of missing the connector Indoor Main PCB Assy
Problem of missing the connector Outdoor Main PCB Assy
Connectors Condition Problem error mode
CN-T/Block
Exploded View
Indoor Unit
Outdoor Unit
Replacement Parts List
Description
Panel ASSY, Front SUB
No A20061Z October

 Connecting
 the
the
 Piping