User’s Guide
Page
Contents
TrueSync Desktop
TrueSync Desktop Contacts view
Contents
Introduction
Introducing the StarTAC clipOn Organizer
About Starfish TrueSync technology
Connecting the clipOn to your StarTAC
Getting started
Turning on the StarTAC clipOn Organizer
Chapter
Getting started with the Setup Wizard
Next Wizard screen confirms your profile selection
Press to continue with the Wizard
Using the Home screen
Using the clipOn Home screen and views
Getting connected for synchronization
Synchronizing with the clipOn
Calling with the StarTAC clipOn
Using the StarTAC clipOn Organizer
Now you can
Using Contacts
Changing views
To sort cards
Sorting cards
Changing the telephone number display
To create a new Contact
Editing your Contacts
To go to
To remove a Contact
To set up a meeting or telephone call with a Contact
Changing views Daily, Weekly, Monthly
Using the Calendar
To create a new event
Editing your Calendar
To follow up, reschedule, or cancel an event
To view To Do items
Using To Do Lists
To view details about an event participant
To create a To Do item
Checking off completed items
Creating To Do items
To check off a completed To Do item
Highlight the To Do’s subject, and then
To view or remove Memos
Using Memos
To reschedule or remove a To Do item
To view details about a call participant
To append to a Memo
Creating a Memo
Changing cities and time zones
Using Time Zones
Understanding time zones and travel
Setting alarmsã
Setting the clock
To change your preferences
Using Preferences
To change your password
To view the device information
Product care
Installing new batteries
To remove the old batteries and install new batteries
Removing the clipOn from the phone
Resetting the clipOn
Screen care
Charging the phone with the clipOn connected
Chapter
TrueSync Desktop and TrueSync Plus
TrueSync Desktop and TrueSync Plus
Requirements
Installing the product
Readme file
Installing TrueSync Desktop or TrueSync Plus
Upgrade information
If the installation does not launch automatically
To start TrueSync Desktop later
Uninstalling your product
Starting TrueSync Desktop
To remove the software from your computer
For more information
Using online help
Starting TrueSync Plus
About the documentation
Chapter
TrueSync Plus users
Setting up TrueSync
Starting TrueSync
TrueSync Desktop users
Using the TrueSync Setup Wizard
Start Calendar
To synchronize
Changing the TrueSync setup
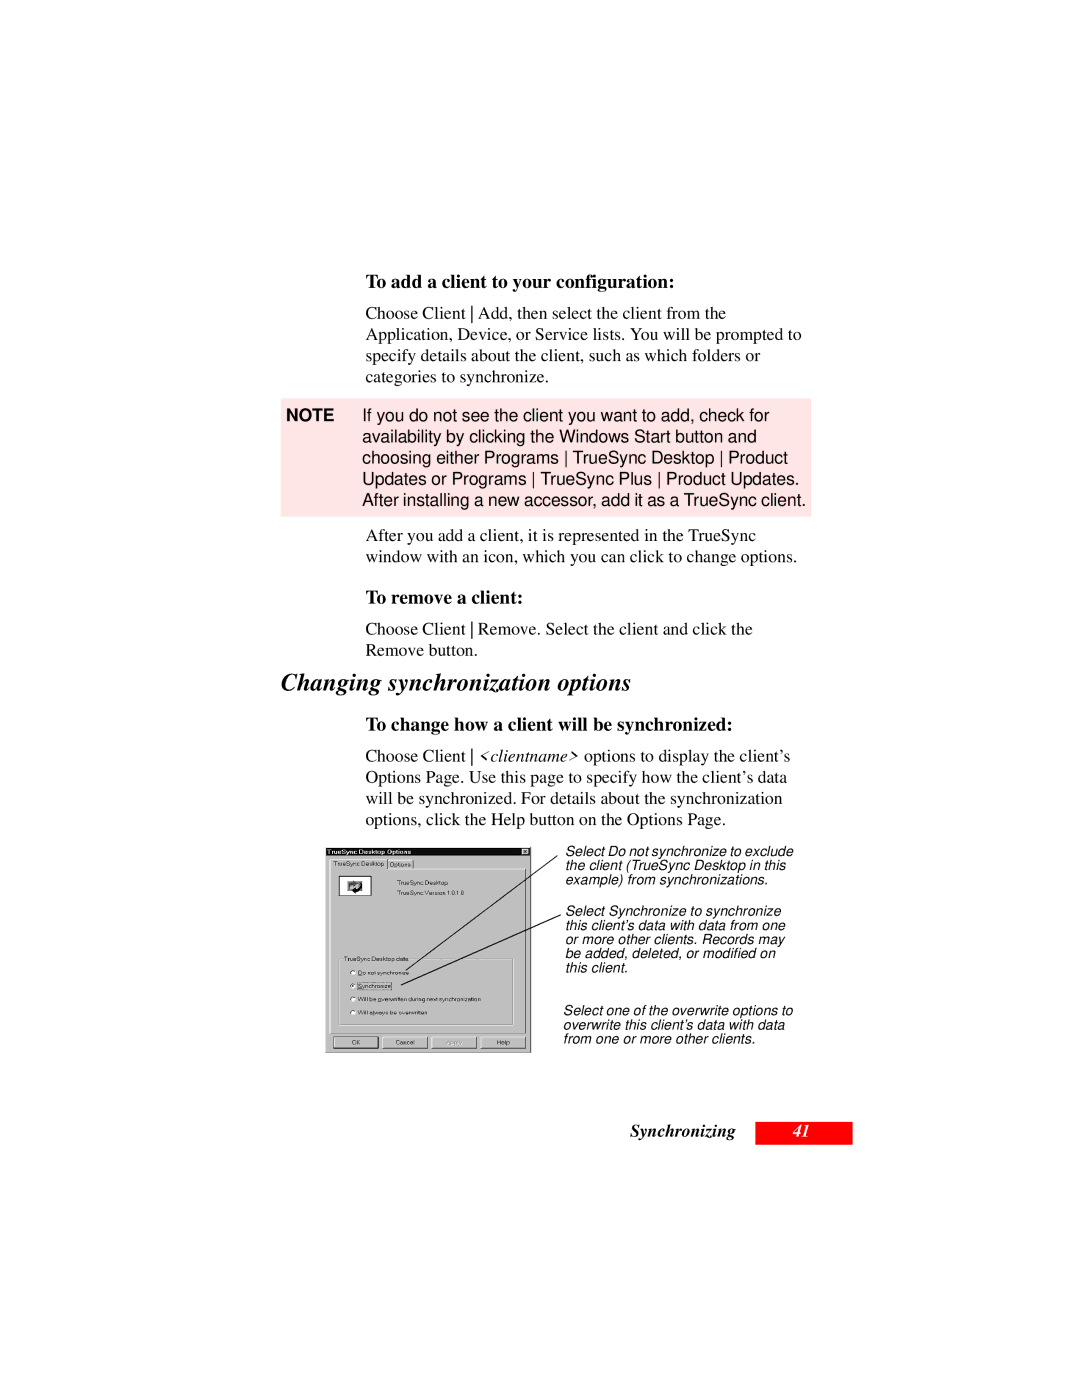
To change how a client will be synchronized
To add a client to your configuration
Changing synchronization options
To remove a client
To select items to synchronize between clients
Selecting what to synchronize
Selecting files, folders, or categories
To map your Contacts fields
Selecting and mapping Contacts fields
Changing your preferences
Using QuickLists
To specify the user
Using the TrueSync Log
Setting up multiple users
To create an additional user
To use Internet Synchronization after registering
Staying up to date with TrueSync Central
To register for a TrueSync Central account
TrueSync Desktop
Using TrueSync Desktop’s features
Shortcut menus
Setting preferences
Customizing the Toolbar
TrueSync Desktop
Chapter
TrueSync Desktop Calendar view
Using the Calendar view
To go directly to today’s calendar
Viewing your Calendar
Selecting dates in the Daily view
Weekly and Monthly views
Scheduling events
Yearly View
When you travel changing time zones
Entering To Do items and calls
TrueSync Desktop Contacts view
Using the Contacts view
Cardfile basics
Following figure shows the Contacts view
Contacts Toolbar
To create a new cardfile
Creating a cardfile
Adding cards
Chapter
TrueSync Desktop Memos view
Using the Memos view
Here is a magnified view of the Memos Toolbar
Memo files, folders, and memos
To create a memo
Creating memos
Changing margins and tabs
Chapter
TrueSync Desktop EarthTime view
EarthTime map
To change one of the displayed cities
Selecting cities
To change your Home Clock
To change the Local Time when you change time zones
Changing the Local Time
Changing the Home Clock
Chapter
TrueSync Desktop Printing
Using the Printing options
Calendar printing
Printing different formats
Printing in Contacts view
Printing in the daily format
To print labels, address book pages, or envelopes
Printing labels, address book pages, and envelopes
Printing in the Memos view
Glossary
Glossary
Glossary
Glossary
Glossary
Index
Index
Index
Index
Index
Index
Index
License for Individual Use