CONTROLS AND THEIR FUNCTIONS
|
|
|
|
|
|
|
| 1 |
| 3 4 |
| 2 |
| 5 |
|
| 6 |
|
|
| ||
| EJECT |
|
|
|
|
|
|
|
|
|
|
|
|
|
|
|
|
|
| EJECT |
| |
| VTR1 |
|
|
|
|
|
|
|
|
|
|
|
|
|
|
|
| V T R 2 |
|
|
| |
POWER |
|
|
|
|
|
|
|
|
|
|
|
|
|
|
|
|
| OPERATION MODE | VTR2 AUDIO | |||
|
|
|
|
|
|
| AUDIO | SPEAKER/ | AUDIO |
|
| EDIT MODE |
|
|
|
| EDIT | INPUT SELECT | ||||
OFF | ON |
| REC | CONTROL | PREROLL |
|
|
|
|
|
| INT | VTR1 | |||||||||
REC | INHIBIT | REMOTE |
| SYNCHRO MONITOR HEADPHONES SWAP |
|
|
|
|
|
|
| REC | EDIT | EXT |
| EXT | ||||||
|
| LOCAL- | 7 - | CF- | V1- | ASMBL | V |
| A1 | A2 | TC | SEPARATE | CH1 | CH2 | ||||||||
| REC |
| 5 - | ON- | - MIX - | V1•2- |
|
|
| |||||||||||||
| DIAG |
| 3 - | OFF- | - | MIX - | 1ST EDIT |
| DUMP | LOAD | EDL | STORE | MENU |
|
| REC | ||||||
| RESET | VTR1 VTR2 EXT VTR |
|
| VTR1 VTR2 | VTR1 | VTR2 |
| RESET |
|
| |||||||||||
CH1 |
|
|
|
|
|
|
|
|
|
|
|
|
|
|
|
|
|
| CH1 | CH2 | ||
CH2 |
|
|
|
|
|
|
|
|
|
|
|
|
|
|
|
|
|
|
| |||
|
|
|
|
|
|
|
|
|
|
|
|
| LAST | COUNTER |
|
|
|
|
|
| ||
| PLAY | STILL | REW | FF |
|
|
| SPLIT |
|
|
|
|
| CTL |
| PLAY | STILL | REW | FF |
|
| |
|
|
|
|
|
|
|
| EDIT |
| TC |
|
|
| |||||||||
| STOP | STB OFF |
| TRACK |
| EVENT |
|
| BS | FS |
| CLEAR |
| UB |
| STOP | STB OFF |
|
|
|
| |
|
|
|
|
|
| VTR1 | VTR2 |
|
|
|
| |||||||||||
|
|
|
|
|
|
|
|
|
|
|
|
|
|
|
|
|
|
|
| |||
|
|
|
|
|
|
|
| IN |
| GO TO |
| OUT |
|
|
|
|
|
|
|
|
| |
|
|
|
|
|
|
|
| OUT | IN |
|
|
|
|
|
|
|
|
|
| |||
| PB |
|
|
|
|
|
|
|
| RECALL |
|
|
|
|
|
|
|
|
|
| PB | |
|
|
|
|
|
|
|
|
|
|
|
|
|
|
|
|
|
|
|
|
| ||
AUDIO LEVEL |
|
|
|
|
|
|
|
|
|
|
|
|
|
|
|
|
|
|
| AUDIO LEVEL | ||
ENTRY / SHIFT
PREVIEW | AUTO EDIT | ALL STOP |
REVIEW | MULTI |
|
Controls and their functions
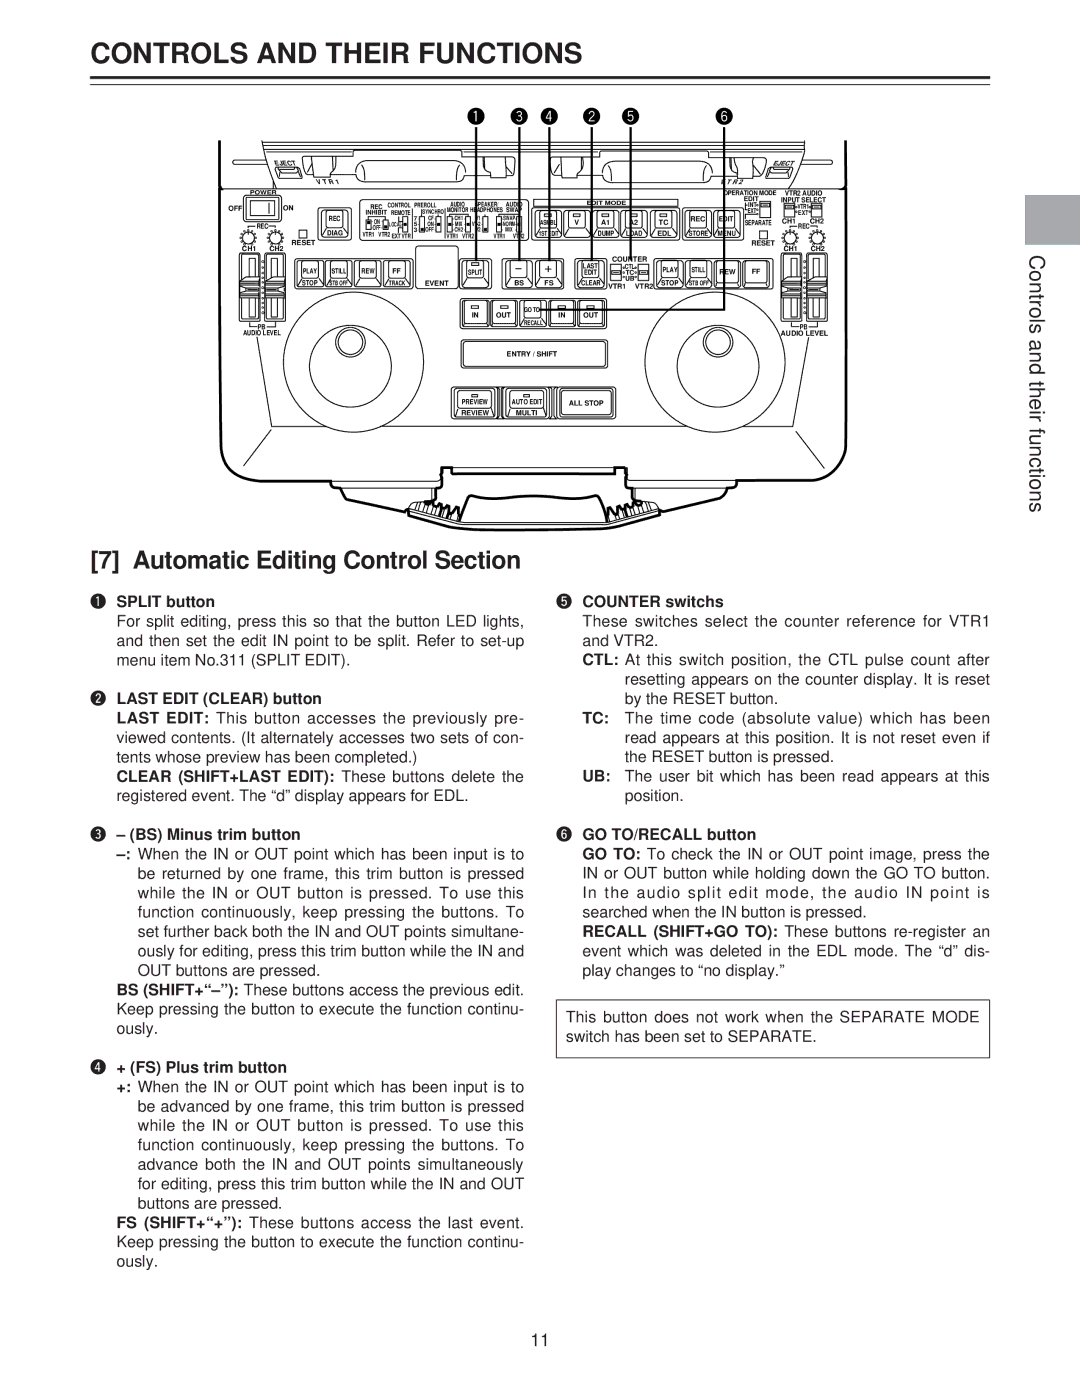
[7] Automatic Editing Control Section
qSPLIT button
For split editing, press this so that the button LED lights, and then set the edit IN point to be split. Refer to
wLAST EDIT (CLEAR) button
LAST EDIT: This button accesses the previously pre- viewed contents. (It alternately accesses two sets of con- tents whose preview has been completed.)
CLEAR (SHIFT+LAST EDIT): These buttons delete the registered event. The “d” display appears for EDL.
e– (BS) Minus trim button
BS
r+ (FS) Plus trim button
+: When the IN or OUT point which has been input is to be advanced by one frame, this trim button is pressed while the IN or OUT button is pressed. To use this function continuously, keep pressing the buttons. To advance both the IN and OUT points simultaneously for editing, press this trim button while the IN and OUT buttons are pressed.
FS (SHIFT+“+”): These buttons access the last event. Keep pressing the button to execute the function continu- ously.
tCOUNTER switchs
These switches select the counter reference for VTR1 and VTR2.
CTL: At this switch position, the CTL pulse count after resetting appears on the counter display. It is reset by the RESET button.
TC: The time code (absolute value) which has been read appears at this position. It is not reset even if the RESET button is pressed.
UB: The user bit which has been read appears at this position.
yGO TO/RECALL button
GO TO: To check the IN or OUT point image, press the IN or OUT button while holding down the GO TO button. In the audio split edit mode, the audio IN point is searched when the IN button is pressed.
RECALL (SHIFT+GO TO): These buttons
This button does not work when the SEPARATE MODE switch has been set to SEPARATE.
11
