Operating Instructions
Information for Your Safety
Dear Customer
Following Applies only in Canada
Declaration of Conformity
Following Applies only in the U.S.A
FCC Note
DMC-L10
Battery charger
About the battery pack
About the battery charger
This Site is English only
Places with a lot of sand or dust
Http//panasonic.co.jp/pavc/global/cs
Contents
Portrait Scenery
Film Mode
SELF-TIMER
Night Portrait
DE-A38F K2CA2EA00002 K1HA08CD0015 K1HA08CD0013 VFC4268
Standard Accessories
DMW-BLA13PP
VKF4091
Card is optional
CD-ROM
Lens Rear Cap
Names Components
Camera body
Lens
Battery charger/AC adaptor P18
30 31 32
About the Lens
Using a lens other than the supplied lens
Rotating the LCD monitor
LCD monitor rotation direction
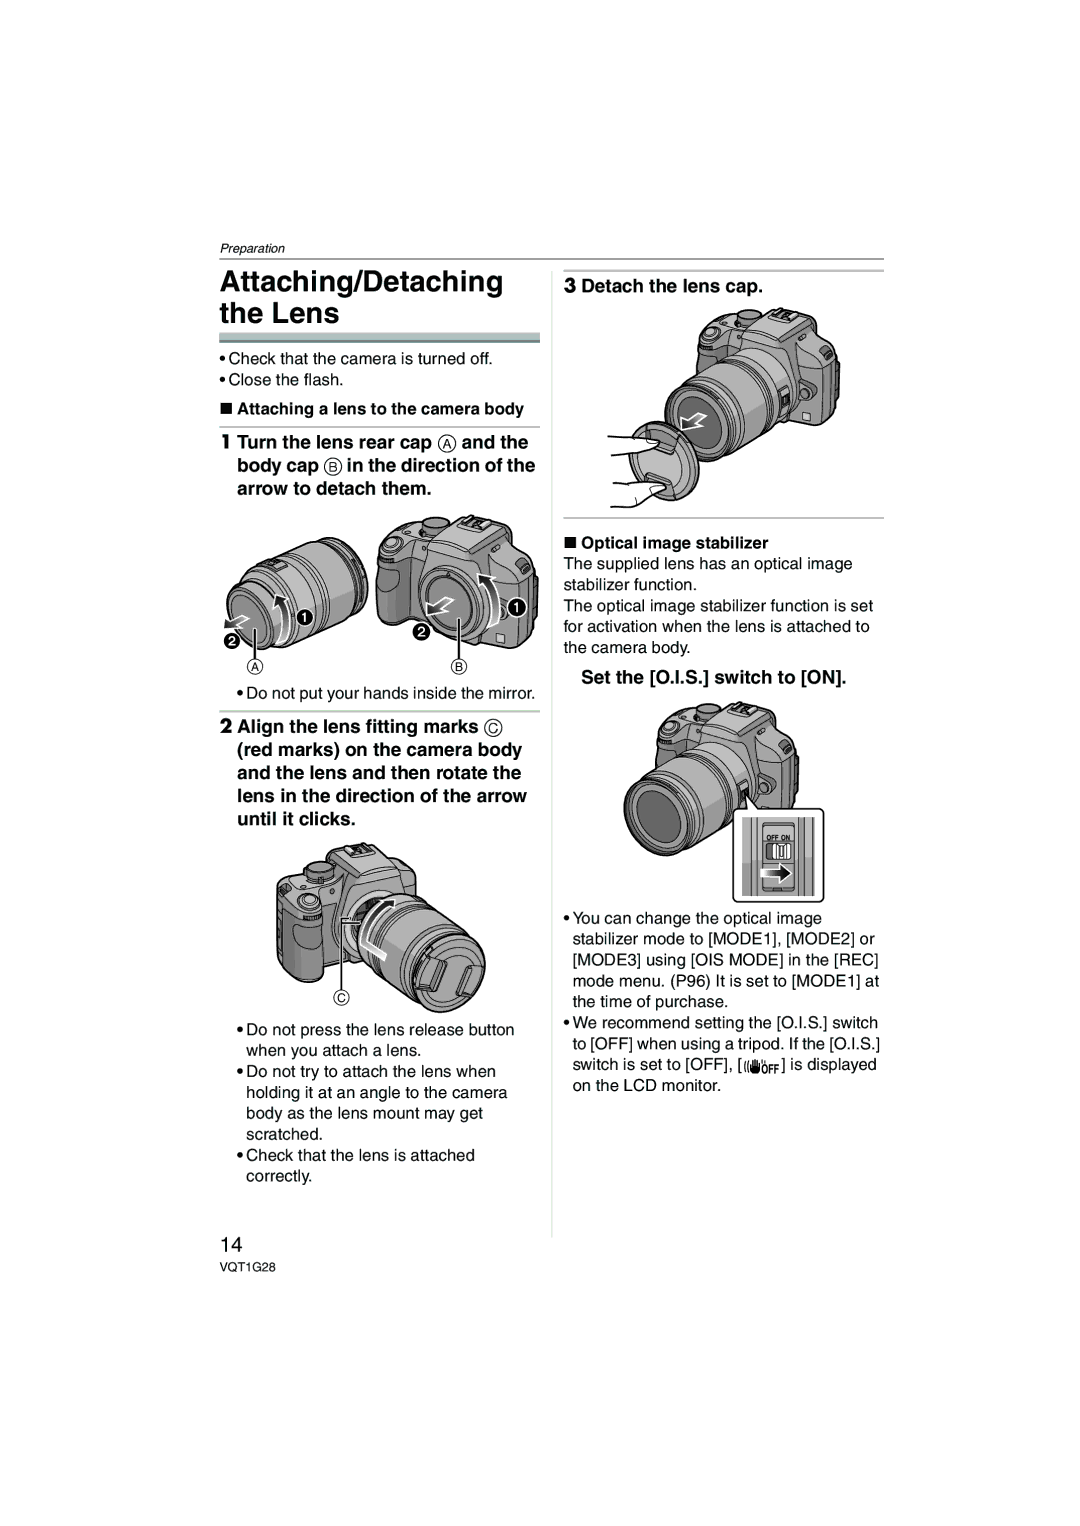
Detach the lens cap
Set the O.I.S. switch to on
Attaching/Detaching the Lens
Attaching a lens to the camera body
Check that the camera is turned off
Attaching the Lens Hood
Detaching a lens from the camera body
Fit to the mark
Temporarily storing the lens hood
Attaching the Strap
Pass the strap through the strap eyelet on the camera body
Attaching the eye cup
Attaching the Eyepiece Cap
Attaching the eyepiece cap
Attaching the Magnifier Eye Cup
Charging the Battery with the Charger
Charging starts when the Charge indicator a lights green
Connect the AC cable
Battery indication
About the Battery
Detach the battery after charging is completed
Battery life
When the Charge indicator flashes
When recording once every
Charge indicator lights when charging starts
Charging Charging time Approx min
Inserting/Removing the Battery
Remove the battery after use
Inserting/Removing the Card Optional
Card optional
Access to the card
About the Card optional
Turning the Camera On
Setting Date/Time Clock Set
Set the camera ON/OFF switch to on
Press MENU/SET Press 3/4/2/1 to select the date and time
Press MENU/SET to set
About the Mode Dial
Changing the clock setting
Setting the Menu
Press MENU/SET
Switching to other menus
Press Press 3/4 to select the setting Press MENU/SET to set
Setting menu items
Press 3/4 to select the menu item
Clock SET
About the Setup Menu
Power Save
Auto Review
LCD Auto
OFF NO.RESET
Monitor
OFF
Highlight
USB Mode
Select on Connection
Onoff
Language
When OFF is set When Auto is set
TV Aspect
Ver. Version Disp
Viewfinder Display
Switching between the Viewfinder Display/ Live View Display
Format
LCD Monitor Display when taking pictures with Live View P54
Live View button B LCD monitor
P54 for details
Tips for taking good pictures with Viewfinder
Making the Viewfinder easier to see Diopter adjustment
Taking Pictures with the Viewfinder
Changing the information display on the LCD monitor
Set the focus mode lever to AFS
Matching the Focus Exposure Automatically
Press Display to change
Setting the AF frame for phase difference AF
Press the shutter button fully to take the picture
Example of program shift when using the supplied lens
Program shift
Preventing jitter camera shake
When there are both near and distant subjects in a scene
Taking good pictures
Exposure
Auto Mode Settings
Taking Pictures in Auto Mode
Set the focus mode lever to AFC
Focus Priority P106 on
Aperture-priority AE
Auto Bracket P72
Press the shutter button halfway
Shutter-priority AE
Manual Exposure
Set the aperture value a Set the shutter speed B
Manual Exposure Assistance
About B Bulb
Under exposed
Compensating the Exposure
Rotate the rear dial to compensate the exposure
Compensate the exposure towards positive
Press 4 to select Exposure COMP. and then press MENU/SET
Taking Pictures with Manual Focus
Press MENU/SET to display the menu Press 3/4/2/1 to select
Press MENU/SET to close the menu
Technique for Manual focus
About the focus distance reference Mark
Rotate the zoom ring towards Wide
Taking Pictures with the Zoom
Rotate the zoom ring towards Tele
To make subjects appear closer use Tele
Changing the Information Displayed on the playback screen
Press Display to switch the monitor screen
Playing Back Pictures
To finish playback
Press Press 3 to select YES and then press MENU/SET
Deleting Pictures
Press
To delete a single picture
To delete Multi Delete
Screen when selecting Multi Delete
Press 2/1 to select the picture and then press 4 to set
ALL Delete
Press Rotate the rear dial right to enlarge the picture
Using the Playback Zoom
Rotate the front dial during playback zoom to switch images
Press 3/4/2/1 to move the position
Press 3/4/2/1 to select a picture
Displaying Multiple
Press Rotate the rear dial left to display multiple screens
Examples of 25 screens To return to normal playback
Press 3/4/2/1 to select a picture and then press MENU/ SET
Displaying Pictures by Recording Date
Press 3/4/2/1 to select the date to be played back
Calendar is displayed monthly
Tips for taking good pictures with Live View
Press Live View to switch to the Live View recording screen
Taking Pictures with Live View
Histogram
Changing the Information Displayed
Guide line
Examples of histogram
Press LCD Mode a for 1 second Press 3/4 to select a mode
Brightening the LCD Monitor
Auto
Taking pictures at a low angle
Canceling setting
LCD Monitor
Auto focus when taking pictures with Live View
Taking pictures with the camera held Vertically
Live View AF P107 in the Custom Menu menu is set to P58
AF mode when taking pictures with Live View
Setting the method used to focus
About face detection
Custom Menu menu is set to P58
When selecting or
Manual focus when taking pictures with Live View
Set the focus mode lever to MF
When selecting
About MF Assist
Press MENU/SET to close MF assist
Taking Pictures using the Built-in Flash
Switching to the appropriate flash setting
To open the flash
Forced on
Auto
AUTO/Red-eye reduction
Slow sync./Red-eye reduction
ISO
Shutter speed for each flash setting Flash setting
30 ¢ 1 to 1/4000
Normal method when taking pictures with the flash
Adjusting the flash output
Setting to the 2nd Curtain Synchro
1st curtain synchro
2nd curtain synchro
Fixing the Focus and the Exposure
Press and hold AFL/AEL to fix the exposure
Fixing the exposure only
Fixing the focus or the focus/the exposure
If you release AFL/AEL, AF/AE Lock is canceled
When AF/AE is selected Fixing the focus and the exposure
Focus on the subject and take a picture
Taking Pictures using Burst Mode
Set the drive mode lever to
Taking pictures with Live View
Taking Pictures using Auto Bracket
Focusing in burst mode
Step
Changing the settings for Step and Sequence in auto bracket
Press MENU/SET twice to close the menu
Sequence
Changing the time setting for the self-timer
Taking Pictures with the Self-timer
Self-timer set to
Settings
Adjusting the White Balance
AWB
For recording outdoors
Resetting the white balance
Select or with on P75 and then press
Than AWB You can also use Func to set. P91
Setting the color temperature
Finely adjusting the white balance
Setting the Light Sensitivity
Viewfinder Display When taking pictures with Live View
ISO sensitivity 100 1600 Use in bright Not Places Suitable
ISO sensitivity Settings
800 1600 ¢ When taking pictures with Live View only
Use in dark Not Suitable Places
Setting the maximum sensitivity setting
Metering mode
Deciding the Method to Measure Brightness
Registering Personal Menu Settings
Clock SET
AF+MF
Taking pictures in Custom mode
AF/AE Lock AF/AE Lock Hold
Creative setting
Press 2/1 to select the advanced scene mode
Sensitivity Metering Mode
Taking expressive portraits and landscape pictures
Scenery
Technique for Portrait mode
Portrait
ISO MACRO¢
Macro
Normal Macro
Creative Macro
Sports
Night Portrait
Scene menu and then press MENU/SET again
Press 2/1 to select the scene mode Press MENU/SET to set
Taking pictures that match the scene being
Sunset
Age display setting
Birthday setting
Food
Refer to BABY1/BABY2 for other information about this mode
PET
Using the Function setting
Using the REC Mode Menu
Film Mode P92
SELF-TIMER P102
Press 2/1 or use the rear dial to select an item
Film Mode
Setting the color tone of the picture to be recorded
Saturation
Contrast
Sharpness
Noise RED
Many pixels Fine B Few pixels Rough
Aspect
PICT.SIZE/QUALITY
Quality
When the aspect ratio is
Only
MODE1
OIS Mode
Optical Image Stabilizer
MODE2
¢ 35 mm film camera equivalent
EX. OPT. Zoom
Picture size and extended optical zoom magnification
≥2k
Zoom
Optical zoom
≥4k
Setting to the 2nd Curtain Synchro
Using the digital zoom together with Extended optical zoom
Switching to the appropriate flash setting
Flash
Decide on the composition, and take the second picture
100
MULTI. Expo
Next
Decide on the composition, and take the third picture
About automatic gain control setting
101
Press 4 to select Exit and then press MENU/SET
Burst Rate
SELF-TIMER
102
Auto Bracket
103
Setting the color space for taking pictures
Removing picture noise when taking pictures
Color Space
Using the Custom Menu
104
Exposure Comp
105
Dial SET
Aperture
AF Assist Lamp
106
Focus Priority
AF+MF
107
Items that can be set Menu
Using the Play mode menu
108
Press 3/4 to select ALL or and then press MENU/SET
109
Slide Show
Press 3 to select Start and then press MENU/SET
Favorite
Setting your favorite pictures
110
Press 4 to select on and then press MENU/SET
Rotate DISP./ROTATE
Example When rotating clockwise
111
To display the picture rotated
112
Setting the picture to print and the number of prints
Single setting
Dpof Print
113
Multi setting
To cancel all settings
Number of prints icon B appears
Protect
Protect icon Appears Cancel The protect icon a Disappears
114
Preventing accidental erasure of pictures
Press 3/4 to select YES or no and then press MENU/SET
115
Resize
Making the picture size smaller
116
Trimming
Press 3/4 to select or Then press MENU/SET
117
Aspect Conv
Press 2/1 to select a picture and then press
Press 3 to select PC and then press MENU/SET
Connecting to a PC
118
Misc
119
Dcim
Printing the Pictures
120
Press 3 to select Single Picture and then press MENU/SET
121
Press 4 to select PictBridge PTP and then press MENU/SET
Press 3 to select Print Start and then press MENU/SET
122
Press 4 to select Dpof Picture and then press MENU/SET
Setting the date printing with the Dpof print in advance
123
Connect the video cable to the video input socket on the TV
Playing Back Pictures on a TV Screen
124
Turn the TV on and select external input
Icon
Using the External Flash
125
External flash Forced on External flash Slow sync
Using the MC Protector/PL Filter
126
MCuMulti-coated PLuPolarizing lens filter
Using the Remote Shutter
127
About Lock on the remote shutter
Connect the AC cable Connect the DC cable a
Using the AC Adaptor
128
Camera becomes warm during use. This is not a malfunction
Displaying the Time at Travel Destination World Time
Setting the home area Home Perform steps 1
Finishing setting the home area
129
Setting the travel destination area Perform steps 1
130
Program shift P38 Age P89
Screen Display
131
132
Live View Display on the LCD Monitor P54
Histogram P48
133
Playback Display on the LCD Monitor
About dirt on the image sensor
134
Wipe off any dust or fingerprints with a soft, dry cloth
135
136
Message Display
137
138
Troubleshooting
139
However a picture is not taken
140
Picture cannot be recorded with Live View
LCD monitor is too bright or dark
Flash is activated 2 times
141
Flash Flash is not activated
Flash is activated continuously
142
143
Number of recordable pictures
144
145
146
Specifications
147
DIGITAL/V.OUT
148
Remote
149
Digital Camera Accessory System
150
For USA Customers
Digital Camera Accessory Order Form
151
Request for Service Notice For USA Only
152
153
Limited Warranty For USA Only
Limited Warranty Coverage
Carry-In or Mail-In Service
154
Service in Puerto Rico
Customer Services Directory For USA Only
Centralized Factory Service Center
155
Memo
156
157
Index
158
32, 35
159
121
47, 97
Panasonic Canada Inc
One Panasonic Way, Secaucus, NJ
Panasonic Puerto Rico, Inc
Ambler Drive, Mississauga, Ontario, L4W 2T3