Manuals
/
Pentax
/
Photography
/
Digital Camera
Pentax
14071
specifications
Names of Parts, Front
Models:
14071
1
20
180
180
Download
180 pages
7.95 Kb
17
18
19
20
21
22
23
24
Troubleshooting
Specifications
Install
Default setting is o
Symbols
Connecting to a Computer
Warranty
Reset Setting
Optional Accessories
About the Battery
Page 20
Image 20
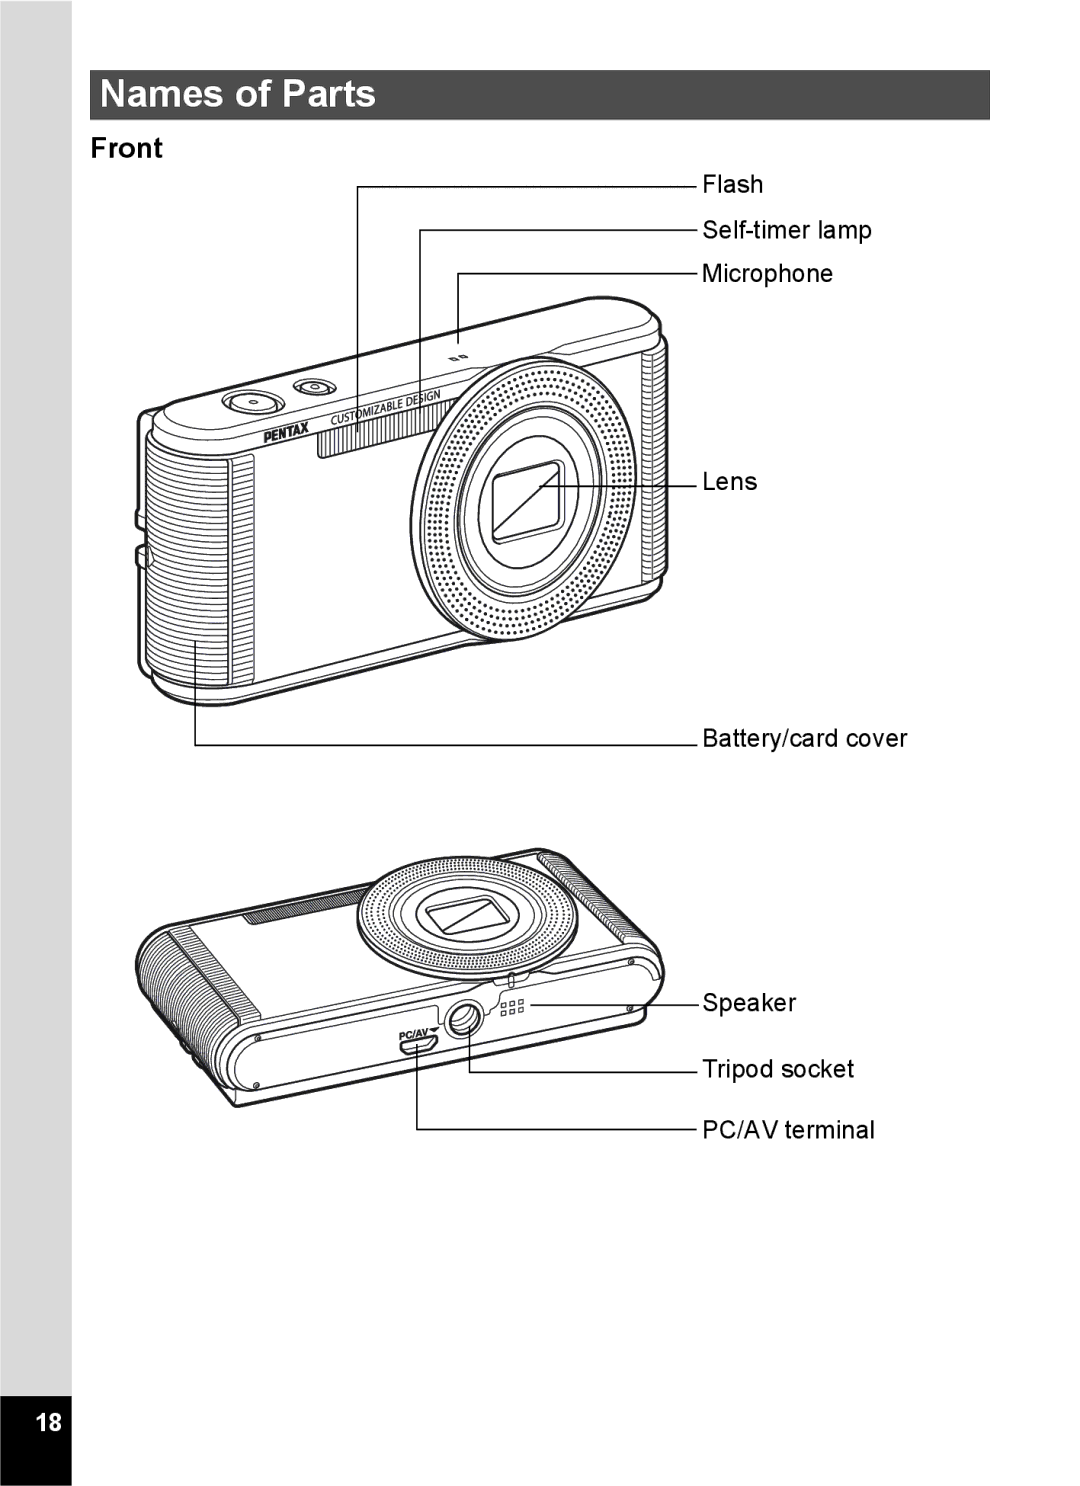
Names of Parts
Front
Flash
Self-timer
lamp
Microphone
Lens
Battery/card cover
Speaker
Tripod socket
PC/AV terminal
18
Page 19
Page 21
Page 20
Image 20
Page 19
Page 21
Contents
ENG
Regarding Product Registration
Regarding copyrights
Regarding trademarks
Using Your Camera Safely
To users of this camera
About the Power Adapter
About the Camera
About the Battery
Page
Care to be Taken During Handling
Before Using Your Camera
Precautions on Carrying and Using Your Camera
Storing Your Camera
Cleaning Your Camera
Other Precautions
Page
Contents
Playing Back and Deleting Images
Editing and Printing Images
Settings
Connecting to a Computer
Appendix
148
165
Index 171
Related operation
Settings
Composition of the Operating Manual
Camera Features
Easy-to-Navigate Capture and Playback Functions
Perfect for Portrait Shots
Add Fun Frames to Your Pictures
Display Your Data in Calendar Format
For decorating your pictures with a frame
Advanced Movie Recording Functions
Checking the Contents of the Package
Names of Parts
Front
Names of Operating Parts
Back
Display in a Mode
Monitor Indications
Normal Display
No Info
Still Picture Capture Mode
+1.0 250 F3.5 200
A14 A13 A12 A11
A9 A10
Display in Q Mode
100-0038 250 F3.5 Edit 200
Using the Histogram
Guide Indications
Understanding Brightness
Dark image Correct image Bright image
Understanding Contrast
Attaching the Strap
Dress-up the Camera
Remove the lens ring
Remove the front panel Put on an Alternative Skin
Alternative Skin
Put on the front panel Attach the lens ring
Powering the Camera
Installing the Battery
Getting
Started
Close the battery/card cover
Getting Started To Remove the Battery
GettingStarted
At 23C with the display on and the battery fully charged
Battery Level Indicator
Installing an SD Memory Card
Backing Up Data
SD Memory
Press the power switch
Press the power switch again
Turning the Camera On and Off
Checking the SD Memory Card
Initial Settings
Setting the Display Language
When the Wrong Language Has Been Inadvertently Selected
When the Screen After Appears in the Wrong Language
Press the 3 button
Use the four-way controller 23 to select Language/ u
Press the four-way controller
Use the four-way controller To choose a city
Frame moves to W Hometown
W Hometown screen appears
Setting the Date and Time
Use the four-way controller 23 to choose the date format
Use the four-way controller 23 to change the month
GettingStarted
GettingStarted
Understanding the Button Functions
Mode
Four-way controller
Green button
Switches to a mode p.46
Green/i button
Press the Q button or the shutter release button halfway
Switching Between a Mode and Q Mode
Press the Q button
Setting the Camera Functions
Operating the Menus
Press the 3 button in a mode
Use the four-way controller 23 to change the setting
Ex. To set Focusing Area on the a Rec. Mode menu
Press the four-way controller 3 twice
To Save the Setting and Start Taking Pictures
To Save the Setting and Start Playback of Images
To Cancel the Changes and Continue with Menu Operations
Press the shutter release button halfway
Rec. Mode Menu
Menu List
a Rec. Mode Menu
Movie Menu
Setting Menu
W Setting Menu
Ntsc
Check the subject and shooting information on the display
Taking Still Pictures
Taking Pictures
Press the shutter release button fully
Using the Shutter Release Button
Poor focusing conditions
Press halfway
Press fully
Setting the Shooting Mode
Press the four-way controller 3 in a mode
Use the four-way controller 2345 to choose a shooting mode
Instant Review
With this mode p.61
Using the Face Detection Function
Taking Pictures Automatically Auto Picture Mode
Use the four-way controller 2345 to select b
Change the settings as needed
Taking Pictures in the Custom Settings Program Mode
Taking Pictures in Basic Mode Green Mode
Press the Green button in a mode
You can use the zoom to change the captured area
Using the Zoom
Press the zoom button in a Mode
To Set the Digital Zoom
Use the four-way controller 23 to select Digital Zoom
Recorded pixels and the maximum zoom ratio
Use the four-way controller 23 to select H, K, K, L Or M
Taking Pictures of Your Pet Pet Mode
Use the four-way controller 45 to select O or P
Framing Your Pictures Frame Composite Mode
Press the zoom button towards the right T
Taking Pictures of Text Text Mode
Taking Pictures Using the Miniature/HDR Filter
Use the four-way controller 45 to select an option
Press the four-way controller 4 in a mode
Setting the Shooting Functions
Selecting the Flash Mode
About the red-eye phenomenon
Selecting the Drive Mode
Press the four-way controller 2 in a mode
TakingPictures
Selecting the Focus Mode
Press the four-way controller 5 in a mode
Setting the a Rec. Mode Menu
To Set the Focusing Area
Default setting is o
Selecting the Number of Recorded Pixels
Compensating for Exposure EV Compensation
Use the four-way controller
Adjusting the White Balance
To change the setting
Setting the Sensitivity
Use the four-way controller 23 to change the sensitivity
To Set the White Balance Manually
Taking
Switching the Face Detection Function
Use the four-way controller 23 to select an option
Setting the Image Sharpness Sharpness
Setting the Date Imprint Function
Setting the Color Saturation Saturation
Setting the Image Contrast Contrast
Calling Up a Specific Function
To Assign a Function to the Green Button
To Use the Green Button
Point the camera at your subject in a mode
Recording Movies
Recording a Movie
Press the Movie button
Setting the C Movie Menu
Keeping the Movie Button Pressed
Setting the Movie SR Movie Shake Reduction Function
Selecting the Recorded Pixels for Movies
Saving the Settings Memory
EV Compensation setting on Rec. Mode menu Digital Zoom
Memory screen appears
Playing Back Images
Playing Back Still Pictures
Press the Q button after taking a picture
Playing Back
Playing Back a Movie
Back and Deleting Images
Available operations during playback
Available operations while playback is paused
Multi-Image Display
Q mode, press the zoom button towards the left f
Six-Image Display/Twelve-Image Display
Deleting
Folder Display/Calendar Display
Folder display
Deleting Images Calendar display
2012
Using the Playback Functions
Press the four-way controller 3 in Q mode
Use the four-way controller 2345 to choose a playback mode
Playback Mode Palette
Slideshow
To Set the Slideshow Conditions
Rotating an Image
Zoom Playback
Available operations while an image is magnified
Deleting Images
Deleting a Single Image
Deleting Selected Images
Choose the image you want to delete Press the i button
Press the 3 button in Q mode
Deleting All Images
Appears on the selected images
If you select an image and press
DeletingImages
Protecting Images from Deletion Protect
Use the four-way controller 23 to select Single Image
To Protect All Images
Use the four-way controller 23 to select Protect
Select All Images in on p.100
102
Connecting the Camera to AV Equipment
Turn the AV equipment on
Turn the camera on
Printing Images
Screen for choosing the number of recorded pixels appears
Cropping Images
Choose the cropping area
Processing Images to Make a Face Look Smaller
Use the four-way controller 45 to change the reduction ratio
Processing Images with the Miniature/HDR Filter
109
Processing Images with the Digital Filters
Printing
Use the four-way controller 23 to choose a filter
To Select a B&W, Sepia or Soft Filter
Use the four-way controller 45 to adjust the effect
Eye Compensation from the Playback Mode Palette
Compensating for an Unwanted Red-eye Effect
Choose the image you want to correct
Adding a Frame Frame Composite
Use the four-way controller 2345 to choose a frame
114
Optional Frames
To Copy Frames
Editing Movies
To Use a New Frame
Editing
To Save a Frame from a Movie as a Still Picture
To choose
Frame you want to save
To determine
Dividing position
Copying Images
Use the four-way controller 23 to select Divide
Use the four-way controller 23 to select
Press the 4 button Use the four-way controller
To select the image you
Want to copy
About printing
Setting the Printing Service Dpof
Printing a Single Image
Use the four-way controller 45 to select an image
Press the Green button to switch O or P for Date setting
Use the four-way controller To select Single Image
Printing All Images
Select All Images in on p.121 Press the 4 button
Formatting the Memory
Camera Settings
Changing the W Setting Menu
Changing the Sound Settings
Use the four-way controller 23 to select Operation Volume
To Change the Operation Volume/Playback Volume
Use the four-way controller 23 to select Format
Use the four-way controller 45 to adjust the volume
Change Playback Volume in the same way as in Steps 3
Changing the Date and Time
Use the four-way controller 23 to select the sound type
126
Setting the World Time
Change the time in the same way as in Steps 7 to
Use the four-way controller 23 to select Destination
To Set the Destination
To Display the Time of the Destination Select Time
Use the four-way controller 23 to select X or W
Changing the Display Language
Use the four-way controller 23 to select Select Time
Changing the Naming System of the Folder
Changing the Video Output Format
Changing the Wallpaper of the Menu
Adjusting the Brightness of the Display
Use the four-way controller 23 to select the wallpaper type
Using the Power Saving Function
Setting the Auto Power Off Function
Changing the Start-up Screen
134
Mapping in the W Setting menu Press the four-way controller
Correcting Defective Pixels in the CCD Sensor Pixel Mapping
Use the four-way controller 23 to select Pixel
To select Pixel
Starting-up in Playback Mode
Resetting to Default Settings Reset
Computer
MSC and PTP MSC Mass Storage Class
PTP Picture Transfer Protocol
Turn your camera on
Connecting the Camera and the Computer
Connect your camera to the computer using the USB cable
Disconnecting the Camera from the Computer
Drag no Name on the desktop to the trash
Disconnect the USB cable from the Macintosh and your camera
Windows
Using the Provided Software
System Requirements
Installing the Software
Click Finish
Click Exit on the installation screen
Select the file format to use and click Next
Click MediaImpression 2.1 for Pentax
Click Close
Using MediaImpression on Windows
Connect your camera to the computer
Click Import media files to local disk
Computer Product Registration on the Internet
Click Import
When the AutoPlay screen does not appear
Select an image to transfer
Using MediaImpression on Macintosh
147
Functions Available for Each Shooting Mode
Can be set × Cannot be set
149
Messages
Built-in memory full
151
Troubleshooting
Problem Cause Remedy
153
Default Settings
Last Memory Setting
Reset Setting
a Rec. Mode Menu Items
C Movie Menu Items
W Setting Menu Items
Playback Mode Palette Items
Key Operation
List of World Time Cities
Region City Video Output Format
Genuine leather strap
Optional Accessories
ST81 Waterproof strap Camera case CC81
Main Specifications
161
162
163
164
Warranty Policy
CE Mark is a Directive conformity mark of the European Union
Pour les utilisateurs au Canada
For customers in USA
For customers in Canada
Declaration of Conformity
169
170
Symbols
Index
Color Emphasis filter 110
Language setting Picture Transfer Protocol 137
Shooting information
Memo
Memo
Memo
Pentax Ricoh Imaging
Top
Page
Image
Contents