Page
Page
Warranty Owner Model Verification Confirmation Registration
Card right away guarantees youll receive
Dear Philips product owner
Safety Information
Important Safety Instructions
Remote control
Additional TV functions
Behind the door at the lower right front corner
Front of the Recorder
Back of the Recorder
Input jacks
Output jacks OUT
Output jack G
Symbols on your DVD Recorder display
Output jacks OUT 480p/480i
Output jacks Digital Audio OUT
Messages on your DVD Recorder display
OPEN/CLOSE J button
Clean the disc or use a new one
But the error will be skipped
PAL recordings
Table of contents
Timer
Dear Philips customer
Question? Tip Problem
AIntroduction
Phil
Thank you for buying a Dvdr 80/17
Welcome to the large family of Philips DVD owners
Compatible discs
Recording and Playback
Playback only
Technical data
Accessories
Region codes
There is a risk of an electrical shock
Important notes regarding operation
Cleaning discs
Can I use a cleaning disc intended for DVD players?
Therefore, refrain from using a cleaning CD
Special functions of your new DVD Recorder
Model no
Tip
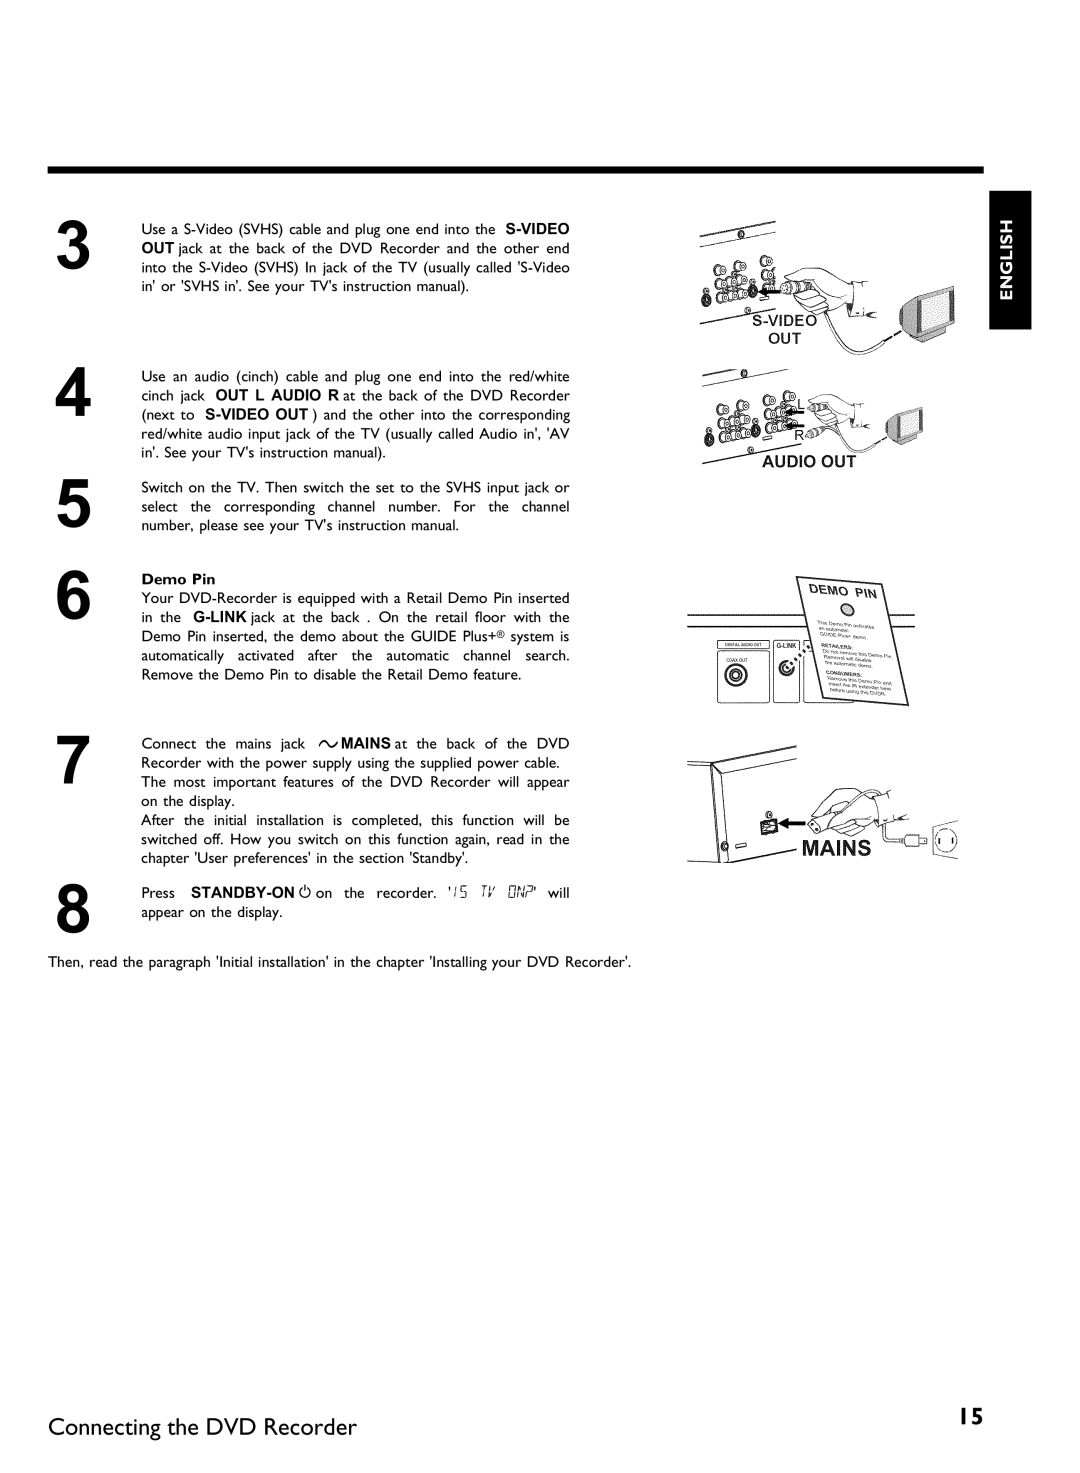
BConnecting the DVD Recorder
Preparing the remote control for operation
Connecting your DVD Recorder to the TV
Connecting with a Component Video Y Pb Pr cable
Interlaced
Progressive scan
Please note the color order
Demo Pin
Switching the DVD Recorder
Connecting with a S Y/C cable
Switching TV and DVD Recorder to Progressive scan
Switching the TV
Connecting the DVD Recorder
Connecting with Video Cvbs cable
Connecting only with the antenna cable
Problem
How do I switch the Recorder between channel 3 and 4?
AI dont see a menu for language selection
Please be aware
CConnecting additional devices
Connecting an additional video recorder
AWhen copying video cassettes appears DVD Recorder display
Connecting a Cable Box only with the antenna cable
Connecting a cable box with Cinch or S cable
Very good Picture Quality
Connecting a camcorder to the front jacks
Connecting audio devices to the analog audio jacks
Best Picture Quality
Connecting audio devices to the digital audio jacks
Digital multi sound
AA loud distorted sound is coming from my speakers
ACH+
DInstalling your DVD Recorder
Initial installation
CH- B or ACH+
Format
Which screen formats can I choose?
AThe DVD Recorder finds very few/no channels during Search
Tuner mode
Procedure may take several minutes
Automatic TV channel search
OK to
AVery few TV channels were found
AI can not select the line Add/Delete Channels
Adding and deleting TV channels manually
Which settings can I choose?
Setting the language
Switching audio recording Stereo, SAP
To end, press SYSTEM-MENU
Stereo
Select the corresponding line with CH- B or ACH+
Setting the time/date automatically
Confirm with
Select Automatic with
Installing your DVD Recorder
Manually setting the time & date
AA Set screen will appear
Setting up the Guide Plus+ system
EThe Guide Plus+ system
General information
Box is transmitting usually channel
Confirm with Use CH- B
Confirm with Use ACH+ CH- B to select your country
Otherwise, you should continue here
How do I find the right position?
Connecting the IR Blaster
Setting up the cable box
Without interference
AMy cable box is not displaying the channel number
AMy cable box has not switched to the other channel number
Finalize set
Next 24 hours
Using the Guide Plus+ system
Guide Plus+ system General
Navigating the Guide Plus+ system
Listings screen
Function buttons
Info button
Sort screen
Function buttons in the Listings screen
Function buttons in the Sort screen
Colors in this listing
Schedule screen
Messages screen
Function buttons in the Messages screen
Colors in this menu
Setup screen
Change system settings
Promotions screen
TV station logos and names are shown here
Change channel display
Review options
Left column
Field for temporary messages
FInformation on the TV screen
Menu bar icons
Menu bar
Disc status icons
Video No disc Disc error
Status box
Disc type icons
Tuner info box
Timer info box
Play G or OPEN/CLOSE J
GPlayback
General information regarding playback
Inserting a disc
Opening/Closing the tray using the remote control
Playing a DVD video disc
Playback starts automatically
Playing a DVD+RW or DVD+R
Playing audio CDs
Audio CD display
MP3 CD display
When creating MP3 CDs, keep the following in mind
Playing MP3 CDs
Important information regarding playback
Playback of a Super Video CD
Disc search
Using the T/C title/chapter button
HOther playback functions
Changing to a different chapter track/title
To continue playback, press Play G
Still picture
Slow motion
Pause 9 to stop playback and display a Still picture
Playback will now start at the time you entered
Search with time entry
Repeating/Shuffle
To continue playback, press Play G twice
Repeat a specific segment a
Scan function
OK button
Camera angle
Zoom function
AThe F icon cannot be selected
Subtitles
Changing audio language
IDisc Manager DM
How many discs can I save in the Disc Manager?
Adding child discs
Recordings are saved automatically
Adding a disc to the Disc Manager
To end, press Disc Manager
Why do I need to label the discs?
Disc contents are not deleted
Removing discs from the Disc Manager
What do the displays on the screen mean?
Select Find title using
Searching for a title in the Disc Manager
DM will appear on the TV screen
Searching discs
Confirm with OK
Displayed disc number. Please insert the appropriate disc
ACH+ or
Searching for a blank section
If you want to start a recording manually
JRecording
What kind of discs can be used for recording?
End of disc is reached
Want to
Recording without automatic switch
CH- B to
Select
Making recordings on DVD+R discs compatible
You can stop recording by pressing Stop h on the remote or
Inserting chapter markers
AIf display reads
How can I delete the recording time I just entered?
Pausing recording
Recording with automatic switch OTR one
Ending recording
What happens with DVD+R discs?
Preventing accidental erasing of discs
Lining up recordings within a title assemble cut
Selecting the recording mode quality
Can I also change the recording mode via a menu?
Which recording modes can I choose?
Can markings also be made on DVD+Rs?
KManaging disc content
Hiding chapters
Select Current chapter using CH- B
Favorite Scene Selection
Inserting chapter marker
Deleting chapter markers
Fast switching options
Changing the index picture
Splitting titles
Can I also divide titles on DVD+Rs?
Editing recording titles name
Playing the entire title
Deleting recordings/titles
Can titles also be deleted on DVD+Rs?
Changing disc name
Disc settings
AThe line Make edits compatible does not appear
AThe Settings for menu does not appear
Finalize editing
Finalizing DVD+R discs
Erasing DVD+RWs
Programming a recording with the Guide Plus+ system
LProgramming a recording Timer
You can also program TV shows as Favorites
Setting up repeat recordings
Select line PlusCode using CH- B
Programming a recording with the VCR Plus+ system
AI will see some informations about the Guide Plus+ system
Quality Recording quality M1, M2, M2x, M3, M4, M6, M8
Decoded data appears after confirmation
Changing the start/end times
CH- B
Programming a recording without the VCR Plus+ system
Fields of Start time and End time
From being recorded but will keep the show in the list
Extending the start/finish time
How to change or delete a programmed recording Timer
To end, press GUIDE/TV
Delete programmed recording
Problem solving for programmed recordings
Recording about to start
Recordable disc
MUser preferences
Vertical video shift
Picture settings
TV shape
Black level shift
Analog output
Sound settings
Night mode
Digital output
Additional settings
Language settings
Display
Remote control settings
Finalize disc
Disc feature menu
Access control
Auto resume
NAccess control Child lock
Child lock DVD and VCD
Activating/Deactivating the child lock
Locking authorized discs
Authorizing discs
Parental control DVD video only
Activating/Deactivating the parental control
What do the parental levels mean?
Confirm with OK . To end, press repeatedly D and then
Changing the country
Forgot my code
Changing the PIN
BWarning
OBefore you call technical support
Cannot playback Super Video CDs
Problemsolution
Other disc errors
La inmediata devolución de su Tarjeta de
Símbolos de seguridad
Información de seguridad
Instrucciones Importantes DE Seguridad
Mando a distancia
Funciones de TV adicionales
Detrás de la tapa, en la parte frontal a la derecha
En la parte frontal del aparato
La parte posterior del aparato
Terminales de entrada
Terminales de salida OUT
Indicaciones de la pantalla display de la grabadora DVD
Terminales de salida OUT 480p/480i
Terminales de salida Digital Audio OUT
Contenga alguna grabación en Ntsc
Mensajes de la pantalla de la grabadora DVD display
Ejemplo, pulsar la tecla OPEN/CLOSE J
Salta el error
Aparece el menú para configurar la fecha y hora
Contenga alguna grabación en PAL
Grabación con desconexión automática OTR
Indice
MConfiguración preferida Personalizada
Aquí explico cosas Aquí menciono funciones que
Pregunta ? Consejo Problema
AIntroducción
Estimado cliente de Philips
Hace el DVD+R?
La gran familia de propietarios de aparatos Philips
Es un DVD?
Hace el DVD+RW?
Discos compatibles
Grabación y reproducción
Sólo reproducción
Código de país o región
Datos técnicos
Accesorios suministrados
Alta tensión en el aparato! abrir! de descarga eléctrica
Láser
Así pues, no utilice CD limpiadores
Limpieza del disco
Funciones especiales de la grabadora DVD
Utilizar un disco limpiador para la grabadora DVD?
Introducción
Model no
BConexión de la grabadora DVD
Preparación del mando a distancia para el funcionamiento
Conexión de la grabadora DVD al televisor
Rastreo progresivo
Conexión con cable de vídeo composite Y Pb Pr
Cb Cr. Consulte el manual de instrucciones del televisor
Clavija de demostración Demo Pin
Preste atención a la disposición de los colores
Cómo conmutar la grabadora DVD
Conexión mediante cable de S Y/C
Conmutar el televisor y la grabadora DVD a Progressive scan
Cómo conmutar el televisor
Conexión de la grabadora DVD
Conexión por cable de vídeo Cvbs
Conexión sólo con el cable de la antena
Clavija de entrada de la antena del televisor
La toma de alimentación de la pared
Durante el modo de espera
Problema
Elegir los canales 3 o
Ponga el televisor en el canal seleccionado 3 o
CConexión de aparatos adicionales
Conexión de aparatos de vídeo adicionales
Pueden conectar aparatos adicionales con Progressive Scan?
Conectar un receptor cable con cable cinch o S
Conectar un receptor cable sólo con el cable de antena
Video in . Si
Calidad de imagen buena
Conexión de una videocámara a las clavijas del frontal
Calidad de imagen superior
Calidad de imagen muy buena
Sonido digital multicanal
CH- B o ACH+
DPuesta en marcha
Instalación inicial
Confirme con la tecla OK
CH- B o
Puesta en marcha
Búsqueda automática de canales
Modo sintonizador Tuner mode
Televisión
ASe encuentran muy pocos canales de
ANon se puede seleccionar la línea Agregar/Eliminar Canales
Asignación y borrado manual de canales de TV
Menú idioma de los OSD, menú en pantalla
Configuración del idioma
Finalice con la tecla
Conmutación de la grabación de audio estéreo, SAP
Not allowed aparece en la pantalla de TV
Ajuste automática de la fecha y hora
Ajuste manual de la fecha y hora
Puesta en marcha
Horas o bien por temas
EEl sistema Guide Plus+
Información general
Instalación del sistema Guide Plus+
Instalación De lo contrario, siga adelante
Qué debo indicar mi código postal/zip?
Es la diferencia entre cable y antena?
Sé cuál es la posición correcta?
Conexión del IR Blaster
Instalación del receptor cable
Cable pueda recibirla
El sistema Guide Plus+
Acceso al sistema Guide Plus+
El sistema Guide Plus+ General
Uso del sistema Guide Plus+
Navegación por el sistema Guide Plus+
AAparece la LISTINGS, pero está vacía
La pantalla Listings
Las teclas de función
La tecla Info
Record tecla de función verde
Consejo
Teclas de la Listings
Favorite tecla de función azul
La pantalla Sort
Teclas del menú Sort
Teclas de función en la pantalla Sort
Colores del menú
La pantalla Schedule
La pantalla Messages
Teclas del menú Mensajes
La pantalla Promotions
La pantalla Setup
Columna derecha
ON.Consejo
Columna izquierda
En ella aparece el canal de TV con una breve descripción
FInformación indicada en el menú de pantalla del televisor
Símbolos de la barra de menús
Barra de menús
Símbolos de los tipos de discos
Error
Campo de respuesta inmediata
Campo de estado
Canal actual / clavija de entrada seleccionada Ninguna se
Símbolos de los modos de funcionamiento
Campo de información del sintonizador
Campo de información del temporizador
GReproducción
Indicaciones generales para la reproducción
AEn la pantalla indicadora aparece
OPEN/CLOSE J . En
Introducción del disco
Reproducción de un disco DVD+RW/ +R
Reproducción de un disco de vídeo DVD
Al crear CD de MP3, tenga en cuenta lo siguiente
Reproducción de un CD de audio
Reproducción de un CD de MP3
El número de pistas del CD y la duración total del mismo
Reproducción de un CD de súper vídeo
Indicaciones del CD de MP3
Otras funciones de reproducción
HOtras funciones de reproducción
Cómo cambiar a otro título o capítulo
Búsqueda en el disco
Para continuar con la reproducción, pulse la tecla Play G
Imagen fija
Cámara lenta
Pause 9 , para detener
Búsqueda por tiempos
Repetición / reproducción aleatoria
La reproducción comienza a la hora indicada
Ninguna repetición
Repetición de un pasaje a
Función de rastreo
Vídeo Reproducción aleatoria Shuffle
SYSTEM-MENUy, con la tecla C , seleccione el Símbolo F
Perspectiva de la cámara
Función zoom
Verá una imagen fija
Subtítulos
Cambio del idioma de doblaje
Discos se pueden memorizar en Disc Manager?
Aviso sobre las grabaciones realizadas con otras grabadoras
Asignación de Discos protegidos para ni
La bandeja del disco
Cómo incluir un disco en Disc Manager
Inserte un disco DVD+RW/+R en la grabadora DVD
Aparece en pantalla la siguiente imagen
Borrado de discos de Disc Manager
Finalice con la tecla Disc Manager
Se borra el contenido del disco
Salta al inicio de la grabación seleccionada
Búsqueda de un título en Disc Manager
Significan las indicaciones que aparecen en pantalla?
AVeo en la pantalla, por ejemplo, el mensaje Insertar disco
Búsqueda de discos
Mando a distancia
Correspondiente
AEn la pantalla veo, por ejemplo el mensaje Insertar disco
Búsqueda de una posición vacía
CH+ o CH- B el título Vacío
Puedo ver el espacio libre para grabar?
Qué disco se puede grabar?
JGrabación manual
Grabación sin desconexión automática
AIndicaciones del índice
Pantalla
Right
Número de canal de las entradas externas
Audio L/R para
Video / left Audio
Cómo hacer compatibles las grabaciones en discos DVD+R
Interrupción de la grabación pausa
Grabación con desconexión automática OTR One
Inserte un disco
Qué sucede con los discos DVD+R
Cómo proteger un disco de grabaciones no deseadas
Sucede con los discos DVD+R?
Cómo agrupar grabaciones dentro de un título Assemble
Selección del tipo de grabación calidad
Tipos de grabaciones se pueden seleccionar?
Puede cambiar el tipo de grabación a través de un menú?
Reproducción total del título
KCómo administrar el contenido del disco
Favorite Scene Selection memoria de escenas
Edición del título de la grabación nombre
Finalice la función con la tecla FSS
Favorite Scene Selection memoria de escenas
Inserción de marcas de capítulos
Cómo ocultar capítulos
Eliminación de marcas de capítulos
Seleccionado Confirme con la tecla OK
Conmutación rápida
Cómo modificar la imagen del índice
División de títulos
Pueden dividir también los títulos de los discos DVD+R?
Reproducción total del título
Edición del título de la grabación nombre
Se pueden eliminar los títulos en los discos DVD+R?
Eliminación de grabaciones o títulos
Modificación del nombre del disco
Configuración del disco
ANo aparece el menú Valores para
Finalización de ediciones
Cómo terminar discos DVD+R finalizar
ANo aparece la línea Finalizar disco
Eliminación de discos DVD+RW
Disco.Consejo
Derecha e indica el proceso de edición
LProgramación de grabaciones Timer
Programación de grabaciones con el sistema Guide Plus+
Pulse la tecla REC/OTR n
Frecuencia
Plus+
Programación de grabaciones con el sistema VCR Plus+
Once grabación única
Modificación de la hora de inicio/fin
ACH+ o
Introducción de repeticiones
Frecuencia Once grabaciones de realización immediata
Programación de grabaciones sin el sistema VCR Plus+
AInformaciones sobre el sistema Guide Plus+ System
Conmutar AM/PM
Cómo revisar o borrar una grabación programada Timer
Finalice con la tecla GUIDE/TV
Disco rescr
Problemas con grabaciones programadas y soluciones
CH- B o ACH+ la
MConfiguración preferida personalizada
Ajuste de la imagen
Forma TV
Variación nivel negro
Variación vídeo vertical
Salida vídeo
Modo nocturno
Ajuste del sonido
Salida digital
Salida analógica
Ajustes adicionales
Configuración de idioma
Despliegue
Configuración del mando a distancia
Finalizar disco
Menú Disco
Control de acceso
Reinicio automático
NControl de acceso bloqueo para ni
Bloqueo para ni DVD y VCD
Activación y desactivación del bloqueo para ni
Cómo desbloquear el disco
Cómo proteger los discos desbloqueados
Disco se protege
Activación y desactivación de la función de filtro
Función de filtro sólo vídeo DVD
Se entiende por nivel de protección?
Modificación del país
Confirme con la tecla OK . Finalice con la tecla
A continuación, con
Cómo cambiar el código PIN
Finalice con la tecla D y SYSTEM-MENU
Si se olvida el código
OAntes de llamar al técnico
Problemasolución
No se puede grabar
La grabadora DVD no reproduce el disco
No puedo reproducir
Ningún CD de súper vídeo
101
Determinados
Otros errores del disco
Algunos discos DVD+RW
No se pueden reproducir en
Limited Warranty
DVD Recorder
Philips, P.O. Box 520890, Miami, FL 33152, 402
WwnnNNNwwnnwWNnwNwnNnNWwnnNnwW Dvdr 80/17
Factory Service Locations
Dvdr 80/17
1279 W. Hamilton Pkwy
Bensalem, PA