DEH-P9800BT
Page
Using radio text
Contents
Attaching the front panel
Reading jacket arts
Disconnecting a Bluetooth audio player Selecting a playlist
Setting the automatic answering
Pausing a song Browsing for a song Stopping playback
Disc multi-CD player Pausing a song
Audio Adjustments
Using the time alignment Adjusting the time alignment
100
Setting the AUX title
Setting the background display
104
Product registration
Before You Start
About this unit
Operating environment
Features
Before You Start About this manual Case of trouble
Before You Start About WMA
About Bluetooth
About AAC
Clearing all memory
Before You Start Resetting the microprocessor
Protecting your unit from theft
Feature demo mode
About the demo mode
Reverse mode
Removing the front panel
Using the remote control
Before You Start Use and care of the remote control
Installing the battery
Function button and Audio button
14 En
What’s What
Remote control
Head unit
Ak e j
Joystick
Selecting a source
Basic Operations Turning the unit on
Loading a disc
Basic Operations
Adjusting the volume
Turning the unit off
Tuner Listening to the radio
Tuner Introduction of advanced tuner operation
Storing and recalling broadcast frequencies
Pears # To cancel the storage process, press
Selecting stations from the preset channel list
Tuning in strong signals
Tuner Storing the strongest broadcast frequencies
RDS
Introduction of RDS operation
Using Auto PI Seek for preset stations
Switching the display
Using PI Seek
Selecting alternative frequencies
Receiving traffic announcements
Using PTY functions
Searching for an RDS station by PTY information
Receiving PTY alarm broadcasts
Using radio text
Using news program interruption
Play # a news program can be canceled by pressing
Storing and recalling radio text
PTY list
General Specific Type of program
Selecting a track directly
Built-in CD Player Playing a CD
Press Direct Track of entered number will play
Repeating play
Playing tracks in random order
Selecting the search method
Pausing CD playback
Built-in CD Player Scanning tracks of a CD
Searching every 10 tracks in the current disc
Built-in CD Player
Using disc title functions
Entering disc titles
Displaying text information on CD Text discs
Using CD Text functions
Displaying disc titles
Scrolling text information in the display
MP3/WMA/AAC/WAV Player Playing MP3/WMA/AAC/ WAV files
07 MP3/WMA/AAC/WAV Player
Selecting a track directly in the current folder
Repeating play
Scanning folders and tracks
Pausing MP3/WMA/AAC/ WAV playback
Searching every 10 tracks in the current folder
MP3/WMA/AAC/WAV Player
When playing back a WAV disc
When playing back an MP3/ WMA/AAC disc
Displaying text information on MP3/WMA/AAC/WAV disc
Displaying jacket arts on CD-ROM discs
Display. Refer to Switching the Ever Scroll on
Selecting tracks from the file name list
Reading jacket arts
Selecting folders with jacket arts
40 En
Standby mode
Bluetooth Telephone
Setting up for hands-free phoning
About the telephone source
Bluetooth Telephone Basic operation of hands- free phoning
Making a phone call
Answering a call waiting
Taking a phone call
Answering an incoming call
Rejecting an incoming call
Connecting a cellular phone
Searching for available cellular phones
Using a cellular phone to initiate a connection
Tailed instructions
Registering connected cellular phone
Disconnecting a cellular phone
To Entering PIN code for Bluetooth wireless con- nection on
Deleting a registered phone
Connecting to a registered phone manually
Connecting to a registered cellular phone
Connecting to a registered phone automatically
Using the Phone Book
Transferring entries to Phone Book
Calling a number in the Phone Book
Changing the Phone Book display order
Assign genres to phone numbers
Editing the name of a Phone Book entry
Acters
Selecting the icon of a Phone
Editing phone numbers
Book entry
Clearing memory
Using preset numbers
Assigning preset numbers
Clearing a Phone Book entry
Using the Call History
Displaying the Call History
Calling a number from the Call History
Assigning preset numbers
Making a call by entering phone number
Calling an international number from the Call History
Echo canceling and noise reduction
Changing the ring tone
Displaying BD Bluetooth Device address
Bluetooth Telephone Setting the automatic rejecting
Setting the automatic answering
Selecting the icon for user phone
Displaying BD address of your cellular phone
Displaying system version for repair
Displaying BD address of this unit
Setting up for Bluetooth audio player
Tailes, refer to Activating the BT Audio source on
Bluetooth Audio
Connecting a Bluetooth audio player
Pausing a song
Bluetooth Audio Function operation
Playing songs on Bluetooth audio player
Stopping playback
Disconnecting a Bluetooth audio player
Displaying BD address of this unit
Scroll, refer to Switching the Ever Scroll on
Multi-CD Player Playing a CD
Introduction of advanced
Multi-CD Player
Disc multi-CD player
Multi-CD player operation
Scanning CDs and tracks
Playback from your ITS playlist
Using ITS playlists
Creating a playlist with ITS programming
Played # To turn ITS play off, press MULTI-CONTROL again
Erasing a track from your ITS playlist
Erasing a CD from your ITS playlist
Selecting discs from the disc title list
68 En
Playing songs on iPod Listening to songs on your iPod
Browsing for a song
Searching for a song
Playing songs on iPod
Displaying text information on iPod
Selecting a playlist
Playing songs in a random order shuffle
Playing songs on iPod Pausing a song
TV tuner Watching the television
Tuning starts as soon as you release
MULTI-CONTROL left or right
Storing and recalling broadcast stations
TV tuner Introduction of advanced TV tuner operation
Storing the strongest broadcast stations sequentially
Preset tuning buttons 1-6 on the remote con- trol
TV tuner
Selecting a disc
DVD Player Playing a disc
Selecting a folder
DVD Player Introduction of advanced DVD player operation
DVD Player
Pausing disc playback
Using ITS playlist and disc title functions
Scanning tracks of a CD/ MP3/WMA
Entering disc titles
Adjusting the audio finely
Audio Adjustments Adjusting the audio easily
Extra functions
Audio Adjustments Introduction of audio adjustments
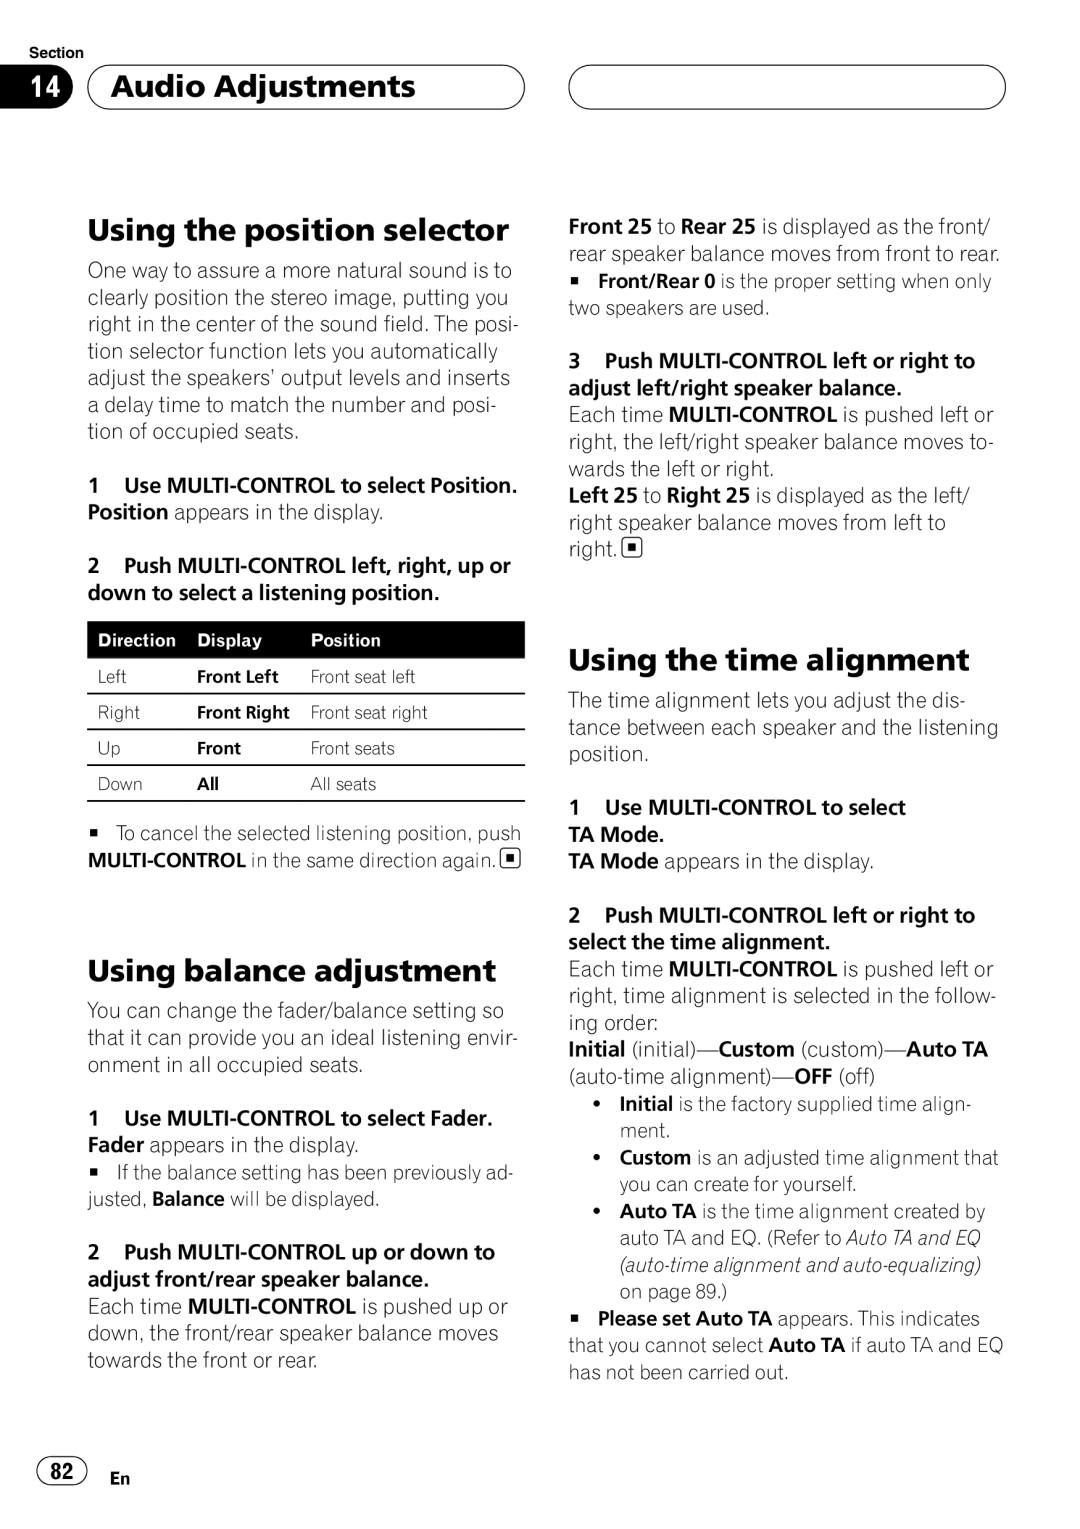
Using balance adjustment
Audio Adjustments Using the position selector
Using the time alignment
Using subwoofer output
Audio Adjustments
Adjusting the time alignment
Adjusting low pass filter attenuation slope
Using the high pass filter
Adjusting subwoofer settings
Muting the speaker units filters
Setting the high pass filter for front speakers
Setting the high pass filter for rear speakers
Adjusting equalizer curves
Using the auto-equalizer
Using the equalizer
Recalling equalizer curves
Using BBE sound
Adjusting 16-band graphic equalizer
Adjusting loudness
Using compression and BMX
Using automatic sound levelizer
Using auditory user interface
Adjusting source levels
Auto TA and EQ auto-time alignment and auto- equalizing
Before operating the auto TA and EQ function
Carrying out auto TA and EQ
92 En
Setting the date
Initial Settings Adjusting initial settings
Selecting the display language
Setting the FM tuning step
Initial Settings
Setting the clock
Turning the off clock display on or off
Switching the face auto open
Switching Auto PI Seek
Switching the warning tone
Switching the auxiliary setting
Switching the feature demo
Adjusting the brightness
Switching the sound muting/attenuation
Correcting distorted sound
For more details, see Feature demo mode on
Switching the reverse mode
Switching the Ever Scroll
Calibrating the RPMs
Entering PIN code for Bluetooth wireless connection
Resetting the Bluetooth wireless technology module
Selecting AUX as the source
Other Functions Using the AUX source
Setting the AUX title
About AUX1 and AUX2
Other Functions
Using different entertainment displays
Setting the entertainment display
100 En
Setting the background display
Text color from among 11 colors # When Vehicle Dynamics
102 En
On rewriting the entertainment displays on
Understanding auto TA EQ error messages
Message Cause Action
CD-R/CD-RW discs
CD player and care
104 En
Dual Discs
Additional Information
MP3, WMA, AAC and WAV files
WMA additional information
MP3 additional information
106 En
AAC additional information
About folders and MP3/ WMA/AAC/WAV files
WAV additional information
108 En
Additional Information Terms
A2DP
110 En
MP3
Additional Information Specifications
112 En
Contenido
114 Es
169
Reproductor de audio Bluetooth 174
Cambio del tono de llamada
Selección del icono del teléfono de
116 Es
Cara Cambio del ajuste de un equipo Auxiliar 213
210
212
Ajuste del brillo 213
Ambiente de funcionamiento
Antes de comenzar
Acerca de esta unidad
118 Es
Acerca de este manual
En caso de problemas
Antes de comenzar Registro del producto
Características
Acerca de AAC
Acerca de WMA
120 Es
Reinicialización del microprocesador
Antes de comenzar Acerca de Bluetooth
Borrado de toda la memoria
Colocación de la carátula
Protección del producto contra robo
Extracción de la carátula
122 Es
Instalación de la batería
Antes de comenzar Acerca del modo demo
Uso y cuidado del mando a distancia
Modo inverso
Operación del botón Function
Uso del mando a distancia
Botones Function y Audio
Operación del botón Audio
Qué es cada cosa
Unidad principal
Mando a distancia
02 Qué es cada cosa
126 Es
Carga de discos
Funciones básicas Encendido de la unidad
Selección de una fuente
BT Audio en la página
Apagado de la unidad
Ajuste del volumen
Funciones básicas
128 Es
Derecha
Sintonizador Para escuchar la radio
Inmediatamente después de que suelte
130 Es
Almacenamiento y recuperación de frecuencias
Pulsado uno de los botones 1-6 en el mando a distancia
Ver la lista de emisoras presintonizadas y se
Sintonización de señales fuertes
La lista de canales presintonizados le permite
De los botones 1-6 en el mando a distancia
Sintonizador
132 Es
Introducción a la operación
Para que esta unidad capte el código
Uso de la búsqueda PI
Cambio de la visualización
Selección de frecuencias alternativas
134 Es
Recepción de anuncios de tráfico
Limitación de las emisoras para programación regional
Uso de la interrupción por programa de noticias
Uso de las funciones PTY
Búsqueda de una emisora RDS por información PTY
136 Es
Visualización de radio texto
Recepción de transmisiones de alarma PTY
Uso del radio texto
Almacenamiento y recuperación de radio texto
Lista PTY
138 Es
Selección directa de una pista
Reproductor de CD incorporado Reproducción de un CD
MULTI-CONTROL izquierda una vez, se salta
Reproducción de las pistas en orden aleatorio
Repetición de reproducción
140 Es
Búsqueda cada 10 pistas en el disco actual
Pausa de la reproducción de un CD
Selección del método de búsqueda
Búsqueda cada 10 pistas
Ingreso de títulos de discos
Reproductor de CD incorporado
Uso de las funciones de títulos de discos
142 Es
Visualización de información de texto de discos CD Text
Uso de las funciones CD Text
Visualización de los títulos
Desplazamiento de información de texto en el display
Reproducción de ficheros MP3/WMA/AAC/WAV
Reproductor de MP3
144 Es
Pista en la carpeta actual
Selección directa de una
Sulte Cambio del desplazamiento continuo en la página
146 Es
Pausa de la reproducción de MP3/WMA/AAC/WAV
Exploración de carpetas y pistas
Cuando encuentre la pista o la carpeta
Al reproducir un disco MP3
Búsqueda cada 10 pistas en la carpeta actual
148 Es
De nombres de ficheros
Desplazamiento de información de texto en el display
Selección de pistas de la lista
Al reproducir un disco WAV
Selección de carpetas con diseños de funda
Visualización de diseños de funda en discos CD-ROM
Lectura de diseños de funda
150 Es
WMA/AAC/WAV
152 Es
Información sobre la fuente telefónica
Teléfono Bluetooth
Configuración de la función manos libres
Modo de espera
Funciones básicas manos libres
08 Teléfono Bluetooth
Realización de una llamada telefónica
Rechazo de una llamada entrante
Aceptación de una llamada telefónica
Respuesta de una llamada entrante
Página
Introducción al uso avanzado de la función manos libres
156 Es
Conexión de un teléfono móvil
Uso de un teléfono móvil para iniciar una conexión
Desconexión de un teléfono móvil
Búsqueda de los teléfonos móviles disponibles
158 Es
Eliminación de un teléfono registrado
Registro del teléfono móvil conectado
Eliminación de un teléfono registrado en esta pági
Conexión automática a un teléfono registrado
Conexión a un teléfono móvil registrado
Conexión manual a un teléfono registrado
160 Es
Transferencia de entradas al Directorio de teléfonos
Uso del Directorio de teléfonos
Total de 500 registros 300 del usuario 1
Llamada a un número del Directorio de teléfonos
162 Es
Asignación de géneros a números de teléfono
Edición de números de teléfono
164 Es
Borrado de una entrada del Directorio de teléfonos
De teléfonos, consulte Borrado de la memoria
Asignación de números prefijados
Borrado de la memoria
Uso de números prefijados
166 Es
Llamada a un número desde el Historial de llamadas
Teléfono Bluetooth Uso del Historial de llamadas
Visualización del Historial de llamadas
Nos en la página
Asignación de números prefijados
Realización de una llamada ingresando el número de teléfono
168 Es
Ajuste del rechazo automático
Teléfono Bluetooth Cancelación del eco y reducción de ruido
Cambio del tono de llamada
Ajuste de la respuesta automática
Visualización de la dirección BD de su teléfono móvil
Visualización de la dirección BD Bluetooth Device
Selección del icono del teléfono de usuario
170 Es
Visualización de la dirección BD de esta unidad
Unidad
172 Es
Tivación de la fuente BT Audio en la página
Bluetooth Audio Ajuste del reproductor de audio Bluetooth
Conexión de un reproductor de audio Bluetooth
Para poner en pausa una canción
Bluetooth Audio Función
174 Es
Para detener la reproducción
Desconexión de un reproductor de audio Bluetooth
Visualización de la dirección BD de esta unidad
176 Es
Reproductor de CD múltiple Reproducción de un CD
Reproductor de CD múltiple de 50 discos
Reproductor de CD múltiple Selección directa de una pista
178 Es
Track repeat, la gama de repetición cambia a Disc repeat
Reproductor de CD múltiple
Exploración de CD y pistas
Gama de repetición Multi-CD repeat y
Uso de listas de reproducción ITS
180 Es
Borrado de un CD de la lista de reproducción ITS
Reproducción de la lista de reproducción ITS
Borrado de una pista de la lista de reproducción ITS
Desea eliminar de la lista de reproducción
182 Es
Algunos discos incluyen información cifrada
Selección de discos de la lista de títulos de los discos
Tulo del CD, el título de pista, el nombre del
184 Es
Para buscar una canción
Para buscar una canción
Para reproducir canciones en el iPod
Visualización de información de texto en el iPod
Selección de una lista de reproducción
Demás canciones
Repeat one Sólo repite la canción actual
188 Es
Sintonizador de TV Uso del televisor
Diatamente después de que suelte
Almacenamiento y recuperación de emisoras
190 Es
Sintonizador de TV
Ajuste de presintonías 1-6 en el mando a distancia
Selección de una carpeta
Reproductor de DVD Reproducción de un disco
Selección de un disco
192 Es
Repetición de reproducción
Exploración de las pistas de un CD/MP3/WMA
Reproductor de DVD
Pausa de la reproducción de un disco
194 Es
Uso de las funciones de títulos de discos
Funciones adicionales
Ajustes de audio Ajuste sencillo del sistema de audio
Ajuste de precisión del sistema de audio
196 Es
Ajustes de audio Introducción a los ajustes de audio
Paso alto trasero-Rear HPF FREQ. frecuen
Uso de la alineación temporal
Ajustes de audio Uso del selector de posición
Uso del ajuste del balance
198 Es
Ajustes de audio
Ajuste de la alineación temporal
Ajustes de audio Uso de la salida de subgraves
Configuración de los ajustes de subgraves
200 Es
Silenciamiento de altavoces filtros
Uso del filtro de paso alto
MULTI-CONTROL arriba
Ajuste del filtro de paso alto para los altavoces traseros
Uso del autoecualizador
Uso del ecualizador
202 Es
Ajuste de las curvas de ecualización
Nada previamente en lugar de Powerful
Recuperación de las curvas de ecualización
Ajuste del ecualizador gráfico de 16 bandas
Uso del sonido BBE
204 Es
Uso del nivelador automático de sonido
Ajustes de audio Uso de la compresión y BMX
Ajuste de la sonoridad
Sonoridad
Uso de la interfaz de usuario auditivo
Ajuste de los niveles de la fuente
206 Es
Antes de utilizar las funciones TA y EQ automáticas
Acústicas del interior del vehículo
Para realizar los ajustes TA y EQ automáticos
208 Es
Micrófono TA y EQ automático
Selección del idioma de visualización
Ajustes iniciales Configuración de los ajustes iniciales
210 Es
Sualización del reloj
Ajustes iniciales Ajuste de la fecha
Ajuste del reloj
Das, se activa o desactiva la visualización del reloj
Cambio del tono de advertencia
Ajuste del paso de sintonía de FM
Cambio de la búsqueda PI automática
212 Es
Cambio del ajuste del
Ajustes iniciales
Cambio de la apertura automática de la cara
Atenuador de luz
Cambio de la demostración de características
Ajustes iniciales Corrección de distorsiones del sonido
Cambio del silenciamiento/ atenuación del sonido
214 Es
Calibración de las RPM
Ajustes iniciales Cambio del modo inverso
Cambio del desplazamiento continuo
Activación de la fuente BT Audio
Reajuste del módulo de tecnología inalámbrica Bluetooth
216 Es
Acerca de AUX1 y AUX2
Otras funciones Uso de la fuente AUX
Selección de AUX como la fuente
Fuente AUX1
Ajuste de la visualización de entretenimiento
Otras funciones
Uso de diferentes visualizaciones de entretenimiento
218 Es
Ajuste de la visualización de fondo
220 Es
Si aparece un mensaje de error como
Zaciones de entretenimiento en la página
222 Es
Mensaje Causa Acción
Reproductor de CD y cuidados
Discos dobles
Información adicional Discos CD-R/CD-RW
224 Es
Información adicional Ficheros MP3, WMA, AAC y
WAV
Información adicional sobre WMA
Información adicional
Información adicional sobre MP3
Información adicional sobre AAC
Acerca de las carpetas y los ficheros MP3/WMA/AAC/WAV
Se pueden reproducir hasta 99 carpetas de un disco
Información adicional Glosario
228 Es
229
230 Es
Información adicional Especificaciones
232 Es
Pioneer Corporation
Kmmzx 06B00000 CRD4092-A/N EW

 Audio Adjustments