Note
Interrupt mode is resumed at default value (Off) after the machine is shut down or reset.
Understanding the Status LED
When the problem occurs, the Status LED indicates the machine's condition by the light color of it's action.
Status
Status |
| Description | |
|
|
|
|
Off |
| • | The machine is |
|
| • | The machine is in power save mode. When |
|
|
| data is received, or any button is pressed, it |
|
|
| switches to |
|
|
| |
Green | On | The machine is | |
|
|
|
|
| Blinking | • | When the backlight slowly blinks, the machine |
|
|
| is receiving data from the computer. |
|
| • When the backlight blinks rapidly, the machine | |
|
|
| is printing data. |
|
|
|
|
Red | On | • | The imaging unit is totally out of lifespan. |
|
|
| Remove the old imaging unit and install a new |
|
|
| one. (Page 11.5) |
|
| • | The toner cartridge is totally empty. Remove |
|
|
| the old toner cartridge and install a new one. |
|
|
| (Page 11.4) |
|
| • | A paper jam has occurred. (Page 12.3) |
|
| • | The cover is opened. Close the cover. |
|
| • | There is no paper in the tray. Load paper in |
|
|
| the tray. |
|
| • | The machine has stopped due to a major |
|
|
| error. Check the display message. |
|
|
| (Page 12.11) |
|
| • | The waste toner container not installated in |
|
|
| the machine, or full waste toner container. |
|
|
| (Page 11.7) |
|
|
|
|
| Blinking | • | A minor error has occurred and the machine |
|
|
| is waiting the error to be cleared. Check the |
|
|
| display message. When the problem is |
|
|
| cleared, the machine resumes. |
|
| • | The toner cartridge is near the end of its life. |
|
|
| Order a new toner cartridge. You can |
|
|
| temporarily improve print quality by |
|
|
| redistributing the toner. (Page 11.4) |
|
|
|
|
Note
Check the message on the display screen, and follow the instruction on the message or refer to Troubleshooting part. (Page 12.1) If the problem persists, call for service.
Menu map
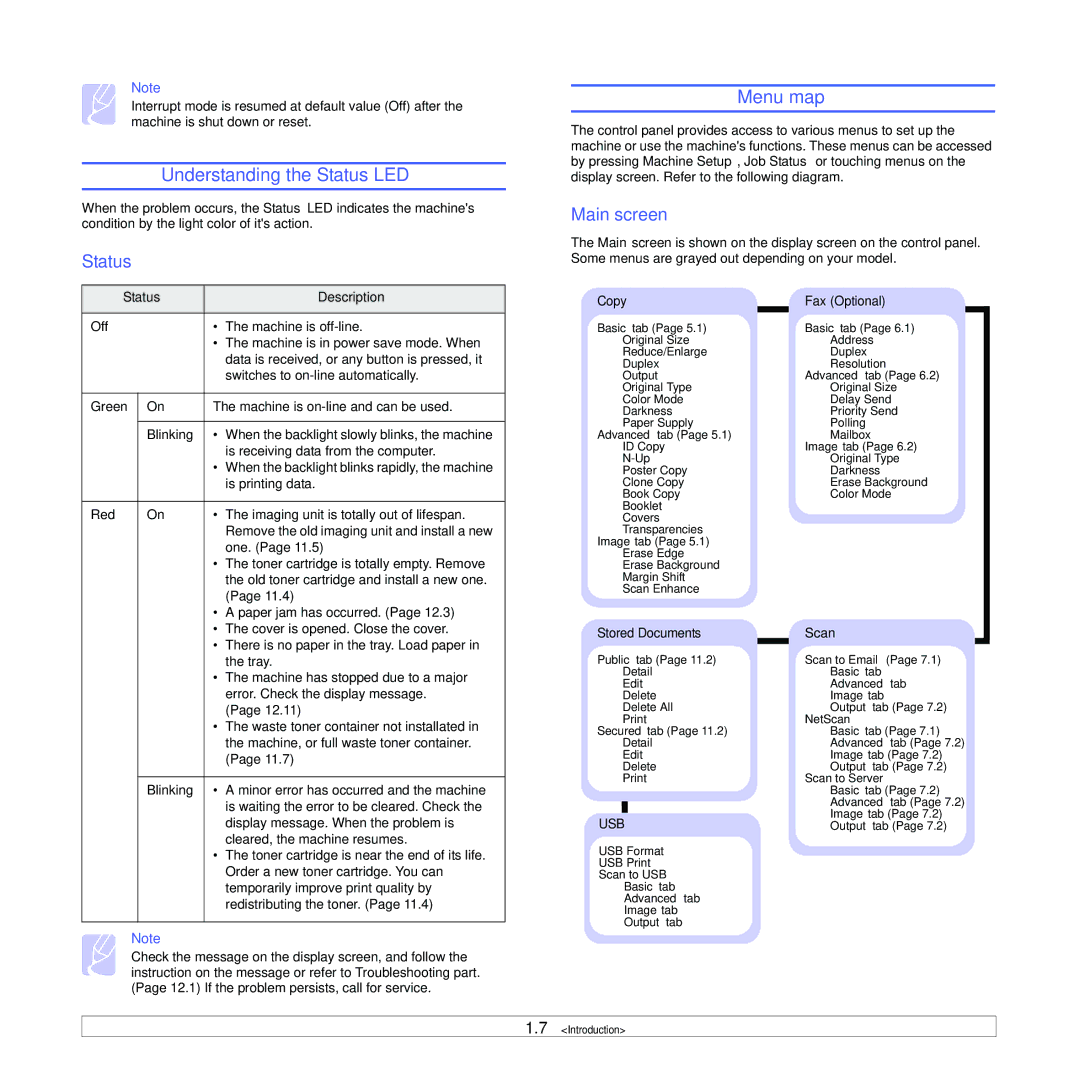
The control panel provides access to various menus to set up the machine or use the machine's functions. These menus can be accessed by pressing Machine Setup, Job Status or touching menus on the display screen. Refer to the following diagram.
Main screen
The Main screen is shown on the display screen on the control panel. Some menus are grayed out depending on your model.
Copy | Fax (Optional) | |
|
|
|
Basic tab (Page 5.1) | Basic tab (Page 6.1) | |
Original Size | Address | |
Reduce/Enlarge | Duplex | |
Duplex | Resolution | |
Output | Advanced tab (Page 6.2) | |
Original Type | Original Size | |
Color Mode | Delay Send | |
Darkness | Priority Send | |
Paper Supply | Polling | |
Advanced tab (Page 5.1) | Mailbox | |
ID Copy | Image tab (Page 6.2) | |
Original Type | ||
Poster Copy | Darkness | |
Clone Copy | Erase Background | |
Book Copy | Color Mode | |
Booklet |
| |
Covers |
| |
Transparencies |
| |
Image tab (Page 5.1) |
| |
Erase Edge |
| |
Erase Background |
| |
Margin Shift |
| |
Scan Enhance |
| |
Stored Documents | Scan | |
|
|
|
Public tab (Page 11.2) | Scan to Email (Page 7.1) | |
Detail | Basic tab | |
Edit | Advanced tab | |
Delete | Image tab | |
Delete All | Output tab (Page 7.2) | |
NetScan | ||
Secured tab (Page 11.2) | Basic tab (Page 7.1) | |
Detail | Advanced tab (Page 7.2) | |
Edit | Image tab (Page 7.2) | |
Delete | Output tab (Page 7.2) | |
Scan to Server | ||
|
| Basic tab (Page 7.2) |
|
| Advanced tab (Page 7.2) |
USB | Image tab (Page 7.2) | |
Output tab (Page 7.2) | ||
USB Format |
| |
USB Print |
| |
Scan to USB |
| |
Basic tab |
| |
Advanced tab |
| |
Image tab |
| |
Output tab |
| |
1.7 <Introduction>