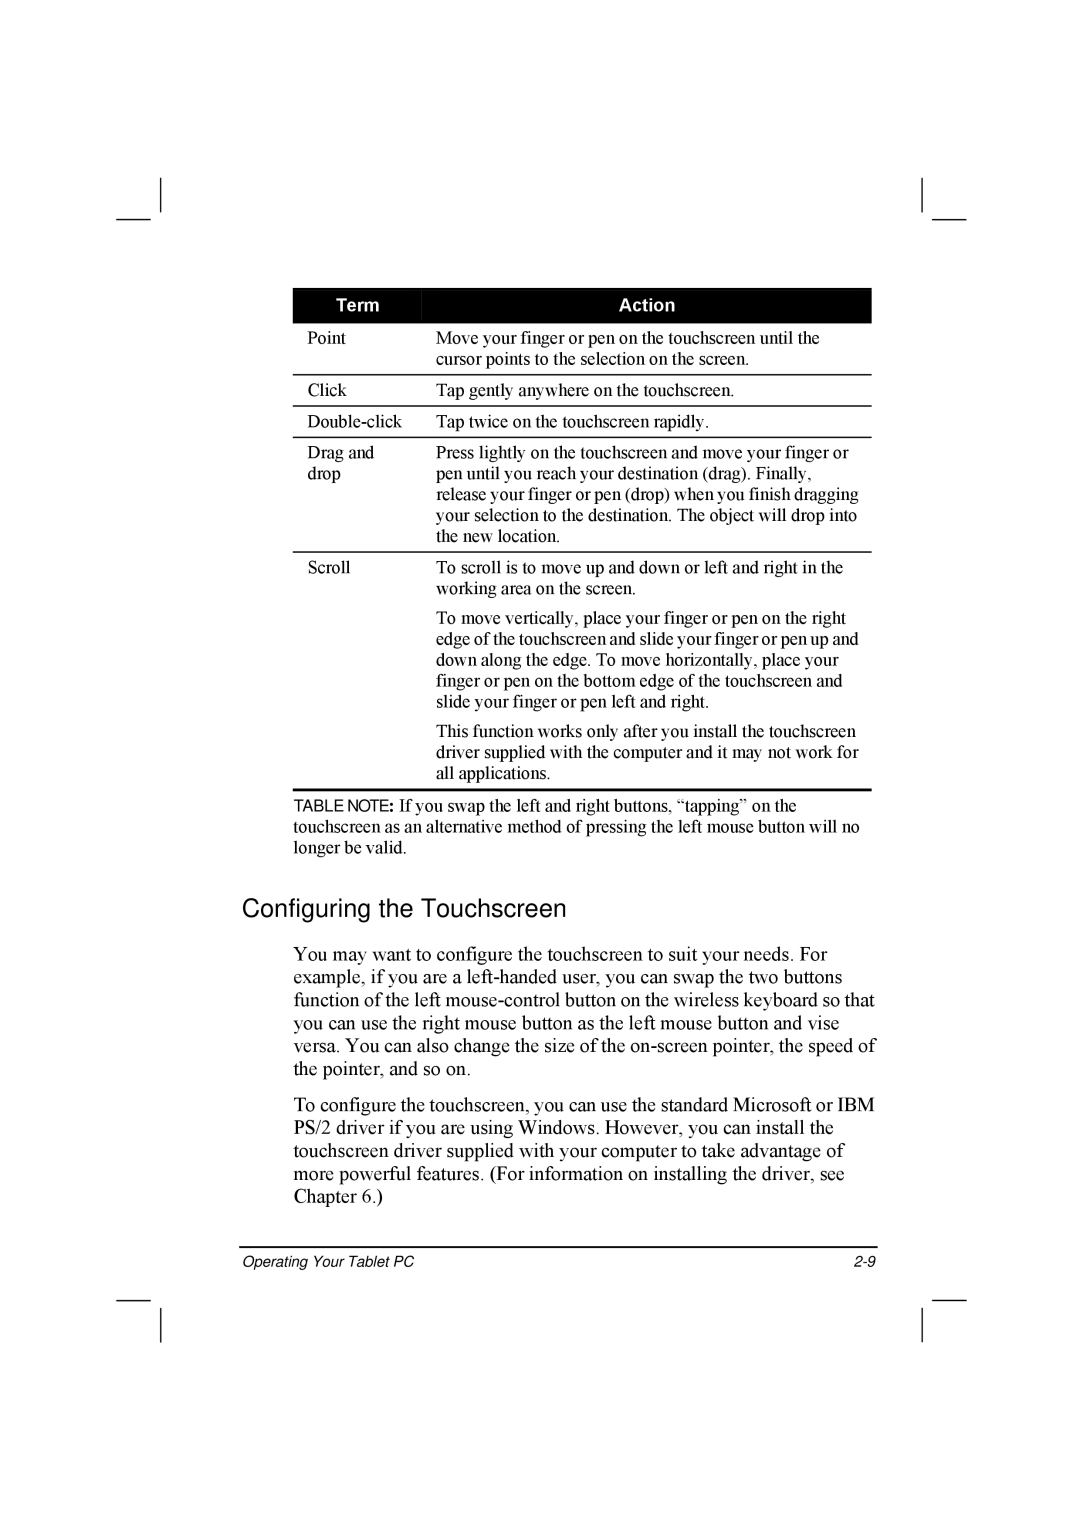
22355 TAG Way, Dulles, VA 20166 Tel 703 406.3000 Fax 703
MIL-BOOK 20 SERIES NOTEBOOK
OPERATOR’ S MANUAL
Page
Information in this manual is subject to change without notice
TRADEMARKS
Regulatory Information
Please note
On the Use of the System
Class B Regulations
Radio Interference Regulations Class B Compliance Notice
Safety Notices
About the Battery
Canada Canadian Department of Communications
About the AC Adapter
Attention for USA Users
Caution for USA Users
About the Modem
Use in specific environments
USA and Canada Safety Requirements and Notices
On the Use of RF Device
Radio Frequency Interference Requirements and SAR
Use on Aircraft Caution
Antenna use
Explosive Device Proximity Warning
Antenna Warning
EMC Requirements
English
European Union CE Marking and Compliance Notices
Canada Radio Frequency Interference Requirements
Statements of Compliance
Italian
Local Restrictions of 802.11b Radio Usage
Greek
Icelandic
France
Departments in Which the Wireless LAN Module Can Be Used Indoors Only
General
Belgium and the Netherlands
Outdoors
Turning Off the Wireless LAN Radio
Frequency Ranges MHz
Indoors
Chapter 2 Operating Your Tablet PC
Table of Contents
Preface
Chapter 1 Getting Started
Inserting and Ejecting Floppy Disks
Chapter 3 Managing Power
Configuring the Display Modes
Chapter 7 Caring for the Tablet PC
Chapter 5 Setup Configuration Utility SCU
Chapter 6 Installing Software Drivers
Chapter 4 Expanding Your Computer
Appendix A Specifications
Chapter 8 Troubleshooting
xviii
Preface
Notational Conventions
CHAPTER
Getting Started
Unpacking
Getting the Computer Running
Before You Begin
Connecting to AC Power
1. Make sure the computer is turned off
Positioning the Tablet PC
Using the Wireless Keyboard option
Getting Started
Turning On and Off the Computer
Turning On
Turning Off
Connector
Taking a Look at the Computer
Right-Side Components
Connector
PC Card Slot
Power
Connector
Expansion Port
IR Port
Left-Side Components
Connector
X-Bay Interface
Pack
Rear Components
Main Battery
Stand
Battery
Front Components
Power Button
Volume
Brightness
Volume/LCD
Adjust Button
Speaker
Getting Started
Bottom-Side Components
CCD Port
Connects a CCD PC camera
1-16
Where to Go from Here
For this purpose…
Do this…
CHAPTER
Operating Your Tablet PC
Stopping the Computer
Starting and Stopping the Computer
Starting the Computer
Operating Your Tablet PC
Mouse-control Buttons
Using the Wireless Keyboard option
Cursor-Control Keys
Typewriter Keys
Numeric Keypad
Euro Symbol
Function Keys
Windows Keys
Using the Touchscreen
Action
Configuring the Touchscreen
Term
Through the Tablet PC’s USB Port
Using the Floppy Disk Drive option
Connecting the Floppy Disk Drive
2-11
Operating Your Tablet PC
Through the Private Cable
Inserting and Ejecting Floppy Disks
2-13
Never turn off or reset the computer while the floppy disk drive in-use indicator is on
Operating Your Tablet PC
Using the Hard Disk Drive
Operating Your Tablet PC
Using the Optical Drive option
CD drive can read CDs, audio CDs, CD-R, and CD-RW discs
Combo drive can work both as a DVD drive and CD-RW drive
1. Turn on the computer
Connecting the Optical Drive
Inserting and Removing a Disc
Follow this procedure to insert or remove a disc
4. Gently push the tray back into the drive
Configuring the Display Modes
Using the Video Features
2-19
Resolution
Colors
Operating Your Tablet PC
2-20
Using the Audio Features
Connecting Audio Devices
Using the Modem
Using the Communication Features
2. Click Network and Internet Connections
Using the Wireless LAN
Configuring the WLAN
Turning Off/On the WLAN Radio
Using the Wireless Modem
Connecting Using the Wireless Modem
GSM data transmission circuit-switched data
Configuring a GPRS Connection
Using the GPS
Connecting Using GPRS
Configuring a GSM Modem Connection
Heres how GPS works in five logical steps
CHAPTER
Managing Power
Managing Power
AC and Car Adapter
Charging the Battery Pack
Battery Pack
Checking the Battery Level
Initializing the Battery Pack
By Gas Gauge
Replacing the Main Battery Pack
By Operating System
To replace the battery pack, follow these steps
Battery Low Signals and Actions
Power Management
Hibernation
Manual Power Management
Power-Saving Tips
Serial device IR device USB device PC card
Expanding Your Computer
This chapter gives guidelines on installing and using these devices
CHAPTER
Connecting a Serial Device
Connecting a USB Device
Expanding Your Computer
For the left side’s IR port
Connecting an IR Device
For the front panel’s IR port
When using the left side’s IR port
Inserting and Removing a PC Card
Using PC Cards
CardBus Support
To remove a PC card
Expanding Your Computer
System Memory Upgrade
CHAPTER
Setup Configuration Utility SCU
This chapter tells you how to use the SCU program
Starting SCU
When and How to Use the SCU Program
When to Use
Function
Moving Around and Making Selections
A brief description of keyboard if installed usage is listed next
Setup Configuration Utility SCU
Main Menu
Date and Time
USB Emulation
Internal Numlock
Geyserville Support
Advanced Menu
Setup Configuration Utility SCU
Shared Video Memory
COM Ports
LPT Port
Function Key 1/2/3 Define FN1/FN2/FN3
HDD Heater
Power Button Define
Security Menu
Set Password
5-12
Hard Disk Boot Sector
Setup Configuration Utility SCU
Boot Sequence
Boot Menu
Exit Menu
5-15
Get Default Values loads factory default values for all the items
Setup Configuration Utility SCU
5-16
Load Previous Values restores previous values for all the items
Setup Configuration Utility SCU
CHAPTER
Installing Software Drivers
How to Use the CD
Just click the Device Driver link on the main screen
Description
Installing Software Drivers
Name
Directory
2. Select “Graphics Options” then click on the “Graphics Properties”
Dos Mode Setting
Installing Software Drivers
1. Select right side corner icon then will appear next figure
Installing Software Drivers
1. Insert the driver CD into the drive
Touchscreen Driver
To install the touch screen driver perform the following
Installing Software Drivers
Touch screen Calibration
Installing Software Drivers
Intel SpeedStep Utility
Make the necessary settings according to your system requirements
Wireless LAN Utility Installation
CHAPTER
Caring for the Tablet PC
Protecting the Computer
Using the Password
Using an Anti-Virus Strategy
General Guidelines
Taking Care of the Tablet PC
Location Guidelines
Battery Pack Guidelines
Cleaning Guidelines
If you will not be using the computer for a long period of time more than two weeks, remove the Main battery pack from the computer and switch OFF Backup battery
When Traveling
CHAPTER
Troubleshooting
Preliminary Checklist
Troubleshooting
Solving Common Problems
For easy reference, the problems are divided into these categories
Problem Type
The operating time of a fully charged battery becomes shorter
Battery Problems
The battery does not charge Battery Charge indicator does not appear
You cannot eject a disc
Optical Drive Problems
Display Problems
The optical drive cannot read a disc
Bad dots appear on the display at all times
The characters on the screen are dim
The external monitor displays nothing
Floppy Disk Drive Problems
Resolution cannot be adjusted to desired setting
The Floppy Disk Drive In-use Indicator stays on
The computer does not recognize a newly installed device
Hardware Device Problems
Hard Disk Drive Problems
Infrared Problems
The PS/2 mouse does not work
Keyboard and Mouse Problems
The numeric keypad is disabled
The external keyboard does not respond
I cannot use the WLAN feature
LAN Problems
WLAN Problems
I cannot access the network
I cannot connect to another WLAN device
The PC card does not work
Modem Problems
PC Card Problems
The modem does not work
The computer does not enter Standby or Suspend mode automatically
Power Management Problems
Printer Problems
The PC card stops communicating properly
An application program does not work correctly
Software Problems
Sound Problems
The printer prints garbled information
The external microphone or audio device does not work
Startup Problems
When you turn on the computer, it stops after POST
The sound system does not record
The date/time is incorrect
Other Problems
Reset Button Switch
Resetting the Computer
Parts
Specifications
APPENDIX
Specifications
Parts
Specifications
Specifications
802.11b, supports Intel PRO / Wireless 2100 LAN mini-PCI type 3B
APPENDIX
Regulatory Information
On the Use of the System
Class B Regulations
Please note
Caution Texts Concerning Lithium Batteries
Canada
Canadian Department of Communications
Radio Interference Regulations Class B Compliance Notice
About the AC Adapter
Attention for USA Users
About the Modem
Caution for USA Users
Radio Frequency Interference Requirements and SAR
Use in specific environments
USA and Canada Safety Requirements and Notices
On the Use of RF Device
Use on Aircraft Caution
Antenna use
Explosive Device Proximity Warning
Antenna Warning
EMC Requirements
English
European Union CE Marking and Compliance Notices
Canada Radio Frequency Interference Requirements
Statements of Compliance
Italian
Local Restrictions of 802.11b Radio Usage
Greek
Icelandic
Departments in Which the Wireless LAN Module Can Be Used Indoors Only
General
Belgium and the Netherlands
France
Outdoors
Turning Off the Wireless LAN Radio
Frequency Ranges MHz
Indoors