Page
FCC Notice
Page
Table of Contents
Setup the Print Server with Windows NT4.0/2000
109
Installing the Printer Driver for Windows
Reset a Printer and NIC 176 Print a Test 177
Troubleshooting
Introduction
Requirements
Hardware
Network Requirements
Others
Example of connection on a peer-to-peer type network
Example of connection on a client-server type network
Setup for Client Server Network for Windows
Setup Flow
Setup for the Peer-to-Peer Type Network
For Windows
For Macintosh
Network Setup
Supplement
Assigning the IP Address
Assigning the IP Address from the Control Panel
Use Dhcp Server
Standby Mode, press Key
Network setting is executing
Press
Press + on the Dial Keypad to select Complete
Display returns to the TCP/IP menu
Assign the IP Address Manually
Network setting is executing
Assigning the IP Address using MAP
Click on your printer unit
Click on Setup TCP/IP
Check off IP Address in Nvram
Check on Enable TCP/IP and enter IP Address
Complete the IP Address setting
Press On the Dial Keypad To select the Frame Type
Novell Settings
Frame type on the Dial Keypad
Press the numeric key of the desired
Press To select Auto
Press to select
Network setting is executing
Appletalk Setting
Standby Mode, press
Press + on the Dial Keypad to select Apple Talk
If you want to cancel the AppleTalk setting Press
Page
Using with PEER-TO-PEER Utility
Required Environment
PEER-TO-PEER Utilities
For TCP/IP Protocol
For IPX/SPX Protocol
Insertdrive. the CD-ROM into the CD-ROM
Installation
Click on Next Installation Notes are displayed Click on Yes
Click on IP P2P setup
Is shown. It is the default port
Files are installed
Click on Next
Field of Max Hops for, input a
Click on Find Printers
Click on Add
Next, installing the printer driver
Printer is added to the Available
Printers list
INSTALLINGTHEPEER-TO-PEERUTILITY FORIPX/SPX
Click on IPX P2P setup
Make sure the printer is displayed Under Available Printers
Click on Next Files are installed
Make sure the printer displayed under
Available Printers shows S flag
Installation is completed
Uninstalling the Peer-to-Peer Utility for TCP/IP
Uninstallingthe PEER-TO-PEER Utility
Click on OK Restart the computer
Uninstalling the Peer-to-Peer Utility for IPX/SPX
Click on OK Click on Yes
Setup the Print Server
Set-up Example
NetWare 3.x Setup
Setting up with Pconsole
Select File Server
Creating a print queue
Creating the print server
Print Server Setup
Page
Assigning a print queue
Enter the priority and press the Enter Key Queue is assigned
Available Queues appears Select a created queue
Print Server Setup
Setting Up Notify Options for the Printer
Preferred File Servers
Primary File Server
Available File Servers list is displayed
Press the Esc key to return to the menu
Page
Setup the Print Server
Nwsrv
Setup in NDS Mode
Starting NetWare Administrator
Setting up NetWare Administrator
Administrator
Start NetWare Administrator
Printer
Click on the container object to create
Create Print Queues appears
Volume indicated by a in the figure
Print Queue Name
Click on Browse of Print Queue
Creating the printer
Assigning the print queue
Click on OK Printer is created
Enter the name of the print server
Create Print Server window
Under Print Server Name
Details of the created print server
Allocating the printer
Print server is created
Confirmation before setting up
Setup in Bindery Mode
Confirm Bindery Context
Press Alt+F10 to complete the confirmation
ORG
Starting Pconsole
Creating the print server
Print Server Information menu
Choose the created print server
Choose Printer from the Print Server
Information menu and press the Enter
Select the created printer and press
Printer Xxxxx configuration
Is the name of the printer created
Enter printer number at Printer No
When Exit? appears, choose Yes and press the Enter key
When Save Changes? appears
Press the Esc key twice
Press the Esc key four times
Problems and press Enter key
When a message appears, press the Enter key
Start the Pconsole utility
Select Print Servers in the Available Option menu
Page
Setup the Print Server
Setup in NDS Mode
This is performed on the workstation
Creating a print queue
Enter the name of the print queue
Click on Browse Print Queue Volume
Under Print Queue Name
Indicated by a in the figure at
Creating the printer
Assigning the print queue
Click on OK Printer is created
Create Print Server window
Allocating the printer
Supplements
Page
With Windows NT4.0/2000
Confirming the TCP/IP Print Services
Preparation for Setting up
Creating a Shared Printer
Click on OK Click on Close
To the list of Available ports
IP address of the printer is added
Add Printer Wizard
Verify that the check box for
Select Windows 95 from the list Click on Next
Check on Shared
\ENGLISH\ESTUDIO\WIN9598\PCL6
Choose Yes or No as necessary, and click on Finish
Printer is created
Log on to Windows 2000 as a user
With Administrator or Power User
Select Local printer
When Using the TCP/IP Printing
Select Create a new port and select
Standard TCP/IP Port at Type
Select Custom and click on Settings
Enter 10001 at Port Number Check on Snmp Status Enabled
Enter PORT1 for the Queue Name Check on Snmp Status Enabled
Select Raw or LPR under Protocol
Drivers for Windows 2000/XP at Copy
Click on OK Click on Next Click on Finish Click on Have Disk
100
101
When Using the IPP
102
Click on OK Click on Have Disk
Installed
103
Select the printer driver to be
104
Select the printer driver and select
105
Sharing... from the File menu
Click on Additional Drivers
Insert the printer driver CD-ROM Click on OK
106
107
Click on OK Printer drivers are installed
108
109
Installing the Printer Driver
Installing the Printer Driver
Features of Each Printer Driver
110
111
Installation from the CD-ROM
112
Insert the Printer kit CD-ROM into the CD-ROM drive
113
Click on the appropriate Setup for
Windows Version
Select the Group Number, and click
SelectPaper. the Emulation and Default
114
Select the Peer-to-Peer Port, and click On Next
115
Click on Browse
Select the network printer and click on OK
Enter the printer name, and click on Next
116
Click on Finish Complete the installation
117
Select the Program Folder to be Created, and click on Next
Installation by Adding Printer
Windows 95/98/Me
118
119
Select the network printer and click
On OK
Click on OK Select the printer to be used, and click on Next
120
121
If necessary, change the Printer name, then click on Next
Select to print a test page or not, then
Windows NT4.0
Click on Start, select Settings, Then click on Printers
122
Select how the printer is to be Controlled
Select the printer connected to
123
Server, and click on OK
Select the port added in the Peer-to
124
Insert the CD-ROM included with
Printer kit into the CD-ROM drive
125
Windows 2000/XP
126
Double-click on Add Printer to start Printer Wizard
127
Next to browse for a printer then
Server, and click on Next
128
129
130
Copying the PageMaker PPD file
131
Setting the Options Configuration
Selectitems. the installed options for each
Click on OK to save the settings
132
Run the Uninstall.exe
Uninstalling the Printer Driver
133
After programs have been removed
134
Install Agfa Font Manager
135
Checkinstall. the components you want to
Click on OK Click Finish
136
137
Uninstall Agfa Font Manager
138
Description of Screen
Getting Started with Agfa Font Manager
140
141
For Macintosh
142
System RequirementSystem Requirements
143
Copying the PPD File
144
Select the Driver
Click on the Apple menu, and select Chooser
Make sure that Active is selected for AppleTalk
145
Option Setup
Exit the Chooser
146
147
Printer Specific Options
Printer Specific Options ➀ Offset Stack
➁ Toner Saving
➃ Duplex
148
➄ Media Type
➅ Edge Smoothing
149
Printer Specific Options ➇ Resolution
150
151
Netpanel Function
152
Installing Netpanel
Installing
153
Click on a language of your Operating
154
Click on Setup utilities Click on Netpanel setup
Enter the IIS virtual directory
155
Decide whether to read the Readme file at this time
156
157
Uninstalling
158
Starting Netpanel
Required Environments
159
160
Browsing with NetPanel
161
Log
162
Description of Screen
➀ Logo ➁ Topic bar
➂ Task bar
163
Using Help
Click on the Help button on Control bar
Open the Window and display Help
For the Normal User
Operating Flow
164
Log Printer Discovery
165
For the Administrator
Printer Management
166
167
NetPanel Setting
Server Management
Group Management
Printer Discovery
Printer Discovery Main
168
Searching Result Display
169
➀ System Properties
➁ Connection Properties
170
➂ Status Diagnose
➃ Search Result List
Printer Management
Printer Management Search
171
➀ Reset Printer
Printer Management Main
172
➁ Printer Configure
➂ NIC Configure
173
➃ Novell Configure
➄ Device Password
174
175
Reset Printer and Test Print
Click on Reset Printer Now Operating result is displayed
Reset a Printer and NIC
176
Select the printer that you want to
Clickbar. on Reset Printer on the Task Select desired test
Print a Test
177
Printer Configure
General Properties
178
Input Tray Properties
➀ Select Default Input Tray
179
➁ Top Priority Cassette
180
Output Bin Properties
Paper Properties
➁ Default Paper Size
181
➀ Copies
Printer Setting Properties
182
➀ Lines Per
183
➉ Print Postscript Error
➈ Emulation Setting
Device Password
184
185
PCL Font Properties
186
Group Management
NIC Configure
Protocols Configuration
187
188
IP Configuration
189
Apple Talk Configuration
➀ Printer Name
➁ Zone Name
190
System Configuration
➀ Frame Type
➁ LPD Banner
191
➂ Print on Startup
➃ Type of Startup
Novell Configure
Novell Configuration
192
Device Password
Device Password
193
Server Management Main
Server Management
194
➀ Printers shared in Windows NT Server
195
Server Management Main Page of Windows NT Server
196
Install a Printer to a File Server
Printer is installed to the File
197
Server
Remove a Printer from a File Server
198
Select or specify the printer Click on Continue
Printer is removed from the File
199
200
Deleting Print Jobs
201
Selected print jobs are canceled
Group Management
Group Management Main
202
203
Create a Group
204
Delete a Group
205
View Group and Printer
Clickbar. on View Group on the Task
Select a group and click on OK
206
Display the printer properties page or
Printer status
207
Add a Printer to a Group
Remove a Printer from a Group
208
Remove from the list
209
Netpanel Setting
NetPanel Setting Main
210
Administrator Setting
Change the Administrator Password
211
212
WNP Setting
213
Discovery Setting
214
215
MAP
Password for MAP
MAP
216
Install MAP
217
Click on a language of your Operating System
218
Click on MAP setup
219
Start MAP
Click on MAP Setup in the Map folder
220
Select Programs from Start menu
221
Network Administrator page is Displayed
222
Network Administrator page is
Run the WWW Browser
Enter http//xxx.xxx.xxx.xxx/ at
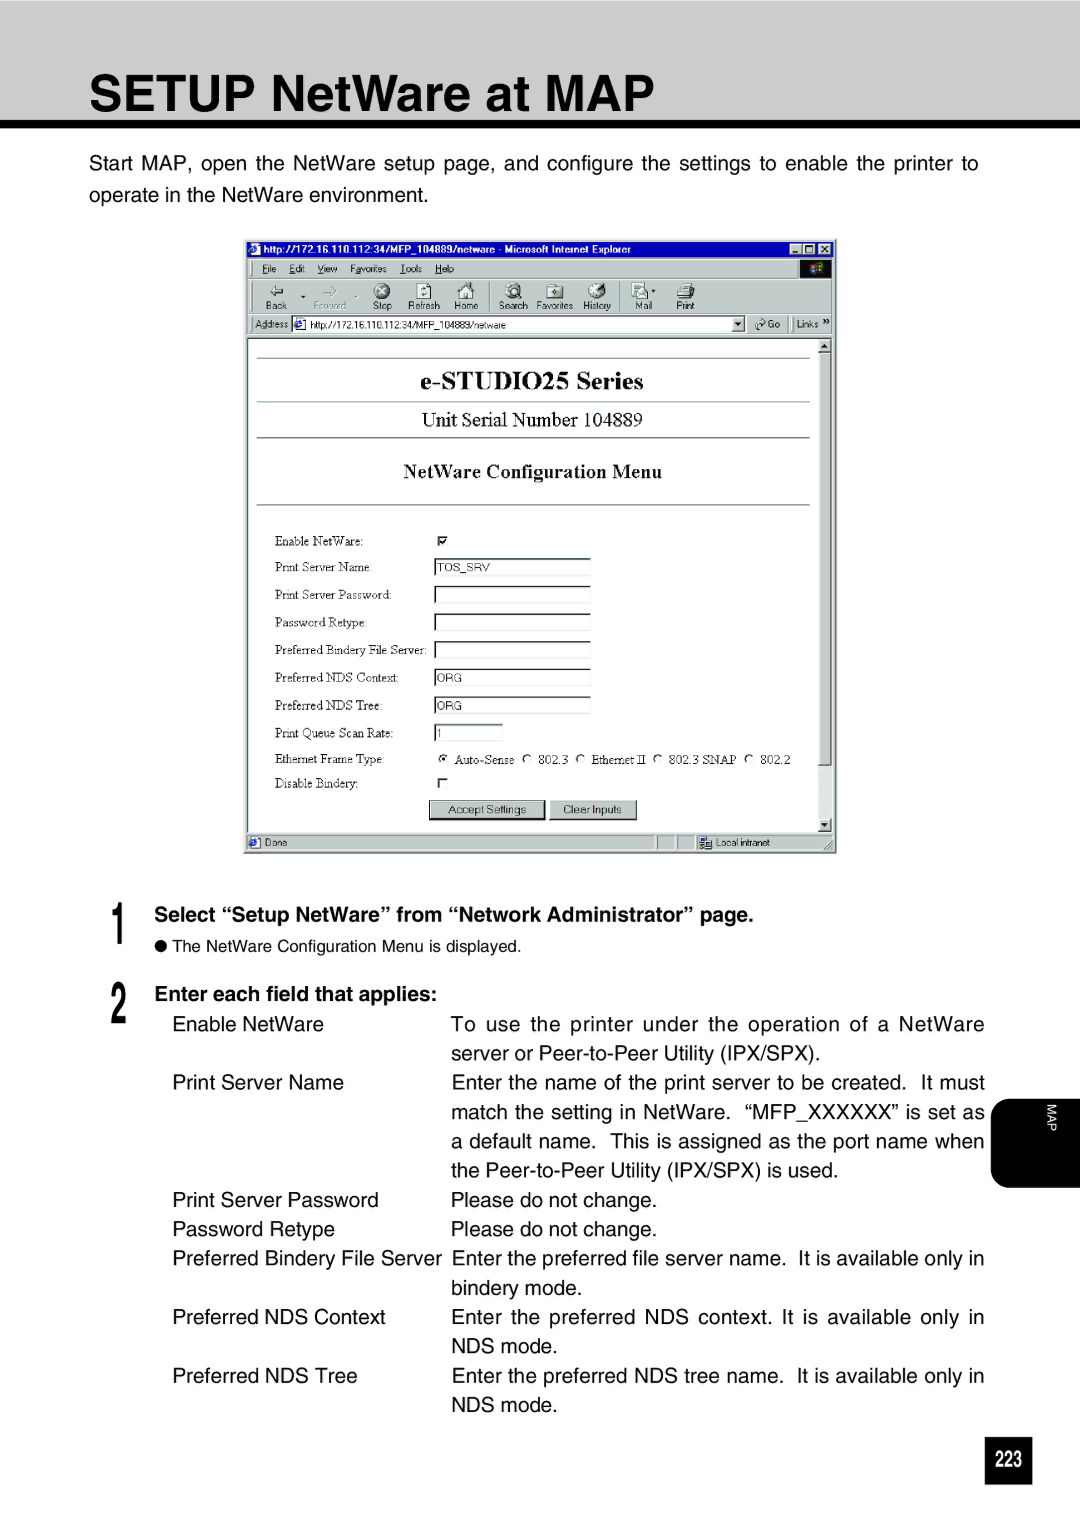
Select Setup NetWare from Network Administrator
223
Enter each field that applies
Enter the password
Click on Accept Setting
224
Select Setup AppleTalk from Network Administrator
225
Displayed Network Interface Card is automatically restarted
Click on Factory Defaults
Restore Factory Defaults
Enter the password and click on Restore Factory Defaults
Factory defaults are restored Restart the printer
227
Troubleshooting
228
Netpanel Error
229
Error messages
230
231
When Printing Cannot be Performed
232
233
Specifications and Other Information
234
Specifications of the Units
Test Print Sample
Demo
235
236
Configuration
237
NIC Status
238
PCL Font List
239
240
241
PS Font List
242
243
Status Log
244
Group Management List
245
List of Internal PCL Fonts
246
247
List of Internal PS Fonts
248
E1-17089B
Kanda NISHIKI-CHO, CHIYODA-KU, TOKYO, 101-8442, Japan