Page
Pantone, Inc.’s check-standardtrademark for color
1999, 2000 Xerox Corporation. All rights reserved
Pantone, Inc.,
Printed in the United States of America
1 2 3 4 5 6 7
Safety Notes
Electrical safety
Disconnect Device
5 6 7
3 4 5 6 7
Laser safety
Maintenance safety
Operational safety
VIII
Ozone safety
Radio Frequency Emissions
Notices
3 4 5
In Canada
Safety Extra Low Voltage Approval
2 3 4 5
Certifications . . . in Europe
The following applies to the product when equipped with Token Ring or Banyan Vines connectivity options
It’s Illegal . . . in the USA
7.Immigration Papers 8.Draft Registration Cards
It’s Illegal . . . in Canada
4 5 6 7
Environmental Notices . . . in the USA
XVIII
Environmental Notices . . . in Canada
CONTENTS
Contents
1 2 3 4
1 2 3 4 5 6 7
4 Maintenance
XXII
11 2 4 5 6 7
1.About this manual
1 2 4 5
Conventions used in this manual
2. Meters, consumables, and Auditron
Overview
1 22
Meters
Entering the Administration mode
1 22 4 5 6 7
Figure 1: Administration button
Figure 3: Meters button Figure 4: Meters screen
Figure 5: Access screen
Figure 7: Consumables Status button
Consumables status
Figure 6: Access screen
Figure 8: Consumables Status screen
Figure 9: Access screen
Overview
Auditron Administration mode
Auditron administrator duties
Administrator access level
Auditron access levels
User access level
Figure 10: Auditron Administration button
Auditron forms
Auditron account structure
Figure 11: Auditron Administration button
Entering the Auditron Administration mode
Touch the Auditron Administration button
Administration password
Administration password.”
Figure 13: Auditron Administration screen
KEY POINT
Exiting the Auditron Administration mode
Figure 15: Review Accounts button
Review Accounts
Figure 16: Review Accounts
• Touch the Input Number With Keypad
Create/Modify User Accounts
1 22 4
The Create/Modify User Accounts mode allows
the Create/Modify User Accounts button
Figure 19: Entering the account number
Touch the Change Settings: Account ####
Figure 20: The Change Settings screen
2–16
22 4 5 6 7
Figure 21: Entering the account password
Figure 22: Selecting the Restrictions
Change Settings: Account #### button and
Figure 23: Create/Modify User Accounts
screen
Figure 25: Total Copies
Reset Counter
Figure 24: Reset Counter button
Figure 26: Close button
Figure 27: Auditron Administration screen
Exiting the Create/Modify User Accounts mode
Figure 29 Reset Accounts screen
Reset Accounts
Figure 28: Reset Accounts button
Figure 31: Delete Auditron data message
Figure 30: Delete All Accounts button
NOTE: To exit the Reset Copy Counters function
Figure 32: Reset Copy Counters button
Figure 33: Reset Copy Counters message
Figure 34: Disable All Copy Limits button
Touch the Disable All Copy Limits button if you
Figure 35: Disable All Copy Limits message
NOTE: To exit the Disable All Copy Limits
Touch the Remove Color Restrictions button if
Figure 38: Reset Accounts screen
Figure 36: Remove Color Restrictions button
Figure 37: Remove Color Restrictions message
Figure 40: Auditron Access screen
Auditron Access
Figure 39: Auditron Access button
Figure 42: Disabled button
Figure 41 Enabled button
Figure 43: User Account Timeout button
User Account Timeout
Touch the User Account Timeout button
Figure 45: Auditron Access screen
Figure 44: User Accounts Timeout screen
timeout from 1 second to 10 minutes
Auditron Administrator Password button
Changing the Auditron Administrator Password
Figure 46: Auditron Administrator Password
Figure 47: Auditron Administrator Password screen
Figure 50: Auditron Administration screen
Figure 48: Confirm password window
Figure 49: Close button
11111
Figure 1: Tools screen
3.Tools Mode
•Audio Tones •Customize Screens
Entering Tools Mode
Entering and Exiting Tools Mode
Figure 2: Administration symbol
Figure 3: Access screen
Figure 5: Tools screen
Exiting Tools Mode
Paper Type
Tray Management
Figure 6: Tray Management screen
Figure 7: Paper Type screen
Usage Guide
Review the current settings for each tray. Use the
Figure 9: Tray Management screen
Auto Tray Setup
Figure 10: Auto Tray Setup screen
Touch Switching Enabled, Switch-AutoPaper
Touch Enable Auto Paper or Disable Auto
Only, or Switching Disabled
• Switch-AutoPaper Only enables switching
Figure 13: Feature Defaults screen page 1 of
Feature Defaults
The Feature Defaults options include
Figure 14: Feature Defaults screen
Basic procedure for setting Feature Defaults
2 3 4 5 6 7
Cover Tray
Paper Supply
Figure 15: Paper Tray Default screen
Figure 16: Cover Tray screen
Figure 17: Reduce/Enlarge screen
Reduce/Enlarge
Reduce / Enlarge Option Buttons
100%
Figure 18: Original Type screen
Original Type
Figure 19: Photo Type–Photo& Text screen
Photo Type – Photo & Text
Figure 20: Photo Type–Photoscreen
Photo Type – Photo
Figure 21: Text Type screen
Text Type
Output Color
Lighten / Darken
Figure 22: Lighten/Darken screen
Figure 23: Output Color screen
Saturation
Color Shift
1 2 3
Figure 27 Sharpness screen
Sharpness
• No Shift
Margin Shifts for Side 1 and Side
Figure 28: Margin Shift screen
•Auto Center
Variable Shift
Corner Shift
Figure 29: Sample Corner Shift Default screen
Figure 30: Sample Variable Shift Default screen
Input Erase Value selected
Edge Erase
Figure 31 Edge Erase screen with
2 Sided Copy
Original Orientation
Side 2 Rotate
Figure 33: 2 Sided Copying Default screen
2 Pages Up
Multiple-Up
4 & 8 Pages Up
Figure 35: Multiple-UpDefault screen
Figure 38: Machine Setup screen
Machine Set-up
Figure 40: Power Saver Default screen
Figure 39: Copy Quantity Limit screen
Figure 42: IP Address screen
Figure 41: Localization screen
Figure 43: Frame Type screen
Figure 44: Source Routing screen
Figure 45: Audio Tones screen
Audio Tones
Figure 46: Control Panel Input Tone screen
Figure 47: Sample audio tone setting screen
touch No Tone or Tone
Touch the Basic Copying Presets button to
Customize Screens
Figure 49: Basic Copying Presets screen
Figure 48: Customize Screens screen
Figure 50: Preset Tray screen
5 6 7 8
Figure 51: Preset Reduce/Enlarge Selection screen
Reduce / Enlarge Preset Values
3–32
System Image Quality
• Screening Adjustment enables the settings
Adjusting Image Recognition settings
Figure 52: System Image Quality screen
Figure 53: Image Recognition screen
Figure 55: Color Recognition settings
Figure 54: Text & Photo settings
Figure 56: Text & Photo settings
Figure 57: Screening Adjustment screen
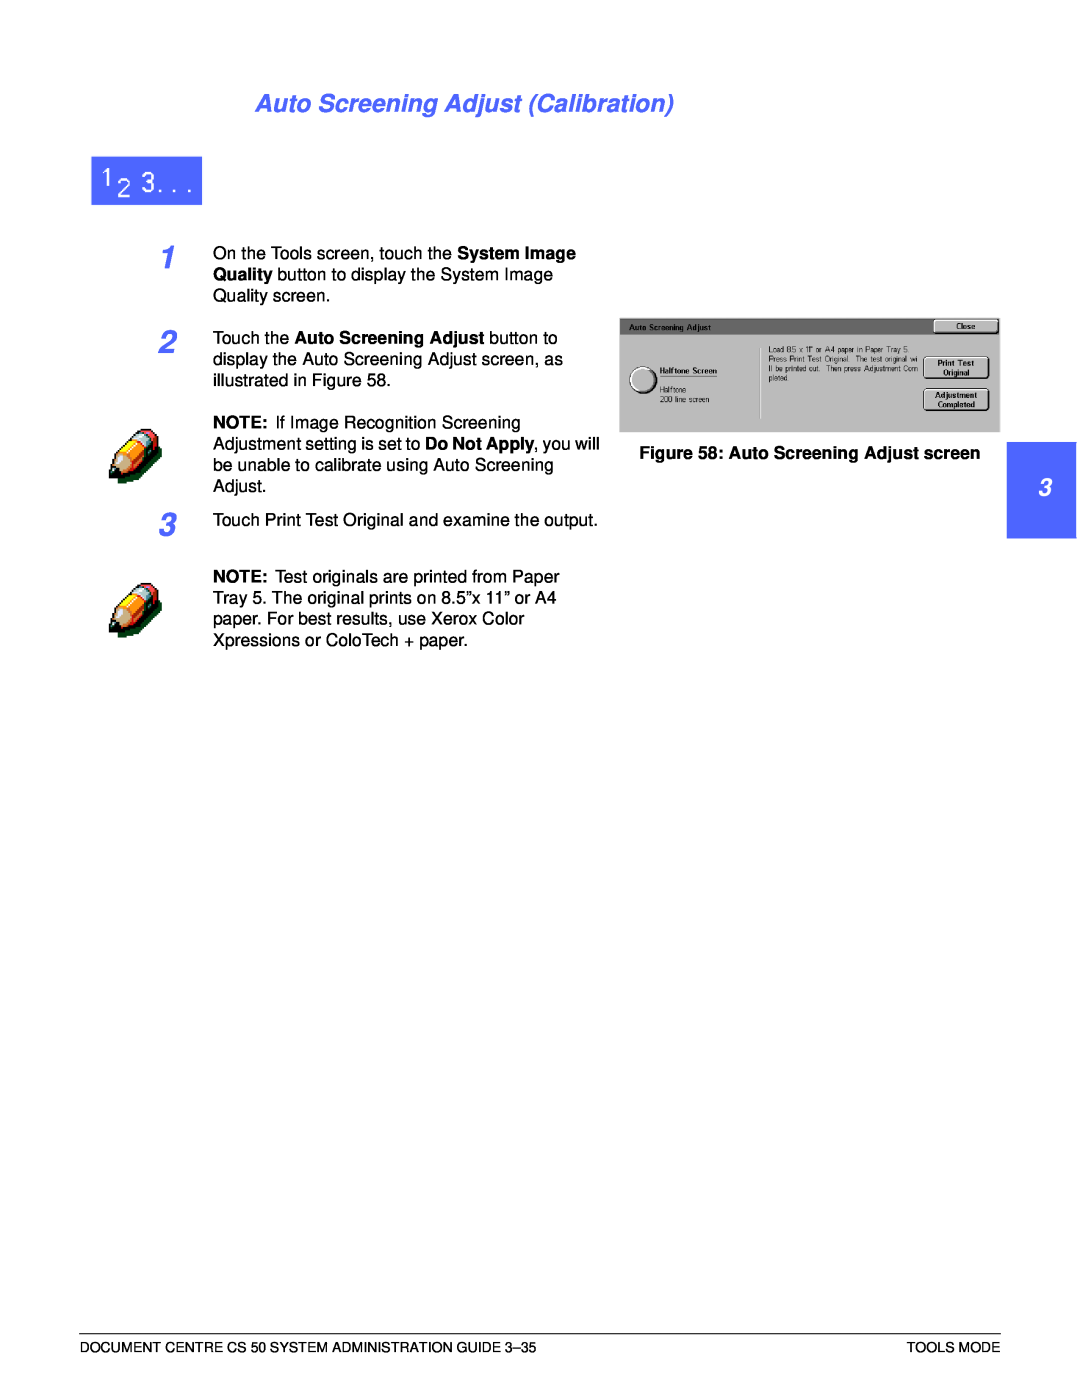
Figure 58: Auto Screening Adjust screen
Auto Screening Adjust Calibration
Touch the Auto Screening Adjust button to
• Halftone - 200 line screen a rotated line
Figure 59: Halftone screen
Table 3: Halftone - 200 line screen
• Photograph - 200 dpi a clustered dot
Start Adjustment
Machine Timeout
Machine Timeouts
Setting
Low Power
On the Tools screen, touch the Machine
Timeouts button to display the Timeouts screen
Figure 60: Timeouts screen
3–40
Figure 61: Sample timeout setting screen
Figure 62: Feature Defaults - Reduce
Reduce/Enlarge Defaults
Figure 63: Reduce/Enlarge Presets screen
Enlarge buttons
3.5” to 11”
Figure 64 Sample Preset screen
11 to A4”
2 3 4
Reduce / Enlarge Fine Adjust
Touch the Reduce / Enlarge Fine Adjust button
and the Reduce / Enlarge Fine Adjust screen
Figure 66: Change Tools Access Number screen
Change Tools Access Number
Next Page or Previous Page button or use the
Original Size Presets
Figure 67: Original Size Presets screen page
Figure 68: Original Size Presets screen with
3 4 5 6
Figure 69: Original Size Presets screen with
Figure 70 Original Size Presets screen with
MAINTENANCE
4.Maintenance
Figure 1 Cleaning the Touch Screen
Cleaning the Touch Screen
1 2 44 5 6 7
Cleaning the Document Glass
Figure 3: Cleaning the Document Glass
Figure 2: Dampening a lint-freecloth
Figure 4: Cleaning the Document Glass Cover
Replacing the Dry Ink Cartridge
Supply replacement
Figure 6: Locating the Dry Ink Cartridge
Figure 7: Rotating the Dry Ink Cartridge
1 2 44
Figure 8: Pulling the Cartridge out of the
copier/printer
Figure 11: Rotating and securing the Cartridge
Dry Ink Waste Container
Replacing the Dry Ink Waste Container
Figure 13: Locating the old
Figure 14 Removing the old
4 5 6
Figure 15: Disposing of the old
Figure 16: Removing the new Dry Ink Waste
Figure 17: Inserting the new
44 5 6 7
Developer Waste Container
Replacing the Developer Waste Container
Figure 18: Locating the old
Figure 21: Placing the cap on the waste container
Figure 20: Removing the cap
Figure 22: Disposing of the used
1 2 4 5
Figure 23: Removing the new
container from the bag
Figure 25 Check the Fuser Oil message
Replacing the Fuser Oil Cartridge
Fuser Oil Cartridge D
Figure 26: Pulling out the Paper Path Module
D Figure 27: Removing the old
from the box and bag
Figure 28: Disposing of the old cartridge
Figure 29: Removing the new cartridge
Figure 30: Removing the Fuser Oil Cartridge Cap
Figure 31: Installing the Fuser Oil Cartridge
Rotate the Paper Path Module Handle
Figure 33: Pulling out the Paper Path Module
Replacing the Cleaning Web
Figure 32: Check the Cleaning Web message
Figure 34: Allow the fuser to cool
Figure 35: Unlatching the Cleaning Web
Figure 36: Removing the Cleaning Web
Figure 38: Replacing the new Cleaning Web
Figure 37: Aligning the new Cleaning Web
message
Replacing the Copy/Print Cartridge
Figure 39: Replace the Copy/Print Cartridge
Figure 41: Unlocking the Copy/Print Cartridge
Figure 40: The gold latch release B
and grasping the Strap
Figure 42: Removing the Copy/Print Cartridge
Figure 43: Removing the Protective
Instruction Sheet from the Cartridge
Figure 45: Locking the Copy/Print Cartridge
Figure 44: Inserting the new Copy/Print Cartridge
Calling for Service
Record the displayed Fault Codes
Customer Replaceable Units
Ordering Replacement Units and supplies
4–30
Consumable supplies
Supply Items
Supplies to keep on hand
Xerox
Canada
Materials Usage Guide
Replacement Manuals USA market only
Recommended papers and transparencies
APPENDIX A
Appendix A
Auditron forms
User password
Auditron User Chart
Copier Model #:__________________________________
Serial Number:____________________________
Copy Volume
Auditron Periodic Billing Form
Copy Volume
Copy Volume
DOCUMENT CENTRE CS 50 SYSTEM ADMINISTRATION GUIDE
Auditron Periodic Billing Form
Page
701P34152
Prepared by: Xerox Corporation
Webster, New York 14580 March