Using the Control Panel
Table 3.6 Control Panel Menu Options (continued)
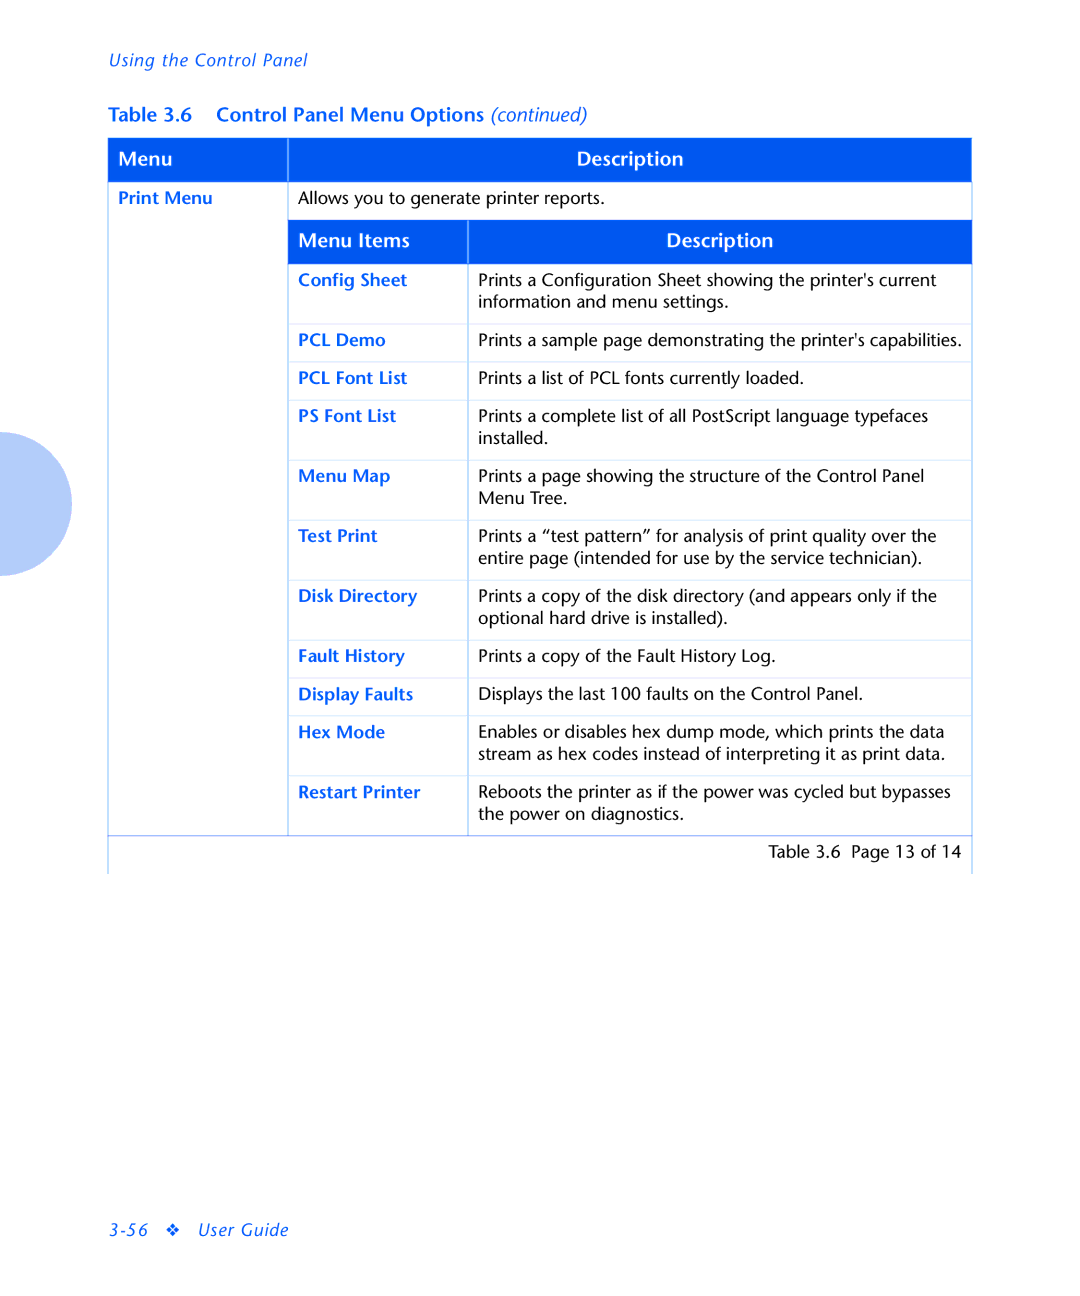
Menu |
|
|
| Description |
|
|
|
|
| ||
Print Menu |
| Allows you to generate printer reports. |
| ||
|
|
|
|
|
|
|
| Menu Items |
| Description |
|
|
|
|
|
|
|
|
| Config Sheet |
| Prints a Configuration Sheet showing the printer's current |
|
|
|
|
| information and menu settings. |
|
|
|
|
|
|
|
|
| PCL Demo |
| Prints a sample page demonstrating the printer's capabilities. |
|
|
|
|
|
|
|
|
| PCL Font List |
| Prints a list of PCL fonts currently loaded. |
|
|
|
|
|
|
|
|
| PS Font List |
| Prints a complete list of all PostScript language typefaces |
|
|
|
|
| installed. |
|
|
|
|
|
|
|
|
| Menu Map |
| Prints a page showing the structure of the Control Panel |
|
|
|
|
| Menu Tree. |
|
|
|
|
|
|
|
|
| Test Print |
| Prints a “test pattern” for analysis of print quality over the |
|
|
|
|
| entire page (intended for use by the service technician). |
|
|
|
|
|
|
|
|
| Disk Directory |
| Prints a copy of the disk directory (and appears only if the |
|
|
|
|
| optional hard drive is installed). |
|
|
|
|
|
|
|
|
| Fault History |
| Prints a copy of the Fault History Log. |
|
|
|
|
|
|
|
|
| Display Faults |
| Displays the last 100 faults on the Control Panel. |
|
|
|
|
|
|
|
|
| Hex Mode |
| Enables or disables hex dump mode, which prints the data |
|
|
|
|
| stream as hex codes instead of interpreting it as print data. |
|
|
|
|
|
|
|
|
| Restart Printer |
| Reboots the printer as if the power was cycled but bypasses |
|
|
|
|
| the power on diagnostics. |
|
|
|
|
|
|
|
|
|
|
| Table 3.6 Page 13 of 14 |
|
|
|
|
|
|
|